If you love the art of crochet and want to create something both charming and unique, the Amigurumi Crochet Sea Turtles – Pattern is an excellent project to explore. This delightful pattern combines the intricate craft of amigurumi with the beauty of sea turtles, resulting in cute, handmade creatures that make wonderful gifts or collectibles. Whether you are a beginner or an experienced crocheter, this pattern is accessible and enjoyable to make.
The Amigurumi Crochet Sea Turtles – Pattern captures the essence of these gentle ocean dwellers with detailed shells, flippers, and expressive faces. The miniature size and soft texture make these turtles perfect companions for children and adults alike. Beyond their aesthetic appeal, crocheting these turtles provides a rewarding way to practice amigurumi techniques, including working in rounds, increasing, and shaping.
Moreover, sea turtles hold symbolic meanings of longevity, patience, and resilience, making these amigurumi creations more meaningful. Crafting them using this pattern allows crafters to connect with nature while developing their crochet skills. In this article, we’ll guide you through every important aspect of the Amigurumi Crochet Sea Turtles – Pattern, from materials to detailed instructions, customization tips, and answers to frequently asked questions.
1. Understanding the Amigurumi Crochet Sea Turtles – Pattern
The Amigurumi Crochet Sea Turtles – Pattern involves creating a small, stuffed turtle using crochet techniques that shape the body, limbs, and shell in three dimensions. Unlike flat crochet pieces, amigurumi works in continuous rounds, which gives the final product its signature rounded and plush look.
Typically, this pattern breaks down the turtle into several parts: the head, shell, four flippers, and tail. Each part is crocheted separately and then sewn together carefully, allowing for better control over shape and proportions.
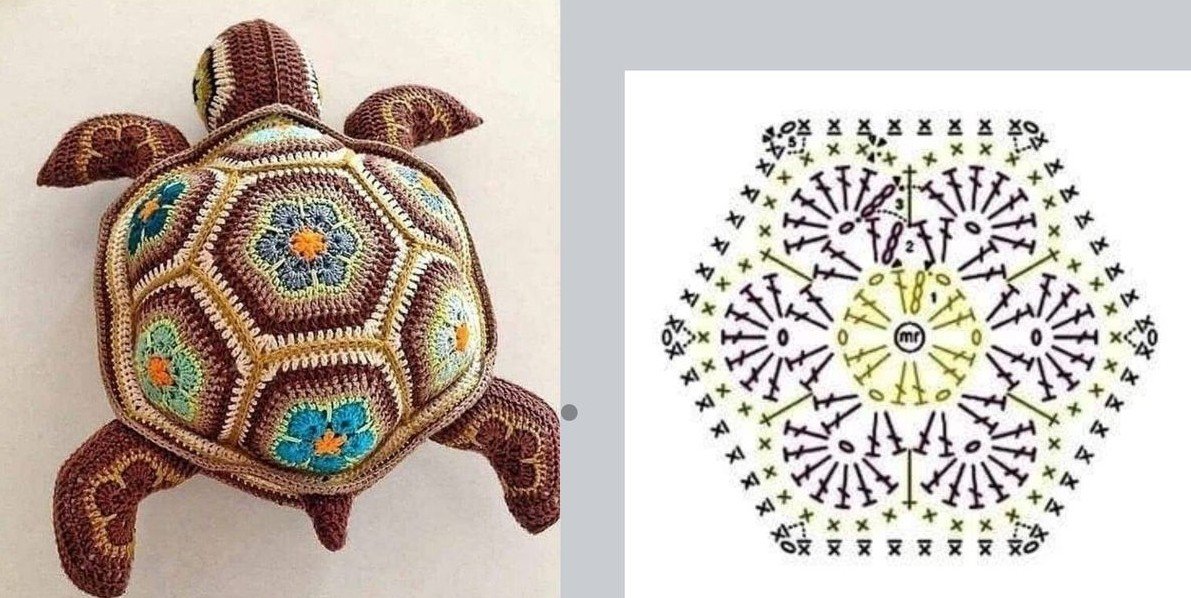
The shell usually features textured stitches or color changes to mimic the natural patterns of sea turtle shells. This detail adds realism and enhances the visual appeal of your amigurumi turtle.
One of the strengths of this pattern is its flexibility. You can choose different yarn weights and colors to create turtles of varying sizes and personalities, from bright and playful to realistic and earthy.
Understanding the stitch techniques used in the pattern, such as single crochet, increases, decreases, and slip stitches, is crucial. These stitches shape your amigurumi turtle and allow you to add features like eyes and mouth for personality.
The Amigurumi Crochet Sea Turtles – Pattern also encourages creativity through optional embellishments like embroidery, safety eyes, or fabric accessories to make each turtle unique.
2. Materials and Tools Needed for Amigurumi Crochet Sea Turtles
Before diving into the Amigurumi Crochet Sea Turtles – Pattern, it’s essential to gather all necessary materials to ensure a smooth crafting experience. Starting with the right yarn is critical; most crafters prefer lightweight or sport-weight cotton or acrylic yarn, which provides a sturdy structure and vibrant colors.
Choosing an appropriately sized crochet hook is also important. Usually, a hook slightly smaller than recommended for your yarn weight is used to create a tight stitch fabric that prevents stuffing from showing through.
You will need polyester fiberfill stuffing to give your turtle its plush, three-dimensional shape. Stuff firmly but not overly tight to maintain softness and flexibility.
Safety eyes or embroidery thread can be used to add eyes, depending on your preference and the intended recipient. Safety eyes are easier to attach securely, while embroidery allows more customization.
Additional tools include stitch markers, scissors, a yarn needle for sewing parts together and weaving in ends, and optionally, a tapestry needle for detailed embroidery.
Keeping your workspace organized with all these materials handy helps maintain focus and prevents frustration during the crocheting process.
3. Step-by-Step Instructions to Crochet Your Amigurumi Sea Turtle
Starting the Amigurumi Crochet Sea Turtles – Pattern involves creating the turtle’s head first. Using the magic ring technique allows you to begin with a tight, adjustable loop, perfect for shaping small amigurumi parts.
Crochet in continuous rounds, increasing stitches to shape the spherical head, then decreasing as you near the neck. Count stitches carefully to keep your shape uniform.
Next, move to the shell. This larger piece often involves color changes or textured stitches like bobbles or popcorns to simulate the turtle’s natural shell pattern. Crochet the shell flat or in rounds depending on your pattern version.
Create the flippers separately, working from the base outward with fewer stitches. Their shape is tapered and slightly curved, so follow increases and decreases precisely.
After crocheting all parts, assemble by sewing the flippers and tail onto the shell, then attach the head. Use a yarn needle and matching yarn to sew securely but gently, preserving the shape.
Finally, stuff each part with fiberfill before completely closing seams, making sure the turtle holds its plush, cuddly form.
4. Tips for Customizing Your Amigurumi Crochet Sea Turtle
One of the best aspects of the Amigurumi Crochet Sea Turtles – Pattern is the opportunity to personalize your creation. Start by selecting yarn colors that reflect different species of sea turtles, such as green, loggerhead, or hawksbill turtles.
You can use variegated yarn for a unique shell pattern without additional color changes, adding visual complexity with minimal effort.
Consider experimenting with stitch textures on the shell to mimic scales or ridges, enhancing the tactile appeal of your turtle.
For eyes, mix it up by using safety eyes for a glossy, realistic look or embroider eyes for a softer, handcrafted feel.
Add small accessories like a tiny crochet flower, scarf, or shell embellishments to give personality and make your turtle stand out.
Adjust the size by changing yarn weight and hook size. Smaller turtles make great keychains or decorations, while larger versions work well as cuddly toys or room décor.
Frequently Asked Questions (FAQ) about the Amigurumi Crochet Sea Turtles – Pattern
Q1: Is the Amigurumi Crochet Sea Turtles pattern beginner-friendly?
Yes, while it requires some familiarity with crochet in rounds and basic shaping techniques, the pattern is straightforward and suitable for dedicated beginners.
Q2: What yarn type is best for making amigurumi turtles?
Cotton or acrylic yarns in lightweight or sport weight are ideal as they provide structure and durability.
Q3: How do I keep the stuffing from showing through the stitches?
Use a smaller hook size than recommended for your yarn to create tight stitches, and stuff the pieces firmly but not too tightly.
Q4: Can I wash the finished amigurumi turtle?
Hand washing in cold water is recommended to preserve shape and color, especially if you use safety eyes or embroidery details.
Q5: How do I attach the parts securely?
Use a yarn needle and matching yarn to sew parts firmly with small stitches, ensuring durability without visible seams.
Q6: Can I make different species of turtles with this pattern?
Absolutely! By varying colors and stitch textures, you can create turtles that resemble various sea turtle species.
Conclusion
In this detailed guide, we have explored the enchanting world of the Amigurumi Crochet Sea Turtles – Pattern, covering everything from understanding the basic structure to gathering materials, following step-by-step instructions, and customizing your turtles. This pattern not only provides a fun, creative outlet but also results in adorable, meaningful crochet creations that celebrate the beauty of sea turtles.
We encourage you to try the pattern, experiment with colors and textures, and share your experiences. Your honest feedback and suggestions are always welcome to help us improve future content and inspire the crafting community. Happy crocheting and enjoy bringing your charming amigurumi sea turtles to life!