If you’ve been searching for the perfect blend of classic and trendy, look no further than the idea to crochet a granny square triangle bandana. This timeless accessory combines nostalgic granny square charm with the modern flair of triangle scarves and bandanas. It’s not just an accessory—it’s a statement of creativity, sustainability, and style.
Learning to crochet a granny square triangle bandana is a satisfying project for beginners and experienced crocheters alike. Not only does it allow you to practice basic stitches like the double crochet and chain stitch, but it also provides endless possibilities for color combinations and personalization. Whether you wear it as a head wrap, neckerchief, or even a boho-style hairband, this versatile piece is functional and fashionable.
In this detailed guide, you’ll learn how to design, crochet, and finish your own triangle bandana using granny squares. We’ll cover essential tools, yarn tips, joining methods, styling options, and more. So grab your hook, pick your favorite yarn, and get ready to crochet a granny square triangle bandana that you’ll be proud to show off.
1. What is a Granny Square Triangle Bandana?
A granny square triangle bandana is a handmade crochet accessory created by stitching traditional granny squares together in a triangular shape. The result is a lightweight and airy scarf or bandana that can be worn around the neck, on the head, or as an accent on bags and outfits.
The foundation of the design lies in the granny square—a motif that has been beloved by crocheters for decades. It’s typically made by working in rounds from the center out, using double crochet stitches and chain spaces to form a square shape with a distinctive holey pattern.
To form a bandana, individual granny squares are either shaped into triangles as they’re crocheted or made as full squares and then joined to form a triangle layout. This flexibility allows you to experiment with different sizes and arrangements depending on your style preferences.
One of the best things about choosing to crochet a granny square triangle bandana is how customizable it is. You can keep it minimal with one or two solid colors or go full rainbow for a vibrant boho look. You can also adjust the size of the bandana to suit adults, children, or even pets.
This project is perfect for stash busting. Those leftover yarn scraps you’ve been holding onto? Now’s their time to shine! You can mix and match them to create something truly unique and personal.
Whether you’re making it as a gift or for your own wardrobe, the granny square triangle bandana is a fashionable, fun, and functional crochet project that never goes out of style.
2. Tools, Yarn, and Materials You’ll Need
Before you start to crochet a granny square triangle bandana, it’s important to gather the right materials to ensure a smooth and enjoyable project from start to finish.
First, you’ll need a crochet hook suitable for your yarn weight. Most granny square projects use worsted weight yarn with a 5mm or H-8 hook, but you can go lighter or heavier depending on the texture and drape you’re looking for.
Next, choose your yarn. Cotton yarn is ideal for wearables like bandanas because it’s breathable and soft on the skin. However, acrylic or blended yarns also work well, especially for adding texture or a more colorful effect.
You’ll also need a pair of sharp scissors to cut your yarn cleanly, a yarn needle for weaving in ends, and optionally, stitch markers to help you keep track of your rounds or join placements.
Consider downloading or sketching a simple layout pattern if you plan to assemble several granny squares into a triangle. This helps visualize the construction before stitching everything together.
Having a tape measure on hand can also be useful to check the dimensions of your finished piece, especially if you’re customizing it for a specific size or use.
Lastly, bring your patience and creativity. Half the fun of this project is choosing color schemes, testing layouts, and enjoying the process of creating something beautiful and practical with your hands.
3. Step-by-Step: How to Crochet a Granny Square Triangle Bandana
Now let’s dive into how to actually crochet a granny square triangle bandana. Follow these steps to create your own stylish accessory.
Start by making individual granny squares. Use the classic method: begin with a magic ring, chain 3, and work clusters of 3 double crochets separated by chains to create your first round. Continue increasing in each corner with chain spaces to grow the square.
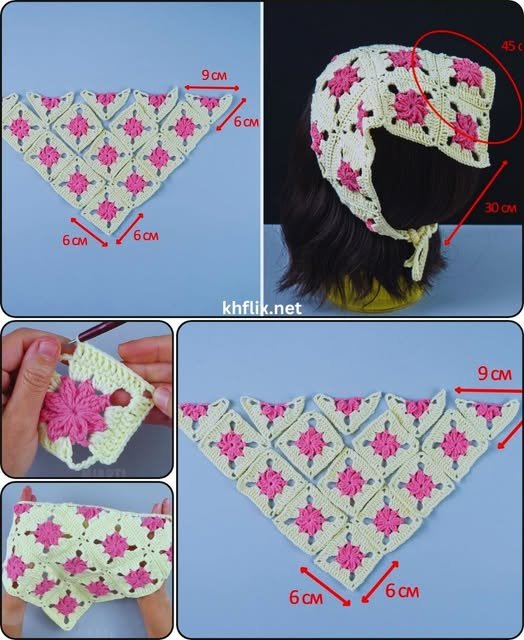
Decide how many squares you’ll need. For a small triangle bandana, you might only need 6–9 squares. Lay them out in a triangle shape, such as 3 in the first row, 2 in the second, and 1 at the top to form the point.
Join your squares using your preferred method. You can sew them together with a yarn needle or crochet them together using slip stitches or single crochet. Seam placement affects the final look, so choose what feels and looks best for your design.
Once your triangle is formed, add a border around the entire piece. This gives the bandana a finished, polished appearance and helps hold the shape. Use single crochet or shell stitches to keep the border simple and clean.
To make it wearable, add ties on each top corner. These can be long chains worked into single crochet rows or even braided yarn strands. Make sure they’re secure and long enough to tie comfortably around your head or neck.
Lastly, block your bandana if necessary. Lightly mist it with water and pin it into the desired shape, letting it dry fully. This helps even out stitches and improves the final drape and fit of your bandana.
4. Styling, Care, and Creative Variations
One of the best parts of making your own granny square triangle bandana is styling it. This accessory is not only cute but incredibly versatile in your wardrobe.
Wear it tied around your head like a traditional bandana to keep your hair back in a chic and retro way. It’s perfect for casual outings, beach days, or music festivals.
Use it as a neck scarf, either folded or scrunched, to add a pop of color and handmade charm to any outfit. The granny square texture adds dimension that’s both cozy and eye-catching.
You can also tie it to your purse handle or backpack strap as a boho accessory. It adds flair and shows off your creativity wherever you go.
For cooler seasons, use chunkier yarn to create a thicker, warmer version. It functions like a small shawl and pairs well with cardigans and winter layers.
Get creative by mixing motifs—add flowers, stars, or even hearts into the center of your granny squares before turning them into a triangle bandana. This allows for personalization and fun storytelling through your crochet.
To maintain your bandana, hand wash it in cold water using mild detergent and lay it flat to dry. This will preserve the colors, stitches, and overall shape so it lasts for years to come.
FAQ: Crochet a Granny Square Triangle Bandana
Q1: Can beginners crochet a granny square triangle bandana?
A: Yes! This project is beginner-friendly. It mainly uses basic stitches like double crochet and chain stitches. Plus, granny squares are a great way to practice consistency.
Q2: How many granny squares do I need to make a triangle bandana?
A: Typically, 6 to 9 squares are enough, depending on the size. You can create a triangle by stacking them in rows (e.g., 3-2-1 or 4-3-2).
Q3: What is the best yarn to use for a crochet bandana?
A: Cotton yarn is ideal for wearables like bandanas because it’s breathable, lightweight, and comfortable. Acrylic is also a budget-friendly option.
Q4: Can I use triangle-shaped granny squares instead of full squares?
A: Absolutely! Triangle granny squares can be crocheted from scratch, which can simplify shaping and reduce bulk at the corners.
Q5: How do I add ties to my bandana?
A: You can crochet long chain straps and reinforce them with single crochets. Alternatively, you can braid yarn strands and attach them securely at each top corner.
Q6: How do I care for my crochet bandana?
A: Hand wash in cold water with a mild detergent, then lay flat to dry. Avoid wringing or machine washing to maintain shape and stitch quality.
Conclusion
Creating your own accessory using the crochet a granny square triangle bandana pattern is a wonderful way to express your creativity and craft something both beautiful and useful. From choosing your yarn colors to wearing your finished piece, every step of the process offers joy and satisfaction.
This guide covered what a granny square triangle bandana is, what materials you’ll need, how to make it step-by-step, styling tips, and answers to common questions. Whether you’re crafting for yourself or gifting it to someone special, this is a project full of personality and handmade charm.
We’d love to hear about your experience! Leave your honest opinion and suggestions in the comments. Did you try
the pattern? Do you have your own twist on it? Your feedback helps inspire other makers in the crochet community.