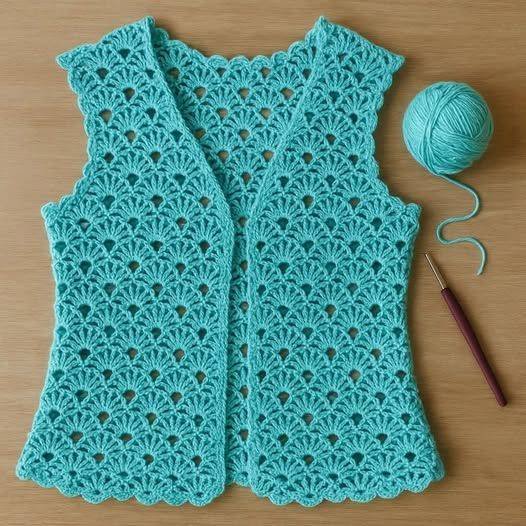
If you’re looking to create a stylish, handmade garment that works across all seasons, this crochet vest – pattern is the perfect place to start. Crochet vests are fashionable, customizable, and surprisingly easy to make — even for beginners. Whether you’re crafting something cozy for winter or a light accessory for warmer months, this tutorial will guide you every step of the way.
The beauty of a crochet vest lies in its versatility. You can dress it up with elegant stitches and textures or keep it casual with simple, breathable patterns. Plus, crochet allows you to make a garment that perfectly fits your size and style. Unlike store-bought clothing, every stitch in your vest can reflect your personality and creativity.
In this article, we’ll walk you through everything from choosing the right materials and understanding sizing to mastering stitch patterns and shaping. With this detailed crochet vest – pattern, you’ll feel empowered to pick up your hook and yarn and bring a one-of-a-kind vest to life — perfect for layering and elevating any outfit.
1. Choosing Materials and Understanding the Pattern
Before diving into the project, the first step in any successful crochet vest – pattern is selecting the right materials. The yarn, hook size, and pattern all work together to determine the final texture, drape, and wearability of your vest.
Start with choosing your yarn. For spring or summer vests, opt for breathable fibers like cotton or bamboo. These keep the vest light and wearable even in warmer weather. For fall or winter, consider wool or acrylic blends for added warmth and texture. Make sure the yarn weight aligns with your pattern — typically, DK (double knit), worsted, or bulky weight yarns work best.
Next is the crochet hook. Most crochet vest patterns specify the hook size you need, but it’s always smart to make a gauge swatch first. This helps ensure your stitches match the pattern’s measurements. If your stitches are too tight or loose, try adjusting your hook size accordingly.
Understanding the pattern is crucial. Carefully read through the entire crochet vest – pattern before starting. Pay attention to sizing instructions, stitch abbreviations, and construction details. Vests can be made in panels, worked in the round, or even top-down — so it’s good to know what to expect.
You’ll also want to gather a few additional tools: stitch markers, a measuring tape, scissors, and a yarn needle for sewing pieces together or weaving in ends. These small tools make a big difference in keeping your project organized and neat.
Lastly, think about your style. Do you want an openwork lace vest? A solid, textured one? A cropped fit or a long, flowy silhouette? Choose a pattern that fits your wardrobe and skill level. With the right materials and preparation, you’re already halfway to making a beautiful, custom vest.
2. Starting Your Vest: Sizing and Stitch Patterns
Once you’ve selected your materials and read through the crochet vest – pattern, it’s time to start your project. Understanding how sizing works in crochet garments is one of the most important parts of the process.
Unlike store-bought clothes, a crochet vest can be tailored exactly to your body. Most patterns come with a size chart or measurements for bust, waist, and length. Take your own measurements and compare them with the chart to choose the correct size. Remember, ease (the space between your body and the garment) also plays a role in fit.
Many vests begin with a foundation chain or chainless foundation row. It’s essential to make sure this row is the correct length and not twisted. Use stitch markers to help guide your first few rows if needed.
Pay close attention to the stitch pattern used in your crochet vest – pattern. Common options include double crochet, half double crochet, or shell stitches. Some more advanced designs may feature lacework, cluster stitches, or cable patterns. Practice the stitch on a swatch before beginning the actual vest to ensure consistency.
As you progress row by row, it’s helpful to measure often. Crochet can stretch, especially depending on the stitch and yarn used. Measuring regularly helps you stay on track and avoid surprises when piecing everything together.
Also, keep your tension consistent. Changing tension mid-project can cause uneven shapes or panel sizes. Relax your hands, and try to work at the same pace throughout your project. This consistency ensures your crochet vest will look polished and symmetrical when finished.
3. Shaping, Joining, and Finishing Details
This section of the crochet vest – pattern focuses on shaping your garment, connecting panels (if needed), and adding the final touches that give your vest a clean, professional look.
Most vests are made in separate front and back panels that are later joined at the shoulders and sides. Carefully follow the pattern for when and where to decrease or increase stitches to shape armholes, neckline, and waist. This part can be intimidating for beginners, but patience and close reading will guide you through it.
Once you finish the front and back pieces, it’s time to join them. You can use a whip stitch, mattress stitch, or even slip stitch crochet to seam the edges together. Use stitch markers to align sides before sewing to ensure symmetry and proper shaping.
Armholes are often left open, but you can add simple edging like single crochet or shell stitches to give them a neat appearance. This also helps prevent stretching over time, especially if the vest is worn often.
If your crochet vest includes a collar, hood, or ribbed edging, now’s the time to add those pieces. These details elevate the design and can make your vest look store-bought. Ribbing, in particular, adds elasticity and structure to the edges.
Finishing also includes weaving in your yarn ends securely. Use a yarn needle to hide ends within your stitches and prevent unraveling. It’s a small step that makes a big difference in durability.
Finally, block your vest if needed. This means gently wetting and shaping the vest to the correct dimensions and letting it dry flat. Blocking helps smooth out stitches and ensures your vest looks polished and true to size.
4. Styling and Caring for Your Crochet Vest
Now that your crochet vest – pattern is complete, it’s time to enjoy and show it off! But styling and caring for your garment properly ensures it lasts and looks great every time you wear it.
Styling a crochet vest is incredibly fun because it’s such a versatile piece. Wear it over a dress, with jeans and a tee, or even over a swimsuit. You can dress it up with jewelry and boots or keep it casual for a cozy day look. The texture and handmade details always stand out.
For colder months, layer your vest over long-sleeve tops or turtlenecks. In warmer weather, throw it over a tank or crop top for an airy, boho-chic vibe. Neutral colors go with everything, but bright, bold yarns can make a fashion statement.
Caring for your crochet vest depends on the yarn used. Always check the yarn label for washing instructions. In general, hand-washing in cool water and laying flat to dry is safest to avoid stretching or damaging stitches.
Store your vest folded rather than hanging to maintain its shape. Hanging can stretch the fibers over time, especially in cotton or bamboo yarns. If storing for a long time, place it in a breathable cotton bag or drawer.
If you notice pilling or wear, you can gently remove fuzz with a fabric shaver or scissors. Handmade garments can last a lifetime with proper care and occasional maintenance.
Most importantly, enjoy wearing your vest! Every time someone compliments it, you can proudly say, “Thanks — I made it myself.”
FAQ – Crochet Vest – Pattern
Q1: Is a crochet vest hard to make for beginners?
A: Not at all! Many crochet vest patterns are beginner-friendly. Choose a simple stitch pattern and avoid shaping if you’re just starting out.
Q2: How much yarn do I need for a crochet vest?
A: This varies by size and pattern, but most adult-sized vests require between 500 to 1000 yards of yarn.
Q3: What’s the best yarn for making a vest?
A: Cotton or bamboo yarn is great for summer, while wool or acrylic blends are ideal for warmth and structure in cooler months.
Q4: Can I customize the length of my vest?
A: Yes! One of the benefits of using a crochet vest – pattern is the flexibility. You can easily add or reduce rows to change the length.
Q5: What’s the easiest way to join vest panels?
A: Whip stitch or slip stitch crochet are common and easy methods. Always use stitch markers to align pieces evenly before seaming.
Q6: Do I need to block my crochet vest?
A: Blocking is optional but highly recommended. It helps smooth stitches, set the shape, and make your vest look more polished.
Conclusion
This complete crochet vest – pattern guide has walked you through each step of creating a beautiful handmade vest — from selecting yarn and understanding sizing to shaping, joining, and styling your finished garment. Whether you’re making your first vest or looking to refine your skills, this project offers both creative joy and practical value.
We hope you feel inspired to try this project and make it your own. Handmade fashion is not only sustainable, it’s deeply rewarding. Your vest will
be a reflection of your style, skill, and creativity.
We’d love to hear from you! Please leave a sincere opinion or share your suggestions below. Have you tried this pattern? What would you like to see next? Let us know — your feedback helps us create even better content for makers like you.