If you’ve ever wanted to add a handmade touch of elegance to your wardrobe, now is the perfect time to crochet an elegant granny stitch cardigan – pattern that blends timeless charm with modern style. This classic stitch, known for its vintage vibe and rich texture, is perfect for cozy layering pieces that feel as good as they look. Whether you’re new to crochet or looking to tackle a new project, this is one that’s as fun to make as it is to wear.
Granny stitch is one of the most beginner-friendly techniques, yet it produces beautiful, eye-catching results. With just a few basic skills and the right pattern, you’ll be able to transform yarn into a sophisticated cardigan that’s both functional and fashionable. Plus, it’s the kind of handmade piece that gets compliments wherever you go—especially when people find out you made it yourself.
This guide is designed as a complete resource to help you crochet an elegant granny stitch cardigan – pattern with confidence. We’ll go over everything step by step—from choosing materials to finishing touches—so even if it’s your first garment project, you’ll feel guided and supported along the way.
1. Materials and Tools You’ll Need to Get Started
To crochet an elegant granny stitch cardigan – pattern, it’s essential to begin with the right materials. The choices you make at this stage will directly impact the final feel, look, and drape of your cardigan.
Start with your yarn. Choose a soft, medium-weight yarn—typically a category 3 (light) or category 4 (worsted). Cotton blends and soft acrylics are ideal for a breathable, wearable result. Avoid yarns that are too stiff, as the granny stitch needs flexibility to drape well.
You’ll also need a hook size appropriate for your yarn. For most medium-weight yarns, a 5.0 mm (H/8) or 5.5 mm (I/9) crochet hook is commonly used. Always check your yarn label and make a small swatch to test your tension before diving into the full project.
Additional supplies include a tapestry needle for weaving in ends, stitch markers to help shape sleeves and armholes, and scissors. A measuring tape will be helpful as well, especially if you want to tailor the pattern to your size.
Don’t forget to print or download your granny stitch cardigan pattern in advance. Some patterns are designed for seamless construction, while others are made in pieces and sewn together. Choose one based on your comfort level and preferred style.
If you’re a beginner, consider sticking to solid colors rather than variegated yarns. Solid yarns make it easier to see your stitches, which is especially helpful when learning a new pattern or technique like shaping.
Lastly, make sure you work in a comfortable, well-lit area. Crocheting a cardigan takes time, and having an organized space makes it a much more enjoyable and relaxing experience.
2. Understanding the Granny Stitch and Cardigan Construction
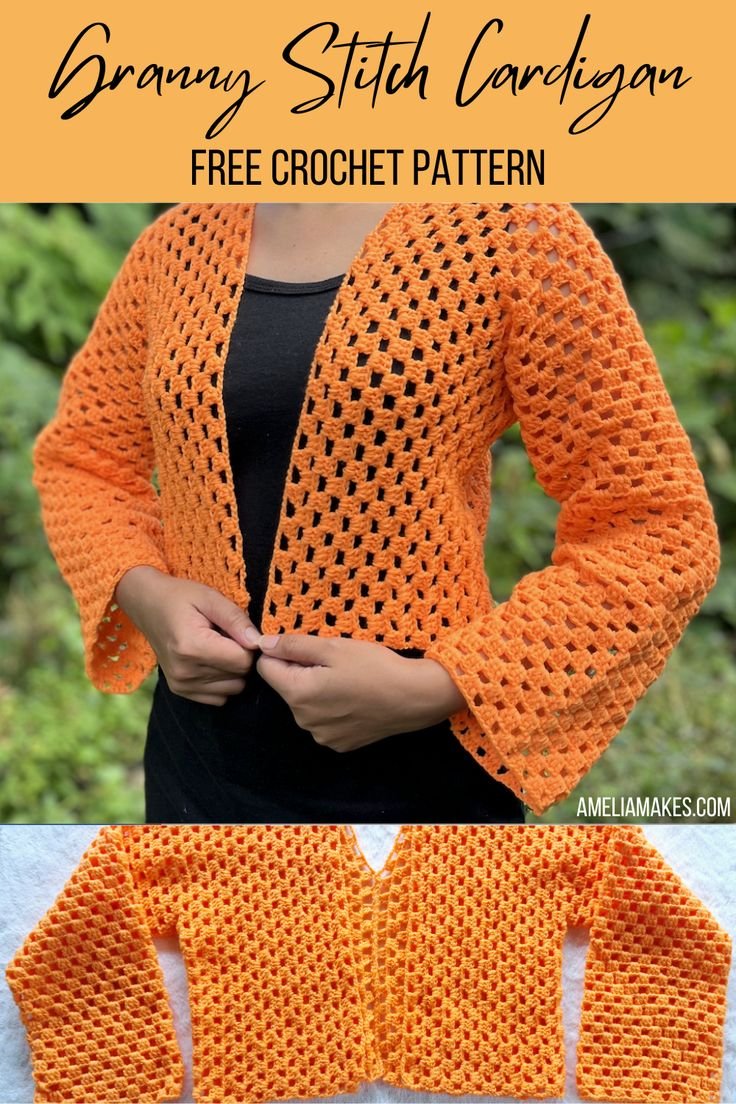
The granny stitch is a beloved technique for its rhythmic, easy-to-follow structure. It typically consists of clusters of three double crochet stitches, creating a repeating and symmetrical design that’s both sturdy and airy.
Before you begin your granny stitch cardigan, take a moment to practice the stitch. Create a swatch of a few rows using the basic cluster to get a feel for the rhythm. This will also help you maintain consistent tension throughout your project.
Most granny stitch cardigan patterns start with a yoke, square, or rectangle that expands outward. You’ll then split the fabric into armholes and continue building the body. This method allows for seamless construction and fewer seams to sew later.
The versatility of the granny stitch means you can customize sleeve lengths, body length, and even add shaping if desired. Many patterns include these options so you can make the cardigan exactly how you like it—cropped, hip-length, or long and flowing.
When working in rows or rounds, pay close attention to turning chains and stitch placement. This helps maintain the symmetry of your clusters and ensures the edges of your cardigan stay neat and even.
It’s important to try on your cardigan as you go, especially when working top-down. This helps you adjust for sizing and make sure it’s comfortable. After all, one of the best parts of DIY fashion is making something that fits you perfectly.
3. Step-by-Step Instructions to Crochet an Elegant Cardigan
Now let’s walk through the actual process to crochet an elegant granny stitch cardigan – pattern. This section provides a simplified outline that can guide you through any standard cardigan design using the granny stitch.
Start by creating your foundation chain. This may be a base for the yoke or back panel, depending on your pattern. Chain an even number if required, then begin your first row of granny clusters.
Continue building your panel or yoke, increasing at corners if working in the round. If you’re working in rows, make sure you’re chaining between clusters as instructed and maintaining the edge shape consistently.
Once your base is complete, you’ll shape the armholes. This often means skipping stitches or chaining to bridge the gap where sleeves will later be attached. Mark these areas with stitch markers to stay organized.
Continue crocheting the body of the cardigan until you reach your desired length. You can switch colors for a striped look or keep it solid for a more elegant finish. Granny stitch works well with color changes, adding a retro-chic vibe.
After the body is complete, you’ll move on to the sleeves. These are typically worked in the round using the armhole space as your base. You can make long, short, or ¾-length sleeves depending on your style.
Finally, add a border or edging to the collar, cuffs, and hem. This helps the cardigan keep its shape and adds a professional-looking finish. A simple row of single crochet or a shell stitch edging works beautifully here.
4. Styling, Finishing Touches, and Care Tips
Now that your cardigan is complete, let’s talk about styling and how to keep it looking great. A well-made granny stitch cardigan can be a staple in your wardrobe for years.
Pair your cardigan with jeans and a tank top for a casual weekend look, or layer it over a dress to add warmth and texture. The openwork of the granny stitch adds a vintage charm that complements both modern and boho styles.
Add personal touches like buttons, tassels, or a belt to customize the final look. These small additions can dramatically change the vibe of the cardigan—from cozy and casual to polished and elegant.
When gifting a handmade cardigan, consider adding a custom label or tag with care instructions. This adds a personal and thoughtful touch, especially when giving your work to friends or loved ones.
To wash your cardigan, follow the yarn label instructions. Most acrylic and cotton blends can be washed in cold water on gentle cycle, but it’s always safest to hand-wash and lay flat to dry, especially to maintain the cardigan’s shape.
Storing your crochet cardigan properly also makes a difference. Fold it neatly in a drawer or place it in a breathable fabric bag. Avoid hanging it for long periods as it may stretch out, especially if the yarn is heavy.
Wearing something you’ve made by hand is incredibly rewarding. With your new crochet an elegant granny stitch cardigan – pattern complete, you’ll feel proud every time someone compliments your creation.
FAQ – Frequently Asked Questions
Q1: Is the granny stitch good for beginners?
Yes! The granny stitch is one of the most beginner-friendly techniques. It uses basic double crochet stitches grouped into clusters, making it repetitive and easy to follow.
Q2: How long does it take to crochet a granny stitch cardigan?
Depending on your skill level and the complexity of the pattern, it can take anywhere from a few days to a couple of weeks. Beginners may take longer, but it’s a great project to work on gradually.
Q3: Do I need to block the cardigan after finishing it?
Blocking is recommended, especially to help shape the cardigan and even out the stitches. Light steam blocking works well for acrylic yarn, while wet blocking is better for natural fibers like cotton or wool.
Q4: Can I adjust the size of the cardigan?
Absolutely. Most granny stitch cardigan patterns include size adjustments. You can also add or reduce rows and clusters based on your measurements for a custom fit.
Q5: What yarn works best for an elegant look?
Soft cotton blends, bamboo yarn, or lightweight merino wool offer great drape and elegance. Avoid rough or stiff yarns if you want a cardigan that flows nicely.
Q6: Can I add a hood or pockets?
Yes! Many advanced patterns include options for hoods and pockets, or you can modify a basic pattern to include them. Just be sure to maintain stitch counts and symmetry.
Conclusion
Crocheting your own cardigan is not just about making a piece of clothing—it’s about creating something with care, creativity, and personality. This guide to crochet an elegant granny stitch cardigan – pattern has taken you through each step of the journey, from gathering materials to finishing touches.
Whether you’re new to crochet or a seasoned crafter, the granny stitch offers endless opportunities to explore your style. It’s comfortable, classic, and incredibly versatile—perfect for all seasons and ages.
We hope this tutorial inspired you to pick up your hook and yarn. If you tried this **granny stitch
cardigan pattern**, please leave a sincere opinion in the comments below. Share your experience, tips, or suggestions—we’d love to hear what you created and what you’d like to see next.
Happy crocheting!