If you’ve been searching for a beautiful and functional crochet project, the Daisy flower coaster – Pattern might just be the perfect fit. These charming coasters not only protect your surfaces but also add a delicate touch of nature to any room. Whether you’re a beginner or an experienced crocheter, this guide will walk you through everything you need to know about creating your very own daisy flower coasters, complete with expert tips and a stylish, modern approach.
Crochet has seen a huge resurgence in popularity, and with good reason. It allows crafters to combine creativity, mindfulness, and functionality in one hobby. One of the most trending items in the crochet community today is the Daisy flower coaster – Pattern, which blends classic flower motifs with practical uses in home décor.
From choosing the right yarn to stitching techniques and pattern variations, this comprehensive guide will help you master the art of crafting the perfect daisy flower coaster. Let’s dive in and explore what makes this pattern such a delightful and versatile choice for crochet lovers.
1. Understanding the Daisy Flower Coaster – Pattern
The Daisy flower coaster – Pattern is more than just a pretty floral design—it’s a combination of color, technique, and texture. Knowing the background of this popular pattern can help you appreciate its structure and purpose even more.
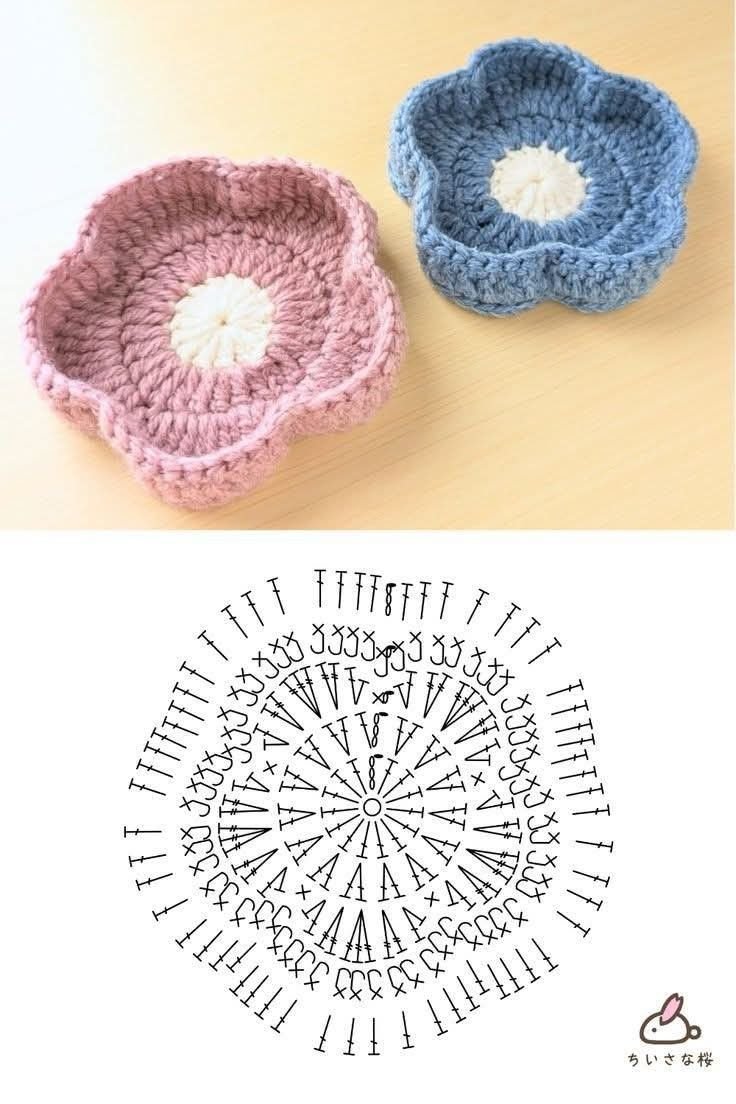
This pattern typically starts from the center with a magic ring or chain loop, forming the yellow center of the daisy. From there, white petals are crocheted outward in layers, followed by a circular base in your chosen background color. The result? A soft, absorbent coaster that resembles a blooming daisy.
Color selection is key to achieving an authentic look. Classic combinations include yellow centers with white petals and green or beige borders. However, don’t be afraid to explore pastel hues, vintage tones, or even bold neon palettes for a modern twist.
The Daisy flower coaster – Pattern uses basic crochet stitches such as chains, single crochets, double crochets, and slip stitches. This makes it an ideal project for beginners while still allowing for customization and creativity.
Beyond aesthetics, daisy coasters serve a functional purpose. Their layered construction offers good thickness and durability, making them perfect for protecting furniture from heat and moisture.
You’ll also find that daisy coasters make wonderful handmade gifts. They’re quick to produce, budget-friendly, and carry a personal touch that store-bought items simply can’t match.
Lastly, using natural cotton yarn ensures the coasters are both eco-friendly and washable. This adds practicality to their beauty, making them perfect for everyday use.
2. Materials and Tools You’ll Need
Before you begin crafting your Daisy flower coaster – Pattern, you’ll need to gather a few essential materials. Having the right tools on hand will ensure a smoother, more enjoyable crocheting experience.
Start with yarn selection. Cotton yarn is preferred for coasters due to its absorbent and durable nature. Brands like Lily Sugar’n Cream or Paintbox Cotton DK are popular choices.
You’ll need a crochet hook that matches your yarn weight. Most daisy coaster patterns use a 3.5mm to 4.5mm hook, but always check your specific pattern’s recommendations.
Scissors are a must-have tool. Choose a sharp pair to ensure clean cuts when trimming yarn tails.
A yarn needle will help you weave in loose ends neatly once your coaster is complete. This step gives your project a polished, professional finish.
If you’re planning to make several coasters at once, consider using stitch markers. These help track your progress and maintain stitch counts, especially during rounds.
Optionally, you may also want a blocking mat and pins. Blocking helps your finished coaster lay flat and enhances the crispness of your daisy design.
3. Step-by-Step Guide to Crocheting the Daisy Flower Coaster
Creating a Daisy flower coaster – Pattern is a relaxing and rewarding process. Follow these steps to craft your own stunning floral coasters with ease and confidence.
Begin with the center of the daisy, usually made using a magic ring technique. Work a set number of single or double crochet stitches into the ring to form a tight, round center.
Next, you’ll add the petals. Each petal typically consists of chain stitches followed by a combination of single and double crochets to give them shape and volume.
Continue crocheting around the center until you have a full set of petals—usually 6 to 12, depending on the design. Adjust spacing for balance and symmetry.
Now it’s time to add the background circle. Using a contrasting color, crochet around the petals to form a smooth, even round that secures the petal edges and forms the base of the coaster.
Work in the round, increasing stitches gradually to maintain a flat shape. This ensures the coaster will lie evenly on a table or counter without curling.
Once complete, fasten off your yarn, weave in the ends, and optionally block your piece. Your Daisy flower coaster is now ready to use or gift!
4. Styling Ideas and Pattern Variations
The Daisy flower coaster – Pattern is incredibly versatile, allowing for endless styling opportunities and customization. Here are some creative ways to personalize your project.
Try using ombre or gradient yarns to create petals that shift in color. This gives your coasters a modern, eye-catching twist.
Incorporate different yarn textures like bamboo or linen blends for a unique finish. This can add sophistication and variety to your collection.
For a playful aesthetic, alternate petal colors in a rainbow pattern. These are great for kids’ rooms or spring-themed parties.
Use metallic yarns or thread for a glamorous touch. Gold or silver highlights can turn your coaster into a statement piece.
Adjust the size of your coaster by changing hook sizes or yarn weights. Larger coasters can double as trivets or wall art.
Finally, create a matching set with other crochet items like placemats, napkin rings, or even a daisy-themed table runner.
FAQ – Frequently Asked Questions
Q1: Is the Daisy flower coaster – Pattern beginner-friendly?
Yes! It uses basic stitches and techniques that are perfect for beginners, especially if you follow a detailed tutorial.
Q2: What type of yarn works best for this pattern?
100% cotton yarn is ideal because it’s absorbent, heat-resistant, and washable.
Q3: How long does it take to crochet one daisy coaster?
Most crocheters can complete one in under an hour, depending on experience and complexity.
Q4: Can I sell coasters made from this pattern?
Absolutely! Handmade daisy coasters are popular at craft fairs and online shops. Just make sure to credit the original pattern if it’s not your own design.
Q5: How can I make my coasters lay flat?
Proper increases in each round and optional blocking after completion will help keep your coasters perfectly flat.
Q6: Where can I find free Daisy flower coaster – Patterns?
There are many free patterns available on crochet blogs, Pinterest, and crafting websites like Ravelry or LoveCrafts.
Conclusion
Creating your own Daisy flower coaster – Pattern is a satisfying and creative journey that blends beauty with function. You’ve learned what materials to use, how to crochet the pattern step-by-step, and even ways to personalize your creations for different styles and occasions. Whether you’re crafting for fun, gifting, or selling, this pattern opens a world of possibilities.
If you’ve enjoyed this guide or have tried making a daisy coaster yourself, we’d love to hear from you. Leave your honest opinion below and feel free to suggest new topics or variations you’d like us to cover in the future. Happy crocheting!