If you’re looking to add a splash of handmade charm to your home or make a thoughtful, practical gift, the Crochet Coaster Flower Tutorial – Pattern is the perfect project. These beautiful little pieces combine functionality with artistic design, bringing both style and protection to your tabletops. Whether you’re a beginner or a seasoned crocheter, this tutorial will guide you step-by-step in creating stunning flower-shaped coasters with ease.
One of the best things about following a Crochet Coaster Flower Tutorial – Pattern is that it allows you to experiment with colors, yarn types, and textures. From bold, vibrant tones to soft pastels, you can make coasters that suit any room, event, or season. Plus, they’re quick to complete, making them ideal for last-minute gifts or craft fairs.
In this article, we’ll walk you through everything you need to know—materials, techniques, customizations, and finishing tips. By the end, you’ll not only have a complete understanding of the Crochet Coaster Flower Tutorial – Pattern, but also feel confident enough to add your own unique twist to this charming crochet project.
1. Choosing Materials for Your Flower Coasters
The first step in the Crochet Coaster Flower Tutorial – Pattern is selecting the right materials. While the project itself is small and beginner-friendly, the materials you choose can make a big difference in the final look and usability of your coasters.
Start with cotton yarn, as it’s absorbent, durable, and easy to clean—making it perfect for coasters. Acrylic yarns, while colorful and soft, tend not to absorb moisture as well and may not lie flat over time.
Pick a DK (double knitting) or worsted weight yarn for the best balance between sturdiness and stitch definition. These weights work well for flower patterns, providing just the right thickness without being bulky.
Color selection is where you can really let your creativity shine. Floral coasters look stunning in classic combinations like pink and green, but feel free to go bold with purples, blues, oranges, or even rainbow themes.
You’ll also need the correct crochet hook size, which usually ranges from 3.5 mm to 5 mm depending on your yarn choice. Always check your yarn label and make a small swatch to ensure your stitches are tight and consistent.
Don’t forget the small extras: a yarn needle for weaving in ends, a scissors, and optionally, blocking tools to help your finished flowers lay flat and symmetrical.
Lastly, keep your chosen Crochet Coaster Flower Tutorial – Pattern nearby—whether printed, digital, or video. Having clear, visual guidance is key to creating uniform, polished coasters every time.
2. Step-by-Step Instructions for Crafting the Flower Shape
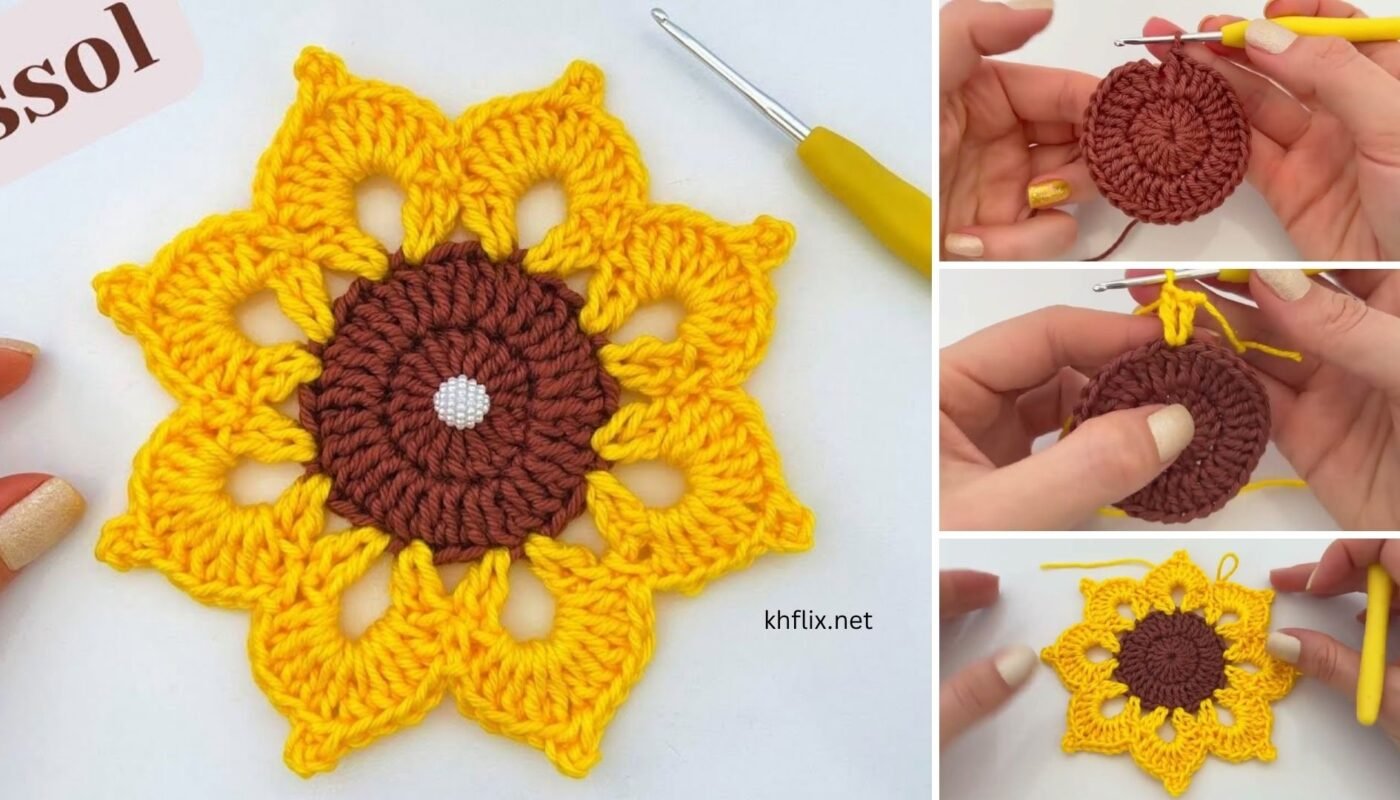
Once you’ve gathered your materials, it’s time to dive into the Crochet Coaster Flower Tutorial – Pattern. The basic shape typically starts from the center and works its way outward, forming petals as you go.
Begin by making a magic ring, which allows you to pull your center circle tight and avoids a hole in the middle. Chain two or three to form your starting height—this will count as your first stitch depending on the pattern.
In Round 1, you’ll usually work a series of double crochet (dc) or half double crochet (hdc) stitches into the ring to form the base. The number of stitches will vary, but a typical starting round may have 12 to 16 stitches evenly spaced.
In Round 2 and beyond, you’ll build petals by working a combination of stitches into each base stitch. Common petal shapes use a sequence like single crochet, half double crochet, double crochet, and then back down to single crochet.
Repeat the petal sequence around the circle, using slip stitches to join each petal and transition to the next. This gives a clean edge and keeps your flower shape intact as it grows outward.
Most Crochet Coaster Flower Patterns consist of 2 to 4 rounds total. You can stop at any size, but 4” to 5” in diameter is ideal for coasters. Remember to finish by cutting the yarn and weaving in the ends neatly with a yarn needle.
3. Customizing Your Crochet Coaster Flower Design
The beauty of the Crochet Coaster Flower Tutorial – Pattern lies in its adaptability. With just a few small changes, you can create dozens of unique variations of the same basic shape.
Try experimenting with multi-color yarn changes. For example, start with a yellow center, switch to pink for petals, and green for a leafy border. Use a color change technique at the end of each round for clean transitions.
You can also adjust the number of petals by modifying the base round. Adding more stitches in your first round creates more petal spaces, while fewer stitches give a simpler, minimalist design.
Play with stitch types too. Instead of the standard dc or hdc petals, try puff stitches or picots to add texture. Using clusters can give a ruffled effect, adding visual depth and softness to your coaster.
If you want a more dimensional effect, consider using the back loops only or working in the third loop of the hdc to create raised ridges between petals and the center.
Add embellishments like small buttons, embroidery, or beads to the center of the flower for a decorative touch. Just be mindful if they’ll be used with cups or glasses—keep surfaces flat if practicality is the goal.
Finally, use your coasters as modular motifs. Stitch multiple flower blocks together to make table runners, trivets, placemats, or even a full-blown floral blanket. This makes the pattern not only charming but incredibly versatile.
4. Blocking, Caring, and Displaying Your Finished Coasters
Once your coasters are complete, the next step in the Crochet Coaster Flower Tutorial – Pattern is finishing and caring for your creations. Proper finishing ensures they not only look their best but also last longer with regular use.
Start by blocking your coasters—especially if they curl or twist. Wet block them by gently soaking in warm water, pressing out excess moisture, and pinning them into shape on a foam board or towel until dry.
For quicker results, try steam blocking. Lay the coasters flat, cover with a damp cloth, and press gently with an iron (never directly on the yarn unless it’s cotton). This helps to set the stitches and improve symmetry.
When it comes to cleaning, hand-washing is best, especially for cotton yarn. Use mild detergent, rinse well, and lay flat to dry. Machine washing may distort the shape, particularly with delicate or embellished designs.
Store coasters flat in a drawer or basket to maintain their shape. If gifting them, wrap in ribbon or stack them neatly in a small box to make a beautiful presentation.
Use your floral coasters not only under drinks but also under plant pots, candles, or small décor items. They bring charm and personality to any room—from kitchens to patios to workspaces.
If you sell handmade items, the Crochet Coaster Flower Pattern is a market favorite. They’re quick to make, appealing year-round, and great for using up leftover yarn—making them both profitable and practical.
FAQ – Crochet Coaster Flower Tutorial – Pattern
Q1: Is this pattern beginner-friendly?
Yes! The Crochet Coaster Flower Tutorial – Pattern is ideal for beginners. It uses basic stitches and simple construction techniques, with plenty of room for creative variation.
Q2: What type of yarn is best for crochet coasters?
Cotton yarn is best because it absorbs moisture and lies flat. Avoid acrylic yarns unless you’re making decorative-only coasters.
Q3: How long does it take to make one flower coaster?
Typically 30 to 60 minutes, depending on your skill level and stitch complexity. It’s a quick and satisfying project.
Q4: Can I use this pattern to make larger items?
Yes! You can join multiple flower motifs to make placemats, table runners, or even blankets. It’s a modular and scalable design.
Q5: How do I keep the coaster flat after crocheting?
Blocking is key. Use wet or steam blocking methods to shape and flatten the coaster, especially if it curls or puckers.
Q6: Can I sell items made from this pattern?
Most patterns allow for personal or small-business sales. Just check the pattern source’s copyright or usage terms first.
Conclusion
The Crochet Coaster Flower Tutorial – Pattern offers the perfect blend of simplicity, beauty, and function. Whether you’re crafting for your home, making thoughtful handmade gifts, or looking for projects to sell, these floral coasters are a delightful and versatile option.
We’ve covered everything from selecting materials to completing and customizing your coasters, along with expert tips on finishing and care. By following this guide, you’re not just creating a useful item—you’re expressing your creativity with every stitch.
Have you tried this pattern yet? Leave a sincere opinion below and share your version of the flower coaster—maybe even your own tips or variations. Your input inspires other makers in the crochet community!
Happy Crocheting! 🌸🧶