If you’re looking for a fun and functional sewing project, the Basket With Pockets And Handles – Pattern might be exactly what you need. This stylish and handy fabric basket is perfect for organizing craft supplies, storing toys, managing household items, or even as a thoughtful handmade gift. With its built-in pockets and sturdy handles, it combines beauty and practicality in a single project that can easily fit into any home.
Whether you’re new to sewing or a seasoned crafter, this basket offers an opportunity to create something truly useful while practicing key techniques such as quilting, attaching pockets, and constructing handles. It’s not just about stitching fabric—it’s about designing a product that enhances your daily life.
In this guide, we’ll walk you through everything you need to know about the Basket With Pockets And Handles – Pattern, from selecting materials to finishing touches. By the end of this article, you’ll have the confidence to make your own basket—customized exactly to your needs.
1. Why Choose the Basket With Pockets And Handles – Pattern?
There are many reasons why the Basket With Pockets And Handles – Pattern is a favorite among sewing enthusiasts and practical makers alike. It’s a beginner-friendly project that serves countless purposes in your everyday routine.
First and foremost, it’s highly versatile. This fabric basket can be used in the sewing room to hold spools and scissors, in the nursery for baby supplies, in the living room for remotes and chargers, or in the kitchen for organizing snacks. The added pockets make it even more functional.
Secondly, it’s customizable. You can adjust the size, fabric style, number of pockets, and handle length to suit your preferences or the basket’s intended use. Choose colorful prints for a playful look or minimalist tones for a modern vibe.
The project also offers a fantastic opportunity to practice essential sewing skills. From adding interfacing to sewing box corners, you’ll get comfortable with techniques that will help you in future sewing endeavors.
Additionally, this basket is eco-friendly. Instead of buying plastic or synthetic organizers, you can create a durable, washable, reusable option using natural or recycled fabrics. This makes it a great project for sustainable living.
If you’re a crafter who sells handmade goods or gifts, the Basket With Pockets And Handles – Pattern is also a highly marketable item. Its utility and aesthetic appeal make it a best-seller at craft fairs, online shops, and as part of gift sets.
Lastly, it’s simply satisfying to make. The feeling of organizing your space with something you’ve created by hand adds a level of joy and accomplishment that store-bought items can’t match.
2. Materials and Tools You’ll Need
To create your own Basket With Pockets And Handles – Pattern, you’ll need a few basic sewing supplies along with your chosen fabric. Don’t worry—nothing too fancy or expensive is required, and you may already have most of these items at home.
Start with cotton or canvas fabric. Choose two coordinating prints—one for the exterior and one for the lining. If you want a sturdier basket, canvas or home decor fabric is ideal. Lighter cotton fabrics will need reinforcement with interfacing.
You’ll also need fusible interfacing or stabilizer to give your basket structure. Medium-weight interfacing works well for everyday baskets, while heavy-duty options are perfect if you want it to hold heavier items.
For the handles, you can use matching fabric, cotton webbing, or even repurposed belts. Just make sure they are strong enough to carry the weight of what you’ll be storing inside the basket.
You’ll also want batting or foam if you prefer a soft, quilted basket. This adds extra padding and shape, especially helpful for baby baskets or storage baskets used for delicate items.
Other tools include scissors or rotary cutters, pins or clips, a sewing machine, thread to match your fabric, and a measuring tape or quilting ruler. If your basket design includes snaps or magnetic closures, gather those as well.
Lastly, you may want to print or draw your pattern based on the desired size. Some patterns are freely available online, while others are part of downloadable sewing kits or tutorials.
3. Step-by-Step Instructions for Sewing Your Basket
Now that your materials are ready, let’s dive into how to make your Basket With Pockets And Handles – Pattern. This step-by-step guide breaks down the process into manageable parts.
Begin by cutting your fabric pieces. You’ll typically need two main rectangles (one for the outer shell and one for the lining), additional strips for the pockets, and smaller rectangles for the handles. Be sure to cut interfacing for each main piece as well.
Fuse the interfacing to the wrong side of your exterior and pocket fabric pieces. This step is crucial for giving your basket structure. Follow the manufacturer’s instructions for ironing on the interfacing, and let it cool completely.
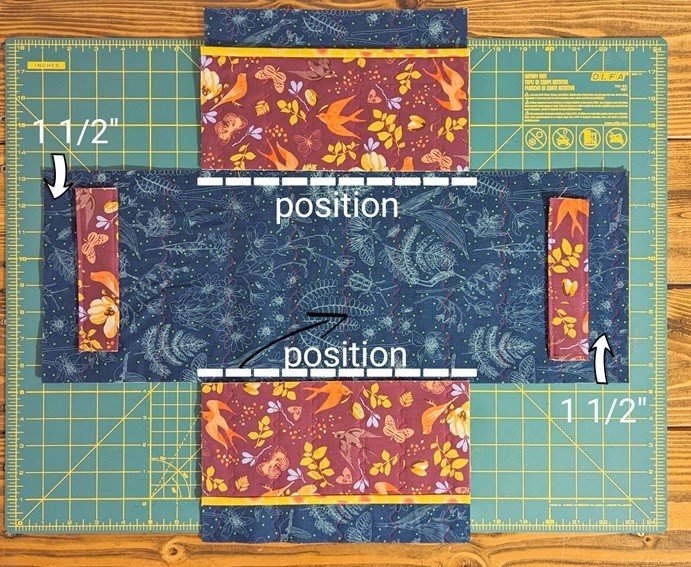
Next, prepare the pockets. Fold the pocket fabric in half lengthwise with the right sides out, then topstitch the folded edge for a neat finish. Pin the pockets onto the exterior fabric, aligning the bottom edges. You can divide the pockets into sections by stitching vertical lines wherever needed.
Once the pockets are secured, sew the side seams of the outer and lining fabric pieces separately. Press the seams open. Then, create the box corners by folding each bottom corner so that the side seam aligns with the bottom edge, forming a triangle. Sew straight across the triangle, then trim.
For the handles, fold and press each fabric strip lengthwise, then sew along the edge to form sturdy straps. Alternatively, attach cotton webbing as-is. Pin the handles to the top edge of the exterior basket, centered on each side, and baste them in place.
With the right sides together, insert the exterior basket into the lining (which should be inside out), aligning seams and handles. Sew around the top edge, leaving a small gap for turning. Turn the basket right side out, push out the corners, and press the top edge.
Finally, topstitch around the top edge of the basket to close the turning gap and secure the handles. Your Basket With Pockets And Handles is now complete and ready to be filled!
4. Creative Ideas for Customizing Your Basket
One of the best things about the Basket With Pockets And Handles – Pattern is how easily it can be personalized to match your needs or décor. Let your creativity guide you!
Try adding embroidery or appliqué to the front of your basket. Personalize it with names, initials, or icons like stars, flowers, or animals. This makes it especially fun for kids’ baskets or personalized gifts.
Use contrasting fabrics for the pockets and handles to create a stylish, designer look. You can also add lace, ribbon, or piping along the edges for a decorative touch.
Include label holders on the front or sides of the basket. These can be made with vinyl or sewn-on fabric tags and allow you to change labels based on what’s stored inside.
Consider adding a drawstring or flap cover if you want the contents of the basket to be hidden. This is useful for baskets in shared spaces or when storing personal items.
Make a nested set of baskets in different sizes. These are fantastic for organizing shelves or drawers and can be stacked when not in use.
Use the same pattern for seasonal fabric variations—pastels for spring, pumpkins for fall, or red-and-green for holiday gift baskets. One pattern, endless possibilities!
Frequently Asked Questions (FAQ)
Q1: Can I make the Basket With Pockets And Handles – Pattern without a sewing machine?
A: Yes, it’s possible to hand-sew the basket, though it will take more time. Use a strong backstitch for seams and double-threaded stitches for handles.
Q2: What’s the best fabric to use for this basket?
A: Canvas, cotton, and linen blends are excellent choices. For added durability, use interfacing or stabilizers with lighter fabrics.
Q3: How do I wash the basket once it’s finished?
A: If all materials are washable (fabric, thread, and interfacing), you can hand wash or use a gentle cycle. Always air dry to maintain the shape.
Q4: Can I sell these baskets?
A: Absolutely. Handmade baskets are popular at markets and on platforms like Etsy. Just make sure to credit the original pattern designer if required.
Q5: What’s a good beginner size for a first-time basket?
A: A medium-sized basket around 10″x8″x6″ is a manageable size for beginners and offers plenty of room for practice and utility.
Q6: How do I prevent the basket from collapsing when it’s empty?
A: Use heavy interfacing or foam stabilizer, and consider quilting the fabric for extra rigidity and structure.
Conclusion
The Basket With Pockets And Handles – Pattern is a rewarding sewing project that beautifully blends functionality with creativity. Whether you’re using it for home organization, gifting, or adding it to your product line, it’s an item you’ll find endlessly useful.
Throughout this article, you
’ve learned how to choose materials, follow a step-by-step construction process, and add your own creative flair. Now it’s your turn to put that knowledge into action.
If you make your own basket, we’d love to hear about it! Please leave a sincere comment below with your feedback, suggestions, or any questions you might have. Your input helps us grow and inspires other makers just like you.
Happy sewing—and happy organizing!