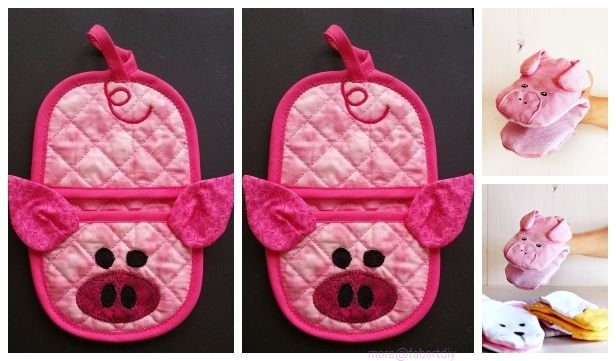
If you’re looking for a fun and practical sewing project, the very cute pig oven mitt sewing – pattern is a perfect choice. Combining creativity and utility, this unique pattern allows you to make an adorable kitchen accessory that is both functional and decorative. From beginners to seasoned sewists, creating this charming pig-shaped oven mitt brings joy and personality to any cooking space.
The very cute pig oven mitt sewing – pattern stands out not only for its playful design but also for its ease of customization. You can adjust colors, fabrics, and details to make your pig mitt truly one-of-a-kind. Whether for personal use or as a thoughtful handmade gift, this project promises satisfaction at every stitch.
In this article, we’ll explore everything you need to know about the very cute pig oven mitt sewing – pattern—from the materials and step-by-step instructions to tips on enhancing your sewing skills. Plus, we’ll provide answers to common questions and expert advice to ensure your pig oven mitt turns out perfect.
1. Understanding the Very Cute Pig Oven Mitt Sewing – Pattern
The very cute pig oven mitt sewing – pattern is a downloadable or printable design guide that outlines the shapes and measurements needed to create an oven mitt resembling a pig. It includes templates for the body, snout, ears, and other details. The pattern is thoughtfully designed to be beginner-friendly while allowing room for personalization.
This pattern emphasizes the importance of both aesthetics and safety. The mitt must have adequate insulation to protect hands from heat, while the pig design adds a whimsical charm. Using quality heat-resistant fabrics and batting ensures the mitt is practical as well as adorable.
Many sewists appreciate that this pattern can be adapted to different skill levels. Simple pig shapes can be sewn with basic stitches, while more advanced crafters can incorporate embroidery or applique details for a professional finish. This versatility makes the very cute pig oven mitt sewing – pattern a favorite among craft communities.
Another notable feature is the pattern’s ability to fit various hand sizes. By following the guidelines and adjusting the template slightly, you can create mitts that fit children and adults alike. This makes it an excellent project for families or for making gifts tailored to friends.
Finally, the very cute pig oven mitt sewing – pattern encourages creativity. Sewists often add personality by choosing fabric patterns, colors, and decorative elements like buttons or fabric paint. The end result is a charming kitchen tool that sparks joy during cooking.
2. Essential Materials and Tools for the Very Cute Pig Oven Mitt Sewing – Pattern
Starting your project with the right materials is crucial for both safety and appearance. For the very cute pig oven mitt sewing – pattern, you’ll need heat-resistant cotton fabric for the exterior. Quilting cottons work well because they come in many patterns and colors, allowing you to match your kitchen decor or pig character style.
For insulation, choose a high-quality thermal batting like Insul-Bright. This special batting reflects heat and makes the mitt safer to use when handling hot pots and pans. Without proper insulation, the oven mitt will fail its practical purpose, no matter how cute it looks.
The lining fabric should also be cotton for breathability and durability. Avoid synthetic fabrics inside the mitt as they may melt or irritate the skin during use. You will also need basic sewing supplies such as needles, thread matching your fabric, scissors, pins, and a sewing machine.
For added charm, consider fabric paint, embroidery thread, or small buttons to create piggy eyes, nostrils, or cheeks. These details enhance the very cute pig oven mitt sewing – pattern and make the finished mitt extra special.
Don’t forget to print your pattern on sturdy paper or cardstock. This helps with accurate cutting and ensures the pieces stay intact throughout the sewing process. Clear labeling of each pattern piece will also save time and confusion.
Lastly, patience and attention to detail are essential tools for success. While the pattern is beginner-friendly, taking your time with cutting, pinning, and stitching will yield the best results for your pig oven mitt.
3. Step-by-Step Guide to Sewing Your Very Cute Pig Oven Mitt
Beginning the very cute pig oven mitt sewing – pattern project involves carefully cutting out your pattern pieces from the printed template. Pin each piece to your fabric and cut precisely, following the lines closely to ensure perfect shapes for the mitt.
Next, sew the decorative elements such as ears, snout, and eyes onto the pig’s face piece. Use small stitches and reinforce edges so they stay secure during use. This step allows you to add character and personality to your pig oven mitt.
Once the decorative parts are attached, sew the front and back mitt pieces together, leaving the bottom open for turning. Remember to insert the insulation batting between the layers to guarantee heat protection.
After stitching, turn the mitt inside out through the opening so the right sides of the fabric are now facing out. This reveals the cute pig design, fully formed. Topstitch around the edges to close the opening and add durability.
Finally, sew a loop or hanging strap on the mitt so you can easily hang it in your kitchen. This functional addition complements the adorable aesthetic of the very cute pig oven mitt sewing – pattern.
The completed oven mitt is ready to protect your hands while bringing smiles to anyone who sees it. With practice, you’ll find the steps intuitive and may even experiment with new designs inspired by this pattern.
4. Tips and Tricks to Enhance Your Very Cute Pig Oven Mitt Sewing Experience
To make your very cute pig oven mitt sewing – pattern stand out, use contrasting thread colors for decorative stitches. This highlights the pig’s features and adds a playful touch to the mitt.
If you want extra durability, reinforce stress points like the seams near the thumb and palm with double stitching. This ensures the mitt lasts through many uses and washes without fraying.
Experiment with different fabric textures such as soft flannel or textured cotton for a unique feel. Just ensure the materials are heat-safe to maintain the mitt’s protective function.
Incorporate embroidery techniques to add details like eyelashes or a smile. These subtle touches bring your pig oven mitt to life and showcase your crafting skills.
Make sure to pre-wash your fabrics to avoid shrinking after the mitt is completed. This prevents distortion of your carefully sewn pieces over time.
Lastly, don’t be afraid to share your project on social media or craft forums. Feedback and ideas from fellow sewists can inspire improvements and new creative directions.
FAQ
Q1: Is the very cute pig oven mitt sewing – pattern suitable for beginners?
Yes! The pattern is designed to be accessible for beginners, with clear instructions and simple shapes. More advanced crafters can add details to personalize their mitt.
Q2: What materials should I use for the best heat protection?
Use 100% cotton fabrics for both exterior and lining, combined with an insulated batting like Insul-Bright for heat resistance and safety.
Q3: Can the pattern be resized for different hand sizes?
Absolutely. The pattern can be scaled up or down to fit children or adults, making it versatile for various users.
Q4: How do I care for my pig oven mitt?
Hand wash or machine wash on gentle cycle with cold water. Avoid bleach and high heat drying to preserve the fabric and insulation.
Q5: Can I add my own decorations to the pattern?
Yes! Adding embroidery, fabric paint, or buttons is encouraged to make your pig mitt uniquely yours.
Q6: Where can I find the very cute pig oven mitt sewing – pattern?
Patterns are available on various craft websites or marketplaces offering downloadable sewing templates.
Conclusion
Creating a very cute pig oven mitt sewing – pattern is an enjoyable project that combines creativity, practicality, and skill development. From gathering materials to sewing and personalizing your mitt, this guide covers all essential aspects to help you succeed.
The finished product is not only a protective kitchen tool but also a charming piece of art that brightens your cooking space. Feel free to share your experiences and suggestions—your honest feedback helps improve future projects and inspires fellow sewists. Happy sewing!