If you’ve been looking for a fun and trendy crochet project, then this crochet granny square bucket hat – pattern guide is exactly what you need. The combination of vintage vibes and modern fashion makes granny square bucket hats a favorite among crochet lovers. This piece is not only stylish but also easy to personalize with endless color and pattern variations.
A crochet granny square bucket hat – pattern lets you blend the timeless charm of granny squares with the practical, laid-back structure of a bucket hat. Whether you’re creating it for yourself, a loved one, or even to sell online, the process is relaxing and rewarding. Plus, it’s a great way to use up leftover yarn and experiment with creative designs.
In this article, we’ll cover everything you need to create your own bucket hat using granny squares—from choosing the right yarn to assembling the squares and finishing off the hat. You’ll find all the inspiration and technical advice to complete this stylish accessory using a crochet granny square bucket hat – pattern that suits your skill level and aesthetic.
1. Choosing Materials for a Crochet Granny Square Bucket Hat
Before you begin your crochet granny square bucket hat – pattern, gathering the right materials will make the entire process smoother and more enjoyable. Picking the best yarn, hook size, and accessories will help ensure a comfortable and professional-looking final product.
Start with worsted weight or cotton yarn. Cotton yarn is ideal because it’s breathable, especially for summer wear. Worsted yarn offers more structure, which can help maintain the bucket hat shape better. Choose colors that pop or go with neutrals for a classic look.
Use a crochet hook size appropriate for your yarn. Most patterns work well with a 4mm to 5.5mm hook. If you’re using tighter stitches or want a firmer fabric, opt for a smaller hook. Always check your tension by doing a test square.
You’ll also need a yarn needle for weaving in ends, scissors, and optionally, stitch markers to help keep your work organized. Some crocheters add a fabric lining to the inside of the hat for added comfort and structure.
Don’t forget a tape measure or ruler. Granny squares need to be the same size to assemble correctly, and the crown, brim, and sides all require specific measurements for the hat to fit properly.
If you’re planning to sell your hats, consider adding branded labels or tags to make your handmade product more professional. This can increase perceived value and help you stand out in a crowded marketplace.
Finally, choose a quality crochet granny square bucket hat – pattern. Many free and premium patterns are available online with step-by-step instructions. Choose one that suits your skill level and desired style.
2. Creating and Customizing Granny Squares
The heart of any crochet granny square bucket hat – pattern lies in the granny squares themselves. These versatile little motifs are both decorative and functional, giving the bucket hat its distinctive style and shape.
A classic granny square starts with a simple center and builds outward using double crochet clusters. The traditional version features three-round designs, but for a bucket hat, you might opt for four or five rounds depending on the size you need.
You can personalize your granny squares with color changes, using different yarns for each round or creating floral or starburst centers. Multicolor granny squares give your hat a playful, boho feel, while solid colors offer a minimalist, modern aesthetic.
Make sure each granny square is the same size. Even minor variations can affect how well the pieces fit together during assembly. Blocking your squares—gently shaping and flattening them—can help maintain uniform size and shape.
Consider using different granny square patterns for different parts of the hat. For example, you might use floral motifs for the crown and classic squares for the sides. This adds a layer of creativity and visual interest to your finished hat.
Don’t hesitate to add a few decorative touches to each square, like a bead or button in the center. This small detail can enhance the overall charm of your crochet granny square bucket hat – pattern.
Finally, create a layout plan before joining your squares. Lay them out on a flat surface to visualize the design. Rearranging them at this stage is much easier than after they’ve been sewn together.
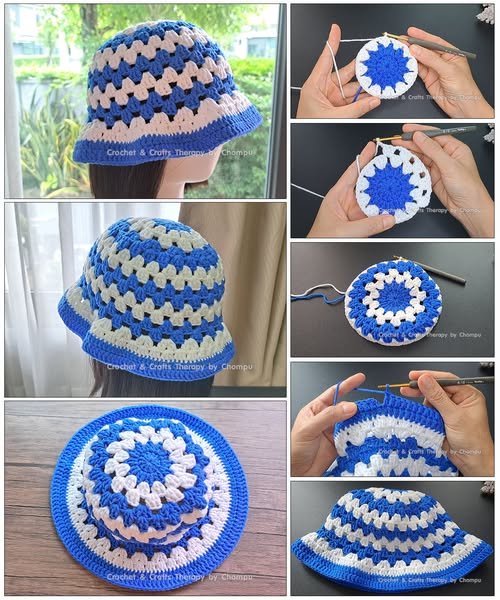
3. Assembling the Bucket Hat Step-by-Step
Once your granny squares are ready, it’s time to assemble your crochet granny square bucket hat – pattern. This step transforms a collection of squares into a fashionable and functional accessory.
Begin by creating the crown of the hat. This usually involves joining four granny squares in a square shape. Use slip stitches or a whip stitch to seam them together. Make sure the seams are tight but not bulky, as this area sits directly on top of the head.
Next, attach additional squares around the crown to form the sides of the bucket hat. Typically, four to five squares will surround the crown, depending on the size. Again, maintain consistency in your stitching to keep the shape even.
Now, it’s time to build the brim. This part is often made using regular rounds of double crochet stitches rather than granny squares. Start crocheting directly onto the bottom edge of the side squares, working evenly around to form the brim.
Increase your stitch count every few rounds to create a slight outward flare typical of bucket hats. The brim can be made stiffer by using tighter stitches, adding interfacing, or even inserting thin wire or plastic cord.
After the brim is complete, weave in all ends using a yarn needle. This step might feel tedious, but it’s crucial for a clean and polished look. Unsecured ends can unravel and ruin the integrity of your hat over time.
Try the hat on and make final adjustments as needed. If it’s too loose, you can add a drawstring or elastic inside the band. If it’s too tight, consider adding an extra round to the brim to give it more room and comfort.
4. Styling, Care, and Selling Tips
Once your crochet granny square bucket hat – pattern is complete, it’s time to enjoy it! Whether you’re keeping it for yourself or selling it, knowing how to style, maintain, and market your hat can elevate the entire experience.
This hat pairs beautifully with boho outfits, sundresses, and even swimsuits. It’s the perfect statement piece for festivals, beach days, or casual summer outings. You can create versions in seasonal colors or neutral shades to match different wardrobes.
If you’re gifting or selling your hat, attach a care label. Most handmade crochet items should be hand washed in cold water and laid flat to dry. This maintains the integrity of the stitches and prolongs the life of the hat.
For storage, avoid folding the brim sharply. Instead, place the hat in a drawer or on a shelf where it can hold its shape. Blocking it occasionally will keep the granny squares looking crisp and neat.
Selling your hats online? Make sure your product photos are bright and clear. Use close-ups to show the stitch quality, and model the hat on a head form or real person so buyers can visualize it in use.
Consider offering customization options—such as colors, sizing, or additional embellishments. This increases buyer interest and makes each crochet granny square bucket hat – pattern more appealing.
Finally, connect with your audience. Share behind-the-scenes photos, tutorials, or time-lapses of your crochet process on social media. Building a personal brand can help you grow a loyal customer base who appreciates the time and skill behind your work.
FAQ – Crochet Granny Square Bucket Hat – Pattern
Q1: How many granny squares do I need for a bucket hat?
A: Typically, you’ll need 5–8 granny squares depending on the size of the hat and the size of each square. Four are used for the crown, and the rest form the sides.
Q2: What size should each granny square be?
A: Most patterns recommend squares that are about 4 inches (10 cm) wide. Consistency in size is crucial for proper assembly.
Q3: Can beginners make a crochet granny square bucket hat?
A: Yes! If you know basic stitches like double crochet and how to join squares, this is a great beginner-friendly project.
Q4: How do I make the brim stiff?
A: Use tighter stitches, switch to a smaller hook, or add interfacing or thin wire inside the brim for more structure.
Q5: Is it possible to machine wash the hat?
A: It’s best to hand wash crochet items, especially if made with cotton or wool. Machine washing may cause shrinking or distortion.
Q6: Can I sell hats made from free online patterns?
A: In most cases, yes—as long as the pattern allows commercial use. Always check the designer’s policy and give credit when required.
Conclusion
The crochet granny square bucket hat – pattern is a fantastic way to combine creative flair with wearable art. From selecting yarn to stitching the final brim, this project offers fun, function, and a fashion-forward result that can be uniquely yours. Whether you’re crocheting for personal use or to share your craft with others, the possibilities are truly endless.
We hope this guide has inspired you to start your own crochet grannysquare bucket hat – pattern journey. We’d love to hear your thoughts—please leave a sincere review and share your suggestions to help us improve and inspire more crafters like you!