If you’re searching for a quick and delightful crochet project, the Crochet Star – Pattern is a perfect choice. Whether you’re a beginner or an experienced crocheter, creating a crochet star is both satisfying and versatile. It can be used as a festive ornament, a charming applique, or even as part of a larger craft like a baby mobile, garland, or table decoration.
What makes the Crochet Star – Pattern especially appealing is its simplicity and adaptability. You can make it in just a few minutes using basic stitches, and yet the result looks intricate and professional. With the right yarn and a little creativity, you can personalize your stars for different seasons, holidays, or interior styles.
In this guide, we’ll explore everything you need to know to crochet a star — from materials and step-by-step instructions to ideas for using your stars in different creative projects. Whether you’re making one or a hundred, this article will help you crochet stars that shine brightly.
1. Materials and Tools to Start Your Crochet Star – Pattern
Before starting your Crochet Star – Pattern, it’s essential to gather all the basic tools. The good news is that this is a low-cost, low-commitment project that uses very little yarn and can be completed quickly.
First, choose your yarn. For well-defined stars, cotton yarn is highly recommended. It’s sturdy, keeps its shape, and provides crisp stitch definition. If you’re going for a softer or fluffier finish, acrylic or wool yarns can also work well.
Next, you’ll need a crochet hook that matches the weight of your yarn. Most patterns for small decorative stars use a hook size ranging from 3.5 mm (E) to 5 mm (H). The hook size can also affect the tightness or looseness of your finished star, so experiment to get the texture you prefer.
Don’t forget a tapestry needle for weaving in ends. Since crochet stars are often made quickly and in multiples, you’ll want to finish each one neatly, especially if they’re going to be used in decorative crafts.
A pair of scissors is essential for clean cuts. Sharp, small craft scissors are best to avoid frayed yarn and uneven ends, especially if you’re gifting or selling your creations.
If you plan to make your star part of a larger project, like a garland or hanging ornament, gather optional items like string, twine, or beads. These embellishments can turn a simple star into a beautiful decor piece.
Finally, consider using blocking tools if you want your stars to lie flat and maintain their shape. A blocking mat and pins, along with a bit of steam or spray, will make your stars look professionally finished.
2. How to Crochet a Simple Yet Stunning Star
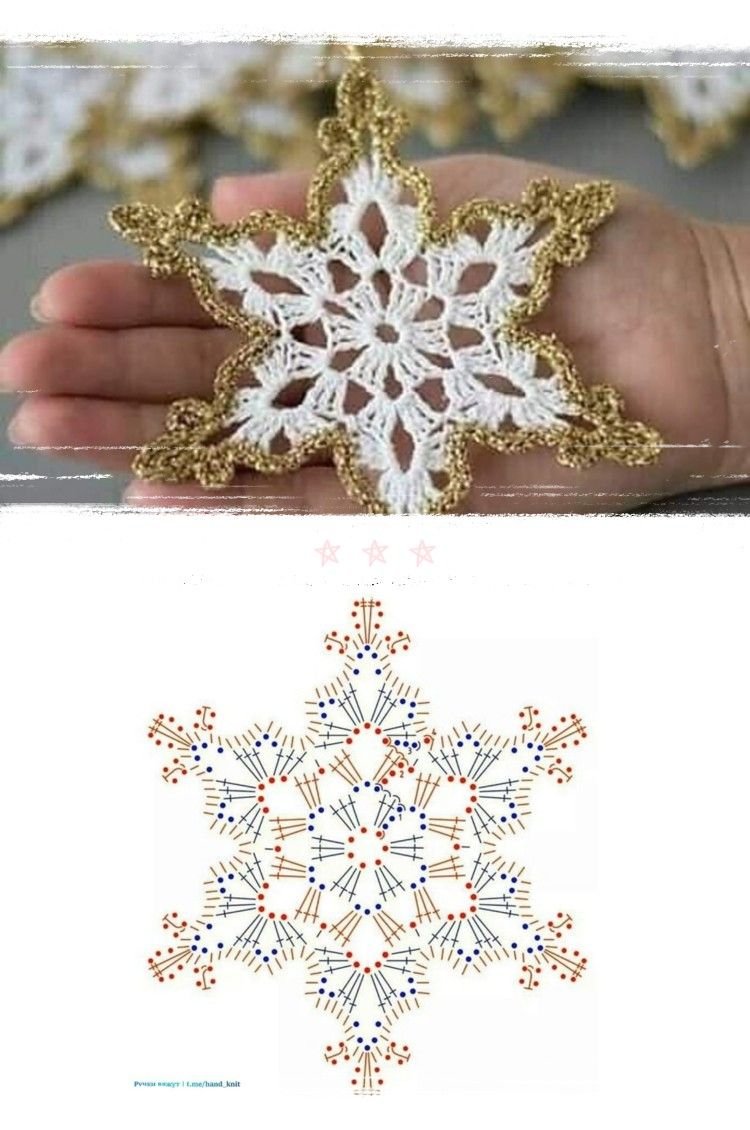
Crocheting a star might seem complicated at first, but the basic Crochet Star – Pattern uses simple stitches in clever combinations. Most star patterns are worked in the round, beginning with a magic ring or chain loop.
To begin, create a magic ring or chain four and slip stitch to form a circle. This will be the center of your star, where all the points will radiate from. The magic ring is preferred by many crocheters because it allows you to tighten the center completely.
Next, work your first round of stitches into the ring. This typically includes double crochets or trebles, depending on the desired height and texture of the star. This round builds the base upon which the star points will be formed.
To form each point of the star, you’ll create a sequence of stitches, usually starting with a chain followed by decreasing stitch heights (for example: treble, double crochet, half double, and single crochet). This tapering effect gives each point its signature shape.
Repeat the same sequence around the center of your star. Most basic stars have five points, but you can adjust the number to your preference by modifying the stitch count and spacing.
Once all points are complete, finish the star with a slip stitch and fasten off. Weave in the yarn ends with your tapestry needle. If needed, block your star flat using pins and light misting to set its shape.
Congratulations! You’ve completed a Crochet Star – Pattern. Now it’s time to consider all the creative ways you can use and customize it.
3. Creative Ideas for Using Your Crochet Stars
One of the best things about mastering the Crochet Star – Pattern is how versatile your finished stars can be. These tiny projects can become cherished items, gifts, or festive decorations.
Create Christmas ornaments by attaching a small loop of yarn or twine to the top of each star. Choose metallic or glitter yarns for extra sparkle, or go with classic red, green, and white for a traditional look.
Make a baby mobile by creating several stars in pastel colors and suspending them from an embroidery hoop. Add clouds, moons, or tiny hearts to create a dreamy nursery accessory that’s handmade with love.
Turn your stars into a garland. Simply make a chain and attach stars along it at regular intervals. This can be used for birthday parties, seasonal décor, or as year-round wall art.
Add stars as appliqués to hats, bags, or clothing. Sew them onto plain items to give them a whimsical, handcrafted touch. Use contrasting colors for bold designs or match tones for a subtle look.
Use tiny crochet stars as gift toppers or tags. Embroider a name or initials onto the star for a personalized detail that makes any gift extra special.
Consider making a coaster set out of larger stars using thick cotton yarn. With proper shaping and blocking, these stars are both decorative and functional.
4. Tips for Customizing and Perfecting Your Crochet Star – Pattern
As you get more comfortable with the Crochet Star – Pattern, you’ll want to experiment with variations to make each project unique. Here are a few tips to help elevate your stars.
Try using different stitch types. For example, replacing double crochet stitches with puff stitches or bobbles can add more texture and dimension to your stars.
Experiment with color changes. Use a different color for the center and each point of the star, or alternate colors in stripes to create a spiral effect. This technique works especially well for festive or themed decorations.
Vary the yarn weight. Thicker yarn creates bold, chunky stars, while fine yarn yields delicate and dainty results. Adjust your hook size to maintain proper tension as you switch yarns.
Block your stars for professional results. Pin them to shape on a foam board or towel, lightly spray with water, and let them dry completely. This helps define the points and flattens out any curling.
Add embellishments such as beads, sequins, or embroidery to enhance the look. This is especially great for holiday stars or those used in gift wrapping and home décor.
Practice and perfect the magic ring technique, as it’s key to a neat and tight center. If you’re having trouble, there are plenty of tutorials available to help you master it.
FAQ: Crochet Star – Pattern
Q1: What is the best yarn for a Crochet Star – Pattern?
Cotton yarn is ideal for a firm and defined star. Acrylic or wool yarns are great for softer finishes, especially for baby items or wearables.
Q2: How long does it take to make one crochet star?
On average, a small crochet star takes 10–20 minutes to complete, depending on the pattern complexity and your skill level.
Q3: Can I use this pattern as a beginner?
Absolutely! The Crochet Star – Pattern uses basic stitches and is perfect for practicing in-the-round techniques.
Q4: How do I keep the star flat after finishing it?
Blocking is the best method. Pin your star to shape, mist it with water or steam, and let it dry flat to avoid curling edges.
Q5: Can I sell items made with this pattern?
Yes, you can sell physical items made from this pattern. Just make sure to check if the specific pattern you’re using allows commercial use if it was created by someone else.
Q6: How many points can a crochet star have?
Traditionally, stars have 5 points, but you can create stars with 6, 7, or even 8 points by adjusting the stitch count and pattern layout.
Conclusion
The Crochet Star – Pattern is more than just a fun and easy project—it’s a creative opportunity to craft something meaningful, decorative, and versatile. With just a few stitches and a little time, you can create beautiful stars that brighten up your home, gifts, or accessories.
We hope this complete guide has helped you understand how to make your own crochet stars from start to finish. If you’ve tried this pattern or have your own tips to share, please leave a sincere opinion or suggestions below. We love hearing how our readers bring their creativity to life!