If you’re looking for a fun, beginner-friendly sewing project, the Quilted Strawberry Coaster – Pattern is a sweet and creative way to get started. Whether you’re a seasoned quilter or just learning the basics, this charming pattern combines function and flair in the form of a strawberry-shaped quilted coaster that can brighten up any kitchen or dining table.
The Quilted Strawberry Coaster – Pattern is ideal for using up fabric scraps, exploring curved seams, and practicing layering and quilting techniques on a small scale. It’s also a perfect handmade gift for spring and summer or for anyone who loves fruit-themed decor. Even better? It takes very little time to complete — a single afternoon is all you need.
In this guide, we’ll walk you through everything you need to know to create your own quilted strawberry coaster. From choosing the right materials to sewing tips and fun ways to personalize your coasters, you’ll get detailed guidance for crafting something beautiful, practical, and uniquely yours.
1. What Makes the Quilted Strawberry Coaster – Pattern So Popular?
The Quilted Strawberry Coaster – Pattern has quickly become a favorite in the quilting and DIY communities — and for good reason. These coasters are adorable, quick to make, and a great way to practice quilting techniques on a smaller, more manageable project.
Unlike large quilting projects that can take weeks or months to complete, this one gives you instant satisfaction. Many people enjoy making a set of these coasters in different color variations, which adds a playful pop to any kitchen or picnic table.
Because of its small size, this pattern is perfect for scrap-busting. You don’t need large fabric cuts — small pieces of red, green, and light-colored cotton are all you need. That makes it very budget-friendly and environmentally conscious.
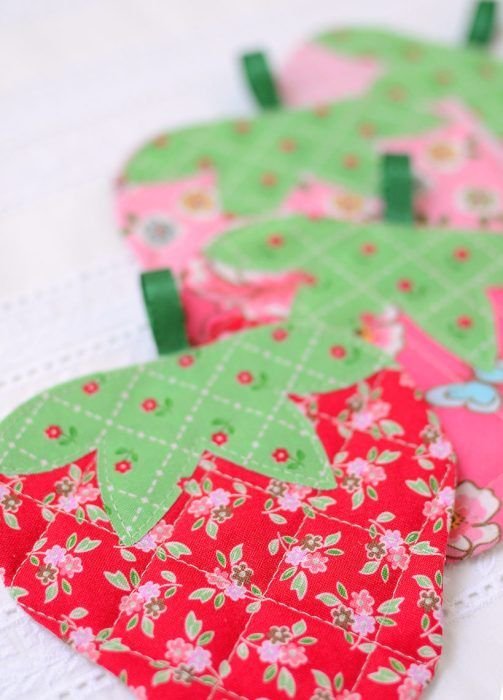
Additionally, the strawberry shape itself is whimsical and eye-catching. It’s not just a square or round coaster — it’s a little piece of soft art. And that visual charm makes it an ideal handmade gift or craft fair item.
The Quilted Strawberry Coaster – Pattern is also a gateway project. It helps new sewers get comfortable with essential quilting skills like layering, sewing curves, and binding — all on a small and low-pressure canvas.
Lastly, this project is a hit with kids. Whether they help pick fabrics or do some of the sewing themselves, it’s a family-friendly way to introduce little ones to the joy of making something by hand.
2. Choosing the Right Fabrics and Tools
The materials you choose for your Quilted Strawberry Coaster – Pattern will determine both the look and functionality of the final piece. The best part is, you probably already have what you need in your fabric stash.
For the strawberry body, choose a red or pink cotton fabric. Look for prints with tiny white dots or floral motifs to mimic the texture of a real strawberry. Solid fabrics also work well if you want a cleaner, modern look.
The strawberry top or leafy cap should be made from green cotton fabric. You can go bright green for a fresh summer vibe or deep forest green for a more vintage aesthetic. Textured prints like batik or tone-on-tone greens add depth to the design.
The inside layers of the coaster should include lightweight batting. This helps absorb moisture and gives the coaster that soft, quilted feel. Cotton or bamboo batting are both excellent choices for this small project.
You’ll also need a backing fabric — preferably something that complements the front. Light neutral colors or small-scale prints work well and hide stitching without clashing with the design.
In terms of tools, you’ll need a rotary cutter, quilting ruler, fabric scissors, straight pins or clips, an iron, and a sewing machine. A walking foot is helpful for quilting, but not essential for this project.
Optional additions include fusible interfacing (to make the coaster stiffer), embroidery floss (for decorative seeds or stitching), and binding tape (if you prefer a finished edge instead of turning it inside out).
3. How to Sew a Quilted Strawberry Coaster – Pattern
Let’s walk through the process of bringing your Quilted Strawberry Coaster – Pattern to life. You’ll be surprised at how simple and rewarding this little project can be.
Start by downloading or sketching a strawberry template. Most are about 4–5 inches tall. Trace the body shape onto red fabric and the leafy top onto green fabric. Cut two of each shape for the front and back layers.
Next, sandwich the layers. From bottom to top: backing fabric (wrong side up), batting, red strawberry front (right side up), and the green leafy top. Pin or clip the layers together securely before sewing.
Quilt through all layers. You can sew vertical lines, free-motion swirls, or even little seeds across the red section for added detail. This is where your creativity comes in — feel free to experiment!
After quilting, place the backing layer right side down over the quilted piece. Sew around the edges with a 1/4-inch seam allowance, leaving a small opening for turning. Trim excess fabric and clip curves for smooth turning.
Turn the coaster right side out and press well with an iron. Close the opening with a ladder stitch by hand or a topstitch close to the edge. You can also topstitch the entire coaster for extra durability and a polished finish.
Finally, add any embellishments you like — embroidered seeds, decorative stitching, or even a small fabric loop so the coaster can hang when not in use. Your Quilted Strawberry Coaster – Pattern is complete!
4. Creative Variations and Gift Ideas
One of the best things about the Quilted Strawberry Coaster – Pattern is how easy it is to customize and gift. This pattern is just the beginning — your imagination can take it much further.
Create a full set of seasonal fruit coasters using the same pattern structure — try a lemon slice, watermelon wedge, or orange. These look amazing when paired together in a fruit-themed gift basket.
Change the size of the pattern and make larger strawberry trivets or mini hot pads for serving dishes. Just enlarge your template and add more batting layers for extra heat protection.
Use vintage or reclaimed fabric for a nostalgic feel. Old tablecloths, aprons, or pillowcases can be repurposed into charming quilted strawberries that tell a story.
Add names or initials to personalize each coaster. This is especially great for kids’ birthday party favors, picnic sets, or kitchen bridal shower gifts. Embroidery or iron-on letters both work beautifully.
Turn the Quilted Strawberry Coaster – Pattern into a hanging decoration or bunting for springtime parties or garden-themed events. Simply add loops or attach coasters to a ribbon.
You can even use waterproof backing (like PUL fabric or vinyl) to make outdoor-friendly coasters. These are great for garden furniture, summer picnics, or patio decor.
FAQ: Quilted Strawberry Coaster – Pattern
Q1: Is the Quilted Strawberry Coaster – Pattern beginner-friendly?
Yes! It’s one of the best projects for beginners who want to learn quilting techniques without committing to a large quilt.
Q2: Do I need a sewing machine to make it?
A sewing machine is helpful for durability and speed, but you can sew this pattern entirely by hand if you prefer.
Q3: What type of batting should I use?
Lightweight cotton or bamboo batting works best for coasters. You can also use insulating batting if you plan to use them as trivets.
Q4: How do I make the strawberry shape?
Use a paper template. You can find printable templates online or draw your own by sketching a basic strawberry outline with a leafy top.
Q5: Can I wash these coasters?
Yes, as long as you use washable fabrics and batting. Machine wash on gentle and lay flat to dry or tumble on low heat.
Q6: Are there other fruits I can make with the same pattern?
Absolutely! With minor shape adjustments, you can create apples, lemons, watermelon, or even pineapples using the same concept.
Conclusion
The Quilted Strawberry Coaster – Pattern is more than just a cute project — it’s a practical and inspiring way to explore quilting on a small scale. With minimal materials and just a bit of time, you can create something handmade that adds personality to your space or joy to someone’s day.
From fabric selection to sewing and decorating, this project allows full freedom to express your creativity. It’s a fantastic introduction to quilting techniques and a perfect gift for spring, summer, or just because.
If you’ve tried the Quilted Strawberry Coaster – Pattern, we’d love to hear your sincere opinion. Did you customize yours? Add any fun details? Drop your thoughts and suggestions in the comments to help others learn and get inspired by your unique spin on this fruity favorite!