The cozy season is the perfect time to pick up your hook and dive into a festive project like the Crochet pumpkin coasters – Pattern. Whether you’re preparing for Halloween, Thanksgiving, or simply want to add autumnal charm to your home, these adorable coasters are the perfect handmade touch. They’re quick to make, great for gifts, and wonderfully decorative for fall tablescapes.
Creating Crochet pumpkin coasters is more than just following a pattern — it’s a creative process that allows you to bring warmth and personality into your space. They offer a balance of practicality and style, protecting your surfaces while adding a seasonal pop of color and texture. Even better, they’re beginner-friendly and can be customized in endless ways.
In this article, we’ll walk you through everything you need to know about making your own Crochet pumpkin coasters – Pattern — from selecting the right materials, to shaping the pumpkin design, to ideas for personalizing your finished pieces. Let’s get hooked and celebrate the beauty of fall with every stitch!
1. Choosing Materials for Your Crochet Pumpkin Coasters
Before you dive into crocheting, it’s important to gather the best tools and materials to bring your Crochet pumpkin coasters – Pattern to life. The good news is that this project doesn’t require fancy equipment — just the basics and a little creativity.
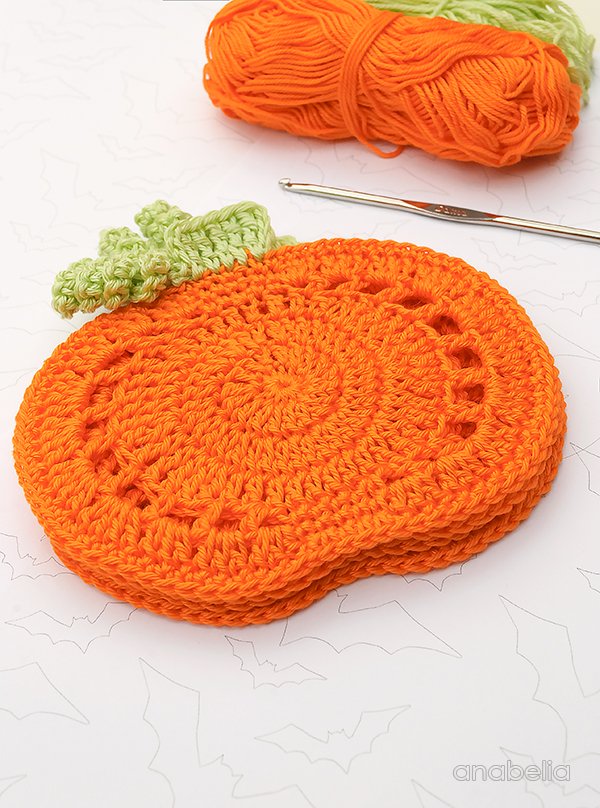
First, you’ll want to select a suitable yarn. Cotton yarn is ideal for coasters because it’s absorbent, durable, and holds its shape well. Choose vibrant fall shades like burnt orange, mustard yellow, forest green, or cream to capture the true spirit of autumn.
A crochet hook between 4.0 mm (G) and 5.0 mm (H) is usually best, depending on the yarn weight you choose. The goal is to create a tight enough stitch that your coaster is sturdy and lays flat on the table, without holes that might let moisture through.
You’ll also need a yarn needle or tapestry needle for weaving in ends. Since coasters are small and visible from all sides, clean finishing makes a big difference in the overall look of your work.
Keep scissors nearby for trimming yarn ends neatly. A good, sharp pair of small craft scissors will help avoid fraying and give your coasters a tidy edge.
Optionally, you might want to use stitch markers, especially if your pumpkin pattern has increases and rounds. They help keep your place and prevent errors in shaping.
Finally, some crafters like to block their coasters to ensure they lie flat. This isn’t mandatory, but it does give your final piece a professional, polished appearance that’s perfect for gifting or displaying.
2. Step-by-Step Guide to the Crochet Pumpkin Coasters – Pattern
Now that you have your materials ready, it’s time to begin working on the actual Crochet pumpkin coasters – Pattern. Most pumpkin coasters are made in the round and shaped with increases and a bit of creative stitching.
Start with a magic circle, or chain 4 and slip stitch to form a ring. Into this ring, you’ll begin working your first round, typically using double crochet or half double crochet stitches to build a circular base.
Increase each round by adding extra stitches evenly spaced throughout. This is what allows your coaster to grow outward into a smooth, flat circle. For a pumpkin shape, you may also incorporate slight variations in your increases to create soft ridges or curves.
After about 4–5 rounds, your coaster will be about the size of a palm. Now you can begin to shape the pumpkin lobes. This is usually done by using post stitches or slight indentations between sections to mimic the ridges found on real pumpkins.
To make it more pumpkin-like, add a small stem at the top. This can be as simple as chaining a few stitches and slip stitching back, or creating a tiny rectangle or loop that resembles a stalk. You can also add a small green leaf or curly vine with simple chain and slip stitches.
Once you’re happy with the shape, fasten off and weave in your ends securely. If needed, block the coaster using a light steam to flatten any curling edges and help define the shape.
Repeat the pattern to make a full set of pumpkin coasters — perfect for fall parties, cozy dinners, or handmade gifts that show you care.
3. Fun Ways to Customize Your Pumpkin Coasters
One of the best things about the Crochet pumpkin coasters – Pattern is how customizable it is. You can easily modify the design, colors, or even the texture to make each coaster unique.
Start with color variations. While orange is the classic choice, consider making pumpkins in white, yellow, or even deep plum for a decorative twist. A neutral color palette looks sophisticated and pairs well with modern table settings.
Play with yarn textures. A thick, nubby yarn gives a rustic farmhouse vibe, while smooth mercerized cotton lends a cleaner, polished finish. Just make sure your yarn is absorbent if the coaster will be used for drinks.
Add faces or designs to your pumpkins. Using simple embroidery, you can turn your coasters into mini jack-o’-lanterns for Halloween, or add initials, leaves, or polka dots for a more playful touch.
Experiment with shapes — instead of a flat round coaster, try making a puffier version by working in the round with tighter tension or stuffing a little fiberfill inside for a 3D plush effect (great for décor, not for actual drink use).
You can also connect several pumpkin coasters with chains or cords to create a table runner or garland. This makes a beautiful centerpiece or mantle decoration for the fall season.
Lastly, mix and match patterns. Combine your pumpkin coasters with leaf motifs, acorns, or sunflowers for a full autumn-inspired crochet set that adds warmth and charm to your space.
4. Tips for Perfecting Your Crochet Pumpkin Coasters
Even a simple project like the Crochet pumpkin coasters – Pattern can benefit from a few expert tips to ensure clean, polished, and long-lasting results. These small adjustments can elevate your handmade items to a professional level.
Always check your gauge before you begin. While coasters are small, consistent size matters if you’re making a matching set. You want each one to be uniform and functional.
Use tight tension for better structure. Loose stitches can make your coasters floppy and uneven. Adjust your hook size if needed to ensure a firm, durable finish that holds up to regular use.
Try working in a spiral rather than joined rounds. This eliminates the visible seam that can form in traditional round construction. Use a stitch marker to track the start of each round if you choose this method.
Block your finished coasters, especially if you notice curling or uneven edges. Light steam and careful pinning can help the pumpkin shape set properly and maintain a flat surface.
Weave in ends carefully and invisibly. Since coasters are viewed from both sides, clean finishing will ensure your project looks neat and professional from every angle.
If giving your coasters as gifts, consider pairing them with a handmade mug cozy or small basket. This thoughtful presentation makes the gift extra special and showcases your talent.
FAQ: Crochet Pumpkin Coasters – Pattern
Q1: Is the Crochet pumpkin coasters – Pattern suitable for beginners?
Yes! This pattern is beginner-friendly. It mainly uses basic stitches like single, half double, and double crochet, with simple shaping techniques.
Q2: What’s the best yarn to use for pumpkin coasters?
Cotton yarn is highly recommended because it’s absorbent and holds shape well. It also washes easily, which is ideal for items like coasters.
Q3: How long does it take to make one coaster?
Most crocheters can finish one pumpkin coaster in 30 to 45 minutes. They’re perfect for quick projects or last-minute gifts.
Q4: Can I wash these coasters?
Yes, if made with cotton yarn. You can hand wash or machine wash on a gentle cycle. Lay flat to dry to maintain their shape.
Q5: Can I sell coasters made with this pattern?
Absolutely. Handmade coasters are popular items at craft fairs and online shops. Just be sure to credit the pattern designer if applicable.
Q6: Can I make different sizes of coasters with this pattern?
Yes! You can adjust the size by changing your hook size or adding extra rounds before shaping the pumpkin. Great for matching sets.
Conclusion
The Crochet pumpkin coasters – Pattern is a fun, fast, and festive way to bring the spirit of fall into your home. With just a few simple stitches and some autumn-colored yarn, you can create beautiful handmade coasters that are as functional as they are decorative.
We’ve covered everything you need to start your project — from choosing materials, following the step-by-step pattern, customizing your design, and finishing like a pro. Whether you’re making a single coaster for yourself or a full set for friends and family, you’re sure to enjoy the process and the cozy seasonal results.