Creating a crochet square yoke to your desired size – pattern is an empowering and creative journey for any crochet enthusiast. Whether you’re new to garment construction or an experienced crafter looking for more flexibility in your designs, this method gives you the freedom to shape your project exactly how you want it. From custom-fitted tops to beautifully structured sweaters, square yokes offer a timeless structure that works with virtually any body type.
The beauty of the crochet square yoke to your desired size – pattern lies in its adaptability. Unlike fixed-size patterns, which often don’t account for every individual’s measurements or preferences, this method allows you to take control. Want a wider neckline? Need extra room in the sleeves? It’s all within your reach once you understand how the square yoke works and how to adjust it based on your needs.
In this article, we’ll guide you step-by-step on how to design, shape, and crochet your square yoke. From understanding measurements to pattern customization, you’ll learn everything you need to successfully create a crochet square yoke that fits you or your client perfectly. By the end, you’ll not only master the structure, but you’ll also gain insights into practical modifications for your ideal fit.
1. Understanding the Structure of a Crochet Square Yoke
A crochet square yoke is built from the top down, beginning at the neckline and expanding outward in four directions to form a square or rectangular shape. Each corner represents an increase point that helps shape the garment evenly.
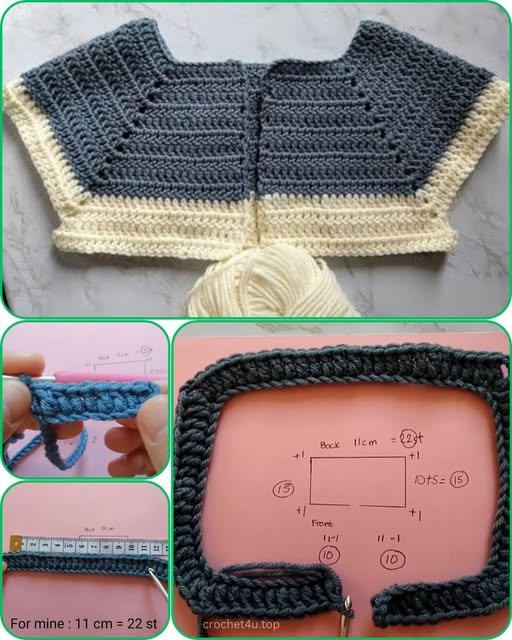
The square yoke starts with a foundation chain or magic ring, depending on the pattern style. The first round is crucial—it determines the neck opening. By increasing at the corners, the square begins to take shape. This layout naturally creates the front, back, and sleeves of your garment.
You can adjust the number of stitches in each section depending on your desired size. For example, if you want more room in the front panel, simply allocate more stitches to that area. This makes the square yoke technique highly customizable.
A key part of achieving your desired size is using a gauge swatch. Crochet a small sample using your chosen yarn and hook, then measure how many stitches and rows fit within a certain area. This helps you predict the final size and avoid surprises later.
Once the yoke reaches the underarm level, it’s time to separate for the body and sleeves. This is often done by chaining a few stitches under each arm and skipping the sleeve sections during the next round. From here, you can continue with the body and sleeves separately.
This top-down method allows you to try on the garment as you go, ensuring a perfect fit. It’s a beginner-friendly technique that provides endless design possibilities and serves as a foundation for countless crochet garments.
2. Choosing the Right Yarn and Hook Size
Selecting the correct yarn and hook for your crochet square yoke to your desired size – pattern is essential. The right combination will not only affect the overall look and feel of the piece but also the fit and drape.
When making wearable items like tops or sweaters, lightweight yarns such as cotton, bamboo, or soft acrylic blends work best. These provide breathability and a nice drape without adding unnecessary bulk.
Hook size plays a critical role in achieving the correct gauge. A larger hook creates a looser, more relaxed fabric, while a smaller hook yields a tighter, more structured result. Always test your gauge before starting your yoke to ensure it matches the pattern or your intended measurements.
Consider your climate and purpose for the garment. If you’re making a summer top, go for breathable, plant-based yarns. For cozy winter wear, opt for wool or wool blends that provide warmth and structure.
Yarn texture also impacts the final outcome. Smooth yarns show off stitch definition well, making your increases and corners stand out. Avoid fuzzy or novelty yarns if you’re new to square yokes, as they can hide stitch placement and make adjustments harder.
Another tip is to choose yarn with a bit of stretch if you’re aiming for a snug but comfortable fit. This helps your finished piece maintain its shape without feeling too tight around the neck or shoulders.
Lastly, make sure to purchase enough yarn from the same dye lot. Running out mid-project and trying to match colors can be frustrating and may ruin the uniform look of your crochet square yoke.
3. Measuring and Adjusting to Your Desired Size
One of the best things about a crochet square yoke to your desired size – pattern is the ability to personalize your fit through accurate measurements and thoughtful adjustments.
Start by measuring your neck circumference, shoulder width, and bust size. These three measurements will guide how many stitches and rows you’ll need to complete the yoke before dividing for the sleeves.
It’s a good idea to sketch out your square on paper and allocate stitch counts for the front, back, and each sleeve. This gives you a visual reference and helps avoid confusion when crocheting your rounds.
When you reach the underarm point, check if the square matches your bust size plus some ease (extra room for movement). If it’s too tight or loose, adjust by adding or removing rows before separating for sleeves.
To get a custom sleeve width, adjust the number of stitches in the sleeve sections. You can also add increases in the sleeves after separation if more room is needed later.
The neckline shaping can be altered by adding foundation chains or by modifying the first round. If you want a wider neckline, increase the initial chain count and redistribute stitches accordingly.
Don’t forget to try on your project frequently. One of the greatest advantages of top-down crochet is the ability to test the fit throughout the process. This ensures you’re always working toward your desired outcome.
4. Styling Ideas and Pattern Variations
Now that you understand the basic structure of the crochet square yoke to your desired size – pattern, it’s time to explore how you can style and modify it for different looks and occasions.
Try experimenting with stitch patterns within the square yoke itself. Instead of plain double crochets, use shell stitches, mesh designs, or popcorn stitches to create texture and personality.
Color changes can dramatically enhance the yoke’s design. Use self-striping yarns for an effortless color transition or switch colors manually for bold, graphic effects.
Want to create a crochet dress or tunic? Simply continue crocheting the body in rounds or rows until the desired length is achieved. Add shaping if needed by using decreases at the waist or hips.
You can also turn your square yoke into a boho-style top by adding fringe, lace sleeves, or an open back. The versatility of the pattern makes it easy to adapt to your personal taste.
If you’re into layering, consider making your yoke into a crochet poncho or capelet. Just stop at a shorter length and add a decorative border. This makes for a stylish accessory during cooler months.
Lastly, don’t forget about embellishments like buttons, appliqués, or beadwork. These small details can elevate a simple piece into a show-stopping handmade garment that reflects your unique style.
FAQ: Crochet Square Yoke to Your Desired Size – Pattern
Q1: What is a crochet square yoke?
A square yoke is a top-down crochet technique where increases at four corners shape the neckline, body, and sleeves of a garment, forming a square or rectangular shape.
Q2: Can beginners make a crochet square yoke?
Yes, it’s very beginner-friendly. As long as you can work basic stitches and increases, you can easily follow or adapt a square yoke pattern.
Q3: How do I adjust the yoke for different sizes?
Measure your neck, bust, and shoulders, then adjust the number of stitches and rounds accordingly. You can add more rows or increase at specific sections for a better fit.
Q4: What type of yarn is best for square yokes?
Lightweight yarns like cotton or bamboo are great for warm weather, while wool blends work well for winter garments. Choose yarn that drapes nicely and suits your project.
Q5: Can I add sleeves later?
Absolutely. After separating for sleeves, you can return to them at any time. You can crochet short, long, or even puffed sleeves depending on your style.
Q6: How do I avoid the yoke being too tight?
Always make a gauge swatch before starting. Also, try on your work as you go and add rows or stitches where needed to ensure a comfortable fit.
Conclusion
Creating a crochet square yoke to your desired size – pattern is more than just following instructions—it’s about embracing flexibility, creativity, and personalization in your projects. You’ve learned how to measure, choose yarn, adjust stitch counts, and style your finished garment to match your vision.
This method is perfect for crafters who value customization and want garments that truly fit and flatter. If you found this guide helpful, please leave a sincere opinion and any suggestions for future articles or tutorials you’d like to see.
Happy crocheting!