The Ratchet block – Pattern is a dynamic and classic quilt block design that has stood the test of time. Known for its bold appearance and intriguing construction, this pattern brings a sense of movement and depth to any quilt project. Whether you’re a beginner or an advanced quilter, exploring the Ratchet block offers both creativity and precision in your quilting journey.
At first glance, the Ratchet block may look like a variation of a pinwheel or churn dash, but its unique geometry sets it apart. Typically composed of half-square triangles, rectangles, and squares, the Ratchet block – Pattern allows for beautiful symmetry and stunning color play. Its versatility makes it a popular choice for full quilts, borders, or as a standout block in samplers.
One of the most exciting aspects of the Ratchet block is how easily it can be adapted to different styles. Whether you’re working in bright modern solids or vintage reproduction prints, the block’s strong lines and angles let you create high-contrast, eye-catching designs. In this article, we’ll explore how to construct the Ratchet block – Pattern, different layout ideas, fabric tips, and how to finish your quilt with finesse.
1. Understanding the Structure of the Ratchet block – Pattern
The Ratchet block – Pattern is built on a simple grid, usually a 3×3 or 4×4 layout, depending on the version you choose. While it may appear complex at first, it uses very beginner-friendly units like half-square triangles (HSTs) and rectangles that are easy to assemble with basic quilting tools.
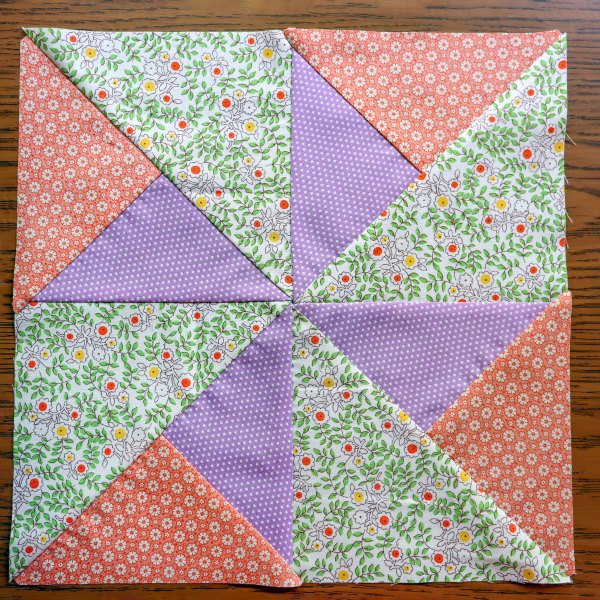
The center square typically forms the visual anchor of the block. You can use a solid fabric for a clean look or fussy cut a printed motif to create a focal point. This small detail can bring character to the entire quilt.
Around the center, the surrounding units often alternate between HSTs and rectangles or squares, forming what looks like rotating blades or a turning mechanism—hence the name “ratchet.” This spinning effect gives the Ratchet block – Pattern a sense of energy and movement.
To get crisp points and clean lines, accuracy in cutting and piecing is essential. Always use a rotary cutter and a quilting ruler, and double-check measurements before sewing. Even small misalignments can affect the balance of the final block.
Pressing seams consistently—either to one side or open—will help the pieces nest better and reduce bulk. This will also make quilting the finished top much easier. A well-pressed block enhances the overall look and feel of your quilt.
Once you’ve mastered the basic layout, you can start experimenting with variations. Try flipping triangle directions or using gradient fabrics to create optical illusions and dynamic patterns across your quilt top.
2. Fabric Selection and Color Play for Maximum Impact
Choosing the right fabrics is key to making the most out of your Ratchet block – Pattern. The block’s angular structure naturally creates contrast zones, making it an ideal pattern for playing with bold prints and high-contrast solids.
Start by selecting a color scheme. Classic combinations like red and white, navy and cream, or black and gold can create a timeless look. For something more modern, try a monochrome palette with varying shades of one color or a rainbow layout using a different hue in each block.
Fabric placement matters a lot in this pattern. The background fabric should be neutral or low-volume to allow the “blades” of the ratchet design to stand out. Avoid busy prints for the background, as they can distract from the pattern’s shape.
Use bold or directional prints for the triangle components to enhance the spinning effect. Stripes, chevrons, or small geometric patterns work particularly well in the triangles, as they emphasize movement.
Scrappy versions of the Ratchet block – Pattern can also be incredibly striking. Use coordinating scraps from other projects or fat quarters from the same fabric line to maintain harmony. This is a great way to use your stash while still creating a cohesive design.
Don’t forget to audition your fabric choices. Lay your cut pieces on a design board or flat surface to see how the colors interact before sewing. Taking a black-and-white photo can help you assess value contrast, which is just as important as color.
3. Assembling the Ratchet block – Pattern with Precision
Once you’ve chosen your fabrics and cut your pieces, it’s time to bring your Ratchet block – Pattern to life. This part of the process is both technical and creative, requiring attention to detail but also allowing room for variation.
Begin with your half-square triangles. If your pattern calls for 4 at a time, use the two-at-a-time HST method to speed things up. Draw a diagonal line on the back of a square, sew ¼ inch on either side, and cut along the line. Press open and trim to size.
Next, piece your rectangles and center square. Lay everything out before sewing to make sure your orientation is correct. With patterns like the Ratchet block, even a small mistake in direction can throw off the entire symmetry.
Sew the block together in rows, being mindful of your seam allowance. A consistent ¼ inch seam is critical for blocks to line up properly when you join them in a quilt. If you’re having trouble, consider using a seam guide or specialty presser foot.
Once your rows are complete, join them together to finish the block. Press the seams carefully, making sure they lie flat and don’t create unnecessary bulk. This will help your quilting needle glide through all the layers when you’re finishing the quilt.
Test your completed block for squareness. It should measure exactly as the pattern dictates, usually 12.5″ x 12.5″ before joining to other blocks. If it’s off by more than ⅛”, double-check your seam allowances and pressing technique.
Repeat the process for as many blocks as your quilt design requires. You can create a grid of identical blocks or mix in complementary designs to break up the layout and keep the eye moving.
4. Creative Ways to Use the Ratchet block – Pattern in Quilting Projects
One of the best things about the Ratchet block – Pattern is how versatile it is across different types of quilting projects. While it’s often used in traditional quilts, you can adapt it to many other creative sewing ideas.
For a full-size quilt, repeat the same Ratchet block in different colorways and arrange them in a grid layout. This creates a dynamic, rhythmic design that feels cohesive but not repetitive. Add sashing or borders to give each block breathing room.
Mini quilts and wall hangings are also excellent uses for this pattern. One or two well-designed Ratchet blocks with a bold border can make a stunning art piece for your sewing room, hallway, or even seasonal décor.
Throw pillows are another fun option. A single Ratchet block – Pattern in the center of a pillow cover creates a modern yet traditional aesthetic. Use high-contrast fabrics and hand quilting for a boutique look.
Table runners and placemats allow you to showcase the pattern in a smaller, functional format. Make a row of blocks in coordinating colors, and bind the edges with a bright accent fabric to tie the project together.
If you’re a bag maker, consider incorporating a Ratchet block into the front panel of a tote or zipper pouch. It adds interest and turns your everyday accessory into a conversation starter.
Finally, mix the Ratchet block with other traditional quilt blocks like Ohio Star or Log Cabin for a sampler quilt. This lets you explore different techniques while giving your quilt a rich, historical feel.
FAQ: Ratchet block – Pattern
Q1: What is the finished size of a standard Ratchet block?
Most commonly, the block finishes at 12″ square, but it can be resized to fit your project. Just adjust the individual components proportionally.
Q2: Is the Ratchet block – Pattern suitable for beginners?
Yes, it’s beginner-friendly, especially if you’re already comfortable with half-square triangles and basic piecing. Accuracy is key, but the steps are straightforward.
Q3: Can I make a scrappy version of the Ratchet block?
Absolutely! Scrappy versions look beautiful and give the quilt more personality. Just ensure there’s enough contrast between your fabrics to keep the design visible.
Q4: What tools do I need to make a Ratchet block?
Basic quilting tools like a rotary cutter, cutting mat, quilting ruler, sewing machine, and iron are sufficient. A seam guide can also help with accuracy.
Q5: How do I press the seams when making this block?
You can press seams open or to one side, depending on your preference. Many quilters press to the dark side or open for flatter results in layered areas.
Q6: Where can I find templates for the Ratchet block – Pattern?
Templates and tutorials are widely available on quilting blogs, YouTube, and online pattern shops. Many offer downloadable PDFs for free or purchase.
Conclusion
The Ratchet block – Pattern is a timeless and bold quilt block that combines visual movement with straightforward construction. From choosing your fabrics to finishing the final stitch, each step in creating this block offers opportunities to grow as a quilter and artist. Its strong lines and versatile applications make it perfect for quilts, home décor, accessories, and more.
Whether you’re working with new fabrics or giving your scraps a fresh purpose, this pattern allows you to create something both meaningful and beautiful. We hope this guide has inspired
you to try the Ratchet block in your next project. Feel free to leave your honest opinion and any suggestions — we’d love to hear about your experience and ideas.
Would you like this in a format ready for WordPress or blog upload?