If you’re looking for a creative, satisfying, and eye-catching sewing project, the Patchwork Hanging Star – Pattern is a perfect choice. This delightful piece of patchwork art is ideal for quilters and crafters of all levels who want to add charm to their home décor. Whether you’re decorating for the holidays or simply love handmade textile art, this project will allow you to express your creativity in a fun and meaningful way.
The Patchwork Hanging Star – Pattern is more than just a decorative item. It can be customized for various seasons, used as a thoughtful handmade gift, or even turned into an heirloom piece passed down through generations. With the right combination of fabric and technique, your star will not only catch the eye—it will tell a story. Each fabric piece can reflect a memory, mood, or theme, giving the star a personal touch that no store-bought decoration can match.
In this article, we’ll explore everything you need to know about creating your own Patchwork Hanging Star – Pattern. From understanding the structure and choosing fabrics to assembling the star and displaying it beautifully, you’ll learn how to turn a simple idea into a cherished piece. Let’s dive into the magic of patchwork and learn how to turn small fabric scraps into something truly spectacular.
1. Understanding the Structure of the Patchwork Hanging Star – Pattern
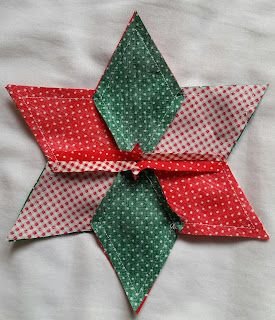
The basic structure of a Patchwork Hanging Star – Pattern usually consists of several diamond or triangle-shaped fabric pieces arranged in a symmetrical star formation. While it may look intricate, the actual construction can be quite simple once you break it down into manageable units.
Most commonly, the star is made using six or eight fabric points that radiate out from a central joining point. These points can be constructed using paper piecing, traditional patchwork piecing, or templates, depending on your preferred method. Each point of the star typically includes multiple segments or fabric scraps sewn together to create a colorful, eye-catching design.
The central point where all the star arms meet is crucial for achieving a clean and professional finish. It requires precise sewing and alignment to make sure the star remains symmetrical and visually balanced. Beginners may want to practice with a few test pieces before assembling the final star.
To reinforce the star and maintain its shape over time, many quilters add a layer of batting and backing fabric, essentially turning the star into a small quilted panel. This not only adds texture and dimension but also makes the piece more durable for long-term display.
Once completed, the star can be quilted with simple straight lines or decorative stitching. This step adds both strength and beauty to the final product. The quilting lines can follow the shape of the star, radiate outward, or create geometric patterns that enhance the overall design.
Finally, a hanging loop is sewn into the top corner of the star, allowing it to be easily hung on walls, doors, mantels, or trees. Whether you choose ribbon, twine, or fabric strips for the loop, it should be strong enough to support the weight of the star.
2. Choosing Fabrics and Colors for Your Patchwork Star
Fabric selection is one of the most enjoyable and important parts of creating a Patchwork Hanging Star – Pattern. Since the star is made from smaller pieces, it’s a perfect project for using up scraps or fat quarters in your collection. The goal is to create a design that is visually cohesive yet vibrant.
Start by deciding on a color scheme or theme. Do you want a winter holiday star with reds, greens, and golds? A rustic farmhouse star with earthy tones? Or maybe a bright spring star with pastels and florals? Your color choice will set the tone for the entire piece.
Mixing patterns is part of the fun. Pair solids with florals, polka dots with stripes, or plaids with geometrics. Just make sure there’s a balance between busy prints and more neutral designs so the star doesn’t feel too chaotic. Using one or two unifying colors can help tie everything together.
Pay attention to value contrast. High contrast between light and dark fabrics will help emphasize the shape of the star and make each point stand out. If all your fabrics are too similar in value, the star may lose its definition.
Consider using metallic or textured fabrics sparingly for a touch of sparkle or luxury. These can be used in the center of the star or at the tips to draw the eye and add interest.
Pre-wash your fabrics before sewing to prevent shrinkage and bleeding, especially if you’re using reds or dark blues. This ensures your Patchwork Hanging Star – Pattern will stay vibrant and crisp for years to come.
Lay out your fabric choices in the star shape before cutting or sewing. This allows you to experiment with placement and get a feel for how the finished piece will look. Take a photo of the layout for reference as you start assembling the star.
3. Assembling and Sewing Your Patchwork Hanging Star
Once you’ve gathered your fabrics and planned your design, it’s time to bring your Patchwork Hanging Star – Pattern to life. This part of the process involves cutting, piecing, pressing, and quilting—all the hands-on steps that make quilting so rewarding.
Begin by cutting your fabric pieces according to the template or pattern you’re using. Accuracy is crucial here. Use a rotary cutter and quilting ruler to ensure clean edges and consistent shapes. Even small differences in size can affect the symmetry of the final star.
Next, sew the individual segments of each star point. This often involves chain piecing—sewing multiple units at once to save time. Press the seams carefully after each step, either open or to one side depending on the bulk of the fabric.
Once the points are complete, sew them together in pairs, then combine all sections around the center. This is where precise alignment is key. Use pins or clips to hold pieces in place before stitching. Go slowly and carefully at the center to avoid puckering.
After the star is assembled, layer it with a piece of batting and backing fabric, just like a mini quilt. Baste the layers using pins or spray adhesive to keep them from shifting during quilting.
Quilt the star using your preferred method. Straight-line quilting works well for a clean, modern look, while hand quilting adds a traditional, handcrafted feel. Stitching around the outer edges of the star can also help define its shape and give it extra strength.
Finally, trim any excess batting or backing, finish the edges with bias binding or a turned edge, and attach a hanging loop. Your Patchwork Hanging Star – Pattern is now ready to shine!
4. Display Ideas and Creative Uses for Your Patchwork Star
The beauty of the Patchwork Hanging Star – Pattern lies not only in its design but also in its versatility. Once completed, your star can become a stunning part of your home décor or a thoughtful gift for someone special.
One of the most popular uses is as a wall hanging. A group of stars in different sizes and colors can create a festive or seasonal gallery wall. Hang them with command hooks, decorative nails, or even wooden dowels for a rustic look.
During the holiday season, use your star as a tree topper or ornament. Smaller versions can be strung together to make a charming garland. Add bells or buttons for a whimsical, festive touch.
The star also makes a lovely addition to a gift package. Use it as a reusable gift tag or ornament attached to the ribbon. This small gesture adds a handmade element to your present and shows extra thoughtfulness.
For a more functional use, turn your star into a coaster, hot pad, or even a centerpiece mat. Just use heat-resistant batting and ensure it’s quilted densely enough to withstand wear and tear.
If you’re into handmade markets or craft fairs, Patchwork Hanging Stars are a wonderful product to sell. They’re quick to make, unique, and appeal to people looking for handmade holiday or home décor.
You can also incorporate your star into larger quilting projects. Use it as a block in a quilt, a pocket on a tote bag, or an applique on a pillow cover. The possibilities are endless once you’ve mastered the basic pattern.
FAQ: Patchwork Hanging Star – Pattern
Q1: Is the Patchwork Hanging Star – Pattern beginner-friendly?
Yes, it’s an excellent project for beginners. The shapes are simple, and it’s a great way to practice piecing and quilting on a small scale.
Q2: What size should my finished hanging star be?
It depends on your pattern. Common sizes range from 6″ to 12″, but you can easily scale the template up or down depending on your project needs.
Q3: Can I make this using only fabric scraps?
Absolutely! The Patchwork Hanging Star – Pattern is perfect for using leftover fabric pieces, especially fat quarters, charm squares, or even smaller scraps.
Q4: How do I make sure my star points align perfectly?
Precision in cutting and consistent seam allowances are key. Use pins or clips to hold pieces in place and go slowly when sewing around the center.
Q5: What type of batting should I use?
Use low-loft cotton or polyester batting. If the star will be used as a hot pad, opt for heat-resistant batting like Insul-Bright.
Q6: Can I machine wash the finished star?
Yes, but it’s best to hand wash or use a delicate cycle, especially if you’ve used decorative or metallic fabrics. Always air dry to
maintain shape.
Conclusion
Creating a Patchwork Hanging Star – Pattern is a wonderful way to enjoy the art of quilting in a small, manageable format. Whether you’re decorating your home, crafting a holiday keepsake, or making gifts, this versatile project is both fun and rewarding. From selecting fabrics to final stitching, each step offers an opportunity to personalize your work and express your style.
We hope this guide has inspired you to try your hand at this beautiful pattern. If you do, please leave your honest opinion and share your suggestions. We’d love to see how your patchwork stars turn out and learn from your creative ideas!
Would you like this article exported for easy upload to WordPress or another blog platform?