If you’re searching for a fun, fast, and fashionable project, this Crochet Lovely Hair Bow – Pattern is just what you need. Whether you’re making accessories for yourself, your kids, or preparing items to sell at craft fairs, a crochet hair bow is a sweet and stylish choice that never goes out of trend. This small but beautiful accessory is a favorite among crocheters because of its simplicity and versatility.
Using the Crochet Lovely Hair Bow – Pattern, you can create a bow in less than 30 minutes with minimal materials. It’s an excellent project for beginners looking to practice their skills or for advanced crocheters seeking a relaxing craft that offers instant gratification. With just a few basic stitches, you’ll be able to make bows in various colors, sizes, and textures to match any outfit or hairstyle.
In this article, we’ll guide you through the process of making a Crochet Lovely Hair Bow – Pattern, from choosing the right yarn and hook to assembling and finishing your bow. We’ll also cover customization ideas and provide tips for selling or gifting these adorable accessories. Get your hook ready and let’s begin this creative journey.
1. Materials and Tools for the Perfect Bow
To create your Crochet Lovely Hair Bow – Pattern, you won’t need much. That’s one of the biggest advantages of this project—it’s affordable, quick, and uses up scrap yarn efficiently. The materials are likely already in your stash.
Start with a worsted-weight cotton or acrylic yarn. Cotton gives a clean and structured finish, while acrylic offers a bit more softness and flexibility. Choose colors that match the mood or season—pastels for spring, bold tones for summer, and rich shades for fall.
A 4.0 mm or 4.5 mm crochet hook works well with worsted yarn. However, you can adjust your hook size if you want tighter stitches or a different texture. Smaller hooks make firmer bows, while larger hooks create a softer, looser shape.
You’ll also need a yarn needle to weave in ends and possibly a hot glue gun or sewing needle if you’re attaching the bow to a hair accessory like a clip, barrette, or headband. A pair of scissors and a measuring tape will help you keep things neat.
Optional materials include elastic bands, alligator clips, or snap hair clips—these can be sewn or glued to the finished bow to make it wearable. You can also add embellishments like pearls, buttons, or even a crocheted flower center for extra flair.
Using quality materials helps the bow hold up better over time, especially if it will be worn frequently. With your tools and yarn ready, you’re all set to begin crafting your Crochet Lovely Hair Bow – Pattern.
2. Step-by-Step Crochet Instructions
The beauty of the Crochet Lovely Hair Bow – Pattern lies in its simplicity. The design can be completed using basic stitches, making it a great beginner project. You’ll be crocheting a simple rectangle and cinching the center to create the bow shape.
Begin by chaining a foundation row of about 25 stitches. This number can vary depending on the desired width of your bow. Turn your work and begin single crocheting across each stitch in the row.
Continue working in rows of single crochet until you’ve built a rectangle that is about twice as long as it is tall. A common size for a standard bow is approximately 4 inches wide by 2 inches tall. Adjust as needed based on your preference.
Once your rectangle is complete, fasten off and leave a long tail for sewing. Use the tail and a yarn needle to cinch the center of the rectangle by wrapping the yarn tightly around the middle several times. This creates the classic bow shape.
Secure the wrapped yarn with a knot and weave in any loose ends. If you want to hide the cinched section more neatly, you can crochet a small strip and wrap it around the center, sewing or gluing it in place.
Attach your bow to a clip, headband, or elastic using hot glue or by stitching it on securely. Your Crochet Lovely Hair Bow – Pattern is now complete and ready to wear or gift!
3. Customizing Your Hair Bows
What makes the Crochet Lovely Hair Bow – Pattern so popular is how easily it can be customized. Once you’ve mastered the basic design, you can explore endless variations to create bows that are uniquely yours.
Try experimenting with different yarn weights and textures. Bulky yarn creates oversized statement bows, while lace or fingering weight yarn results in dainty, delicate bows perfect for babies or pets.
Color changes add a fun twist. You can create striped bows by switching yarn colors halfway through your rows or make ombre effects using gradient yarn. Use festive colors for holidays or match school colors for themed accessories.
Incorporate different stitches like half-double crochet or double crochet to change the texture and appearance of your bow. These variations may also affect the flexibility and structure of the final product.
For an elegant finish, sew a pearl or decorative button at the center. You can also add small crocheted flowers or hearts to the middle or edges for an extra personal touch.
Make a matching set by creating smaller bows for earrings or a keychain and a larger one for the hair. This makes a wonderful gift set or product idea for a handmade shop.
Adding embellishments, altering the shape, and combining textures lets your Crochet Lovely Hair Bow – Pattern stand out and become something truly special.
4. Selling, Gifting, or Using Your Crochet Bows
The Crochet Lovely Hair Bow – Pattern isn’t just a cute project—it’s also a great opportunity to create handmade items that others will love. These bows are highly marketable and perfect for all ages.
When gifting, consider attaching your bow to a kraft paper card or placing it inside a small organza bag for a professional and thoughtful presentation. Include a care tag if the bow has embellishments or delicate yarn.
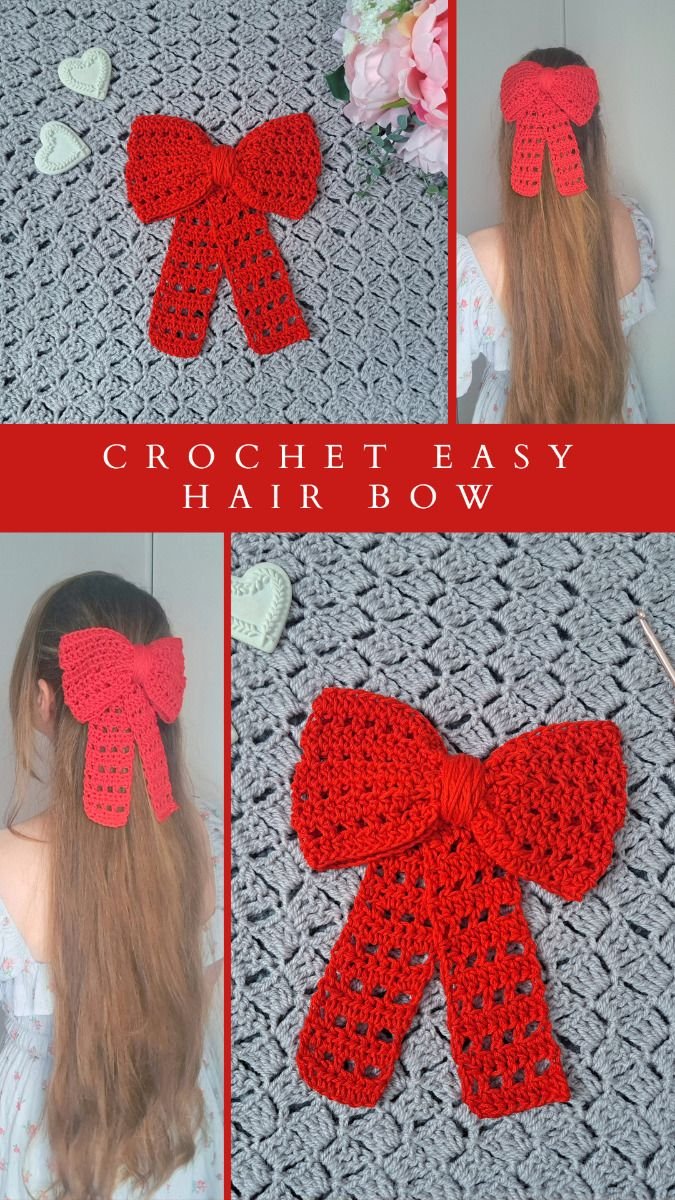
If you’re selling your bows at craft fairs or online, take clear, bright photos showing the size, colors, and how the bow can be worn. Display the bow clipped onto a model or mannequin to help buyers visualize its use.
Offer a variety of sizes, from newborn mini bows to oversized statement pieces for adults. Having options allows your products to appeal to a broader audience. Consider bundling several bows as gift sets or matching collections.
Pricing should reflect the time spent, materials used, and market trends. Many crafters successfully sell bows made from this Crochet Lovely Hair Bow – Pattern by keeping their designs fresh and seasonal.
You can also use your bows for other creative purposes—decorate gift wrap, use them as party favors, or attach them to bags and accessories for a personalized flair.
With a little creativity and attention to detail, your Crochet Lovely Hair Bow – Pattern can turn into a rewarding business or a thoughtful handmade gift that brings joy to others.
FAQ – Frequently Asked Questions
Q1: Is this pattern beginner-friendly?
A: Yes! The Crochet Lovely Hair Bow – Pattern uses basic stitches like chain and single crochet, making it perfect for beginners.
Q2: What is the best yarn for this project?
A: Worsted-weight cotton or acrylic yarn works best. Cotton offers more structure, while acrylic adds softness and flexibility.
Q3: How long does it take to make one bow?
A: Most crocheters can finish a bow in 20 to 30 minutes, making it an excellent quick project or gift idea.
Q4: Can I wash the crochet hair bow?
A: Yes, but it depends on the yarn and attachments. If your bow has embellishments or glue, hand-washing and air-drying is recommended.
Q5: How do I attach the bow to hair accessories?
A: You can sew or hot glue the bow to clips, barrettes, elastic bands, or headbands, depending on your desired use.
Q6: Can I sell bows made from this pattern?
A: Absolutely! Handmade bows are popular at markets and online. Just be sure to credit the pattern source if required by the designer.
Conclusion
The Crochet Lovely Hair Bow – Pattern is a simple yet satisfying project that’s perfect for beginners, busy crocheters, and anyone looking for a creative outlet. With just a small amount of yarn and basic tools, you can make beautiful bows that add a handmade touch to any outfit or gift.
This article walked you through everything from selecting materials and crocheting the bow to customizing it and turning it into a gift or product to sell. The flexibility and charm of this project make it a favorite in the crochet community.
If you try this Crochet Lovely Hair Bow – Pattern, we’d love to hear from you. Leave your honest opinion below and share any suggestions, ideas, or customizations you tried. Your feedback helps inspire others and keeps the creativity flowing!