Pumpkin quilt block – Pattern projects are a charming way to welcome the fall season and celebrate the cozy, colorful atmosphere that comes with it. Whether you’re an experienced quilter or a beginner looking for a festive project, the Pumpkin quilt block – Pattern offers an easy and enjoyable experience with visually stunning results. Perfect for seasonal décor, gifts, or larger quilt projects, this block can be as traditional or as modern as your creativity allows.
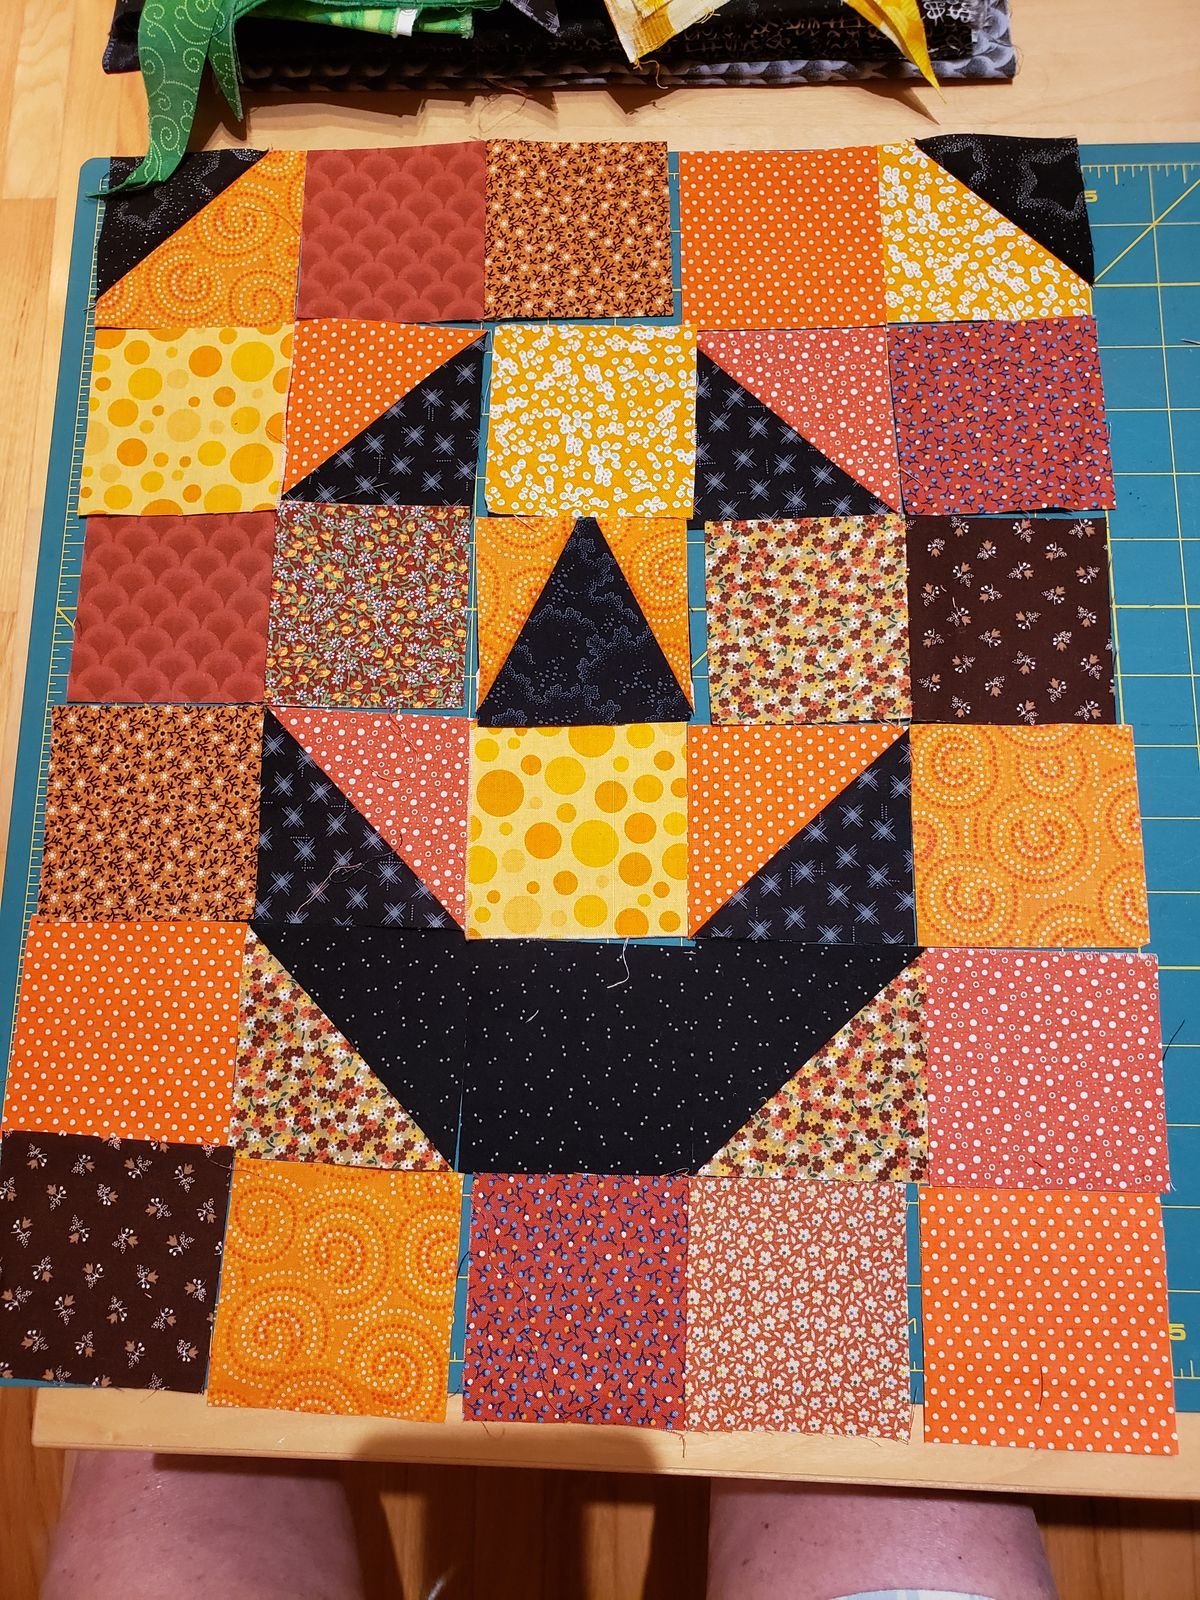
At the heart of any great quilt project is a solid pattern, and the Pumpkin quilt block – Pattern is no exception. It typically combines basic shapes like squares, rectangles, and half-square triangles to form the iconic pumpkin silhouette. The flexibility of the block allows for endless variation—changing fabrics, adjusting block sizes, or mixing in pieced borders can make each quilt unique and personalized.
The best part about using a Pumpkin quilt block – Pattern is its ability to adapt to your style. Whether you’re going for a farmhouse feel with soft creams and oranges or something bolder with modern prints, this pattern accommodates it all. In this article, we’ll walk you through the basics, materials needed, step-by-step techniques, and creative ideas to get the most out of your pumpkin quilt block journey.
1. Introduction to the Pumpkin Quilt Block – Pattern
The Pumpkin quilt block – Pattern is a favorite among seasonal quilters and fabric lovers because of its clear shape and strong visual impact. It’s often made using beginner-friendly construction techniques and can be completed relatively quickly compared to more intricate blocks. This makes it ideal for smaller projects like wall hangings, placemats, table runners, or even mini quilts.
One of the main benefits of this pattern is that it doesn’t require complex curves or advanced piecing. Most versions rely on straight seams and simple shapes, which allows quilters of all skill levels to achieve beautiful results without frustration. You’ll mostly work with squares, rectangles, and triangles—building the pumpkin shape and then adding details like stems or leaves if desired.
Many Pumpkin quilt block – Pattern variations are available online, including free templates and paid patterns with multiple size options. Some come with downloadable PDFs that include diagrams, fabric requirements, and assembly instructions. Be sure to choose one that fits your project size and personal style.
Another reason this block is so loved is the ability to showcase seasonal fabrics. From rustic ginghams and florals to Halloween prints and batiks, the pumpkin shape serves as the perfect frame for your favorite autumn fabrics. This is a great opportunity to dig into your fabric stash and get creative with combinations.
Because it’s a block-based pattern, it’s easy to repeat and scale. You can make a single block to hang on a wall, or you can sew multiple blocks together for a full-size quilt. You can even alternate pumpkin blocks with solid or pieced blocks for a dynamic quilt layout.
Finally, if you’re part of a quilting group or guild, the Pumpkin quilt block – Pattern is a great choice for group projects or seasonal swaps. Everyone can contribute their own block using the same dimensions, resulting in a beautiful, collaborative quilt that celebrates both fall and community spirit.
2. Materials and Tools for the Pumpkin Quilt Block – Pattern
Before diving into sewing, gather the essential tools and materials for your Pumpkin quilt block – Pattern. Start with your fabric choices. You’ll typically need orange fabrics for the pumpkin body, green or brown for the stem, and a background color—often white, cream, or black depending on the mood you want to create.
Use quilting cottons, as they’re sturdy, easy to press, and offer the best consistency for piecing. For a scrappier look, select a mix of orange prints for the pumpkin, or go with a single fabric for a more minimalist style. Fat quarters, fat eighths, or even charm squares can be great sources for your pieces.
Next, have a rotary cutter, cutting mat, and acrylic quilting ruler on hand for precise cuts. Accurate cutting is essential in quilt block construction, especially when working with half-square triangles or narrow stems that can be tricky to piece.
You’ll also need a sewing machine with a ¼-inch presser foot. Consistent seam allowances help your pieces align properly and avoid a wonky block. If your machine doesn’t have a built-in quarter-inch guide, mark it with washi tape or use a seam guide attachment.
Pressing tools are crucial. A hot iron with steam, a wool pressing mat, and a seam roller or tailor’s clapper will help your seams lie flat and keep your block looking clean and crisp. Press each seam as you go, which will improve your accuracy when assembling the block.
Don’t forget a few extra essentials: neutral thread (like light gray or beige), fine pins or fabric clips, a fabric-safe marking tool for any guidelines, and a starch spray if you’re working with loosely woven fabrics. All of these contribute to a smoother sewing experience and a better final result.
3. Step-by-Step Assembly Guide
To start your Pumpkin quilt block – Pattern, begin by cutting all required fabric pieces according to your chosen template. Most patterns will include a cutting chart, but common measurements include squares for the body, small rectangles for the sides, and a few triangles for angled edges or corners.
Start with the center of the pumpkin. This typically involves piecing together several orange squares or rectangles in a grid to form the rounded shape. You’ll attach these pieces using a standard ¼-inch seam, pressing each seam open or to the side depending on the pattern instructions.
Next, add corner triangles or rectangles to shape the pumpkin’s sides and give it a more defined look. These are often created using the “snowball” technique—placing a small square on a larger one, sewing diagonally, trimming the excess, and pressing it open to form a corner.
Once the pumpkin shape is complete, it’s time to attach the stem. This is usually a small brown or green rectangle or square positioned above the pumpkin body. In some variations, you’ll use half-square triangles to shape leaves or add detail to the stem area. This small detail adds a lot of charm.
After the main components are done, you’ll add background strips or squares around the pumpkin to frame the block and bring it to the correct size—typically 8″, 10″, or 12″ finished. This step also helps center your pumpkin and gives you room to quilt around it later.
Once your block is assembled, give it a final press, making sure all seams are flat and square. Double-check the block size and trim any excess if needed. If your block came out smaller than expected, don’t worry—you can always add a small border to bring it to the desired size for joining in a quilt.
4. Creative Ideas for Using Your Pumpkin Quilt Block
The Pumpkin quilt block – Pattern is incredibly versatile and can be used in a wide range of projects beyond traditional quilts. A single block can become a decorative pillow cover—just add a fabric backing, insert a pillow form, and you have instant fall home décor.
Another great option is turning your blocks into table runners. Line up three to five blocks in a row, add a border and backing, and quilt as desired. This makes a festive centerpiece for Thanksgiving or any autumn celebration.
You can also create small wall hangings or banners using just one or two blocks. Hang them by your front door, in your kitchen, or over the mantle to add a touch of seasonal charm. They’re quick to make and easy to change out as the seasons shift.
For a fun twist, try using unexpected colors. Who says pumpkins have to be orange? Use teal, pink, or even spooky Halloween prints to give your Pumpkin quilt block – Pattern a fresh and modern twist. This is also a great way to match your block to different décor styles.
Incorporate applique elements like stitched vines, leaves, or even jack-o’-lantern faces. These additions can be machine-stitched or hand-embroidered to give your block extra personality. Adding buttons or embellishments can also be a fun touch for smaller projects.
Finally, consider using your pumpkin blocks as part of a larger seasonal quilt. Combine them with other fall-themed blocks like acorns, leaves, or stars for a cohesive autumn quilt layout. Sashing and borders can help tie the design together and give each block space to shine.
FAQ
Q: What size is a standard Pumpkin quilt block – Pattern?
A: Most patterns offer blocks in 8″, 10″, or 12″ finished sizes, but you can adjust the scale as needed depending on your project.
Q: Can I make this block if I’m a beginner?
A: Yes! The Pumpkin quilt block – Pattern is beginner-friendly and a great way to practice basic piecing, pressing, and cutting techniques.
Q: Do I need to use only orange fabrics for the pumpkin?
A: Not at all. You can use any color you like—teal, rust, gold, even novelty prints. The pumpkin shape will still come through beautifully.
Q: Can I sew this block by hand instead of with a machine?
A: Yes, although it will take longer. Be sure to use small, consistent stitches and press frequently to keep your block aligned.
Q: How do I quilt the finished pumpkin block?
A: You can stitch in the ditch around the pumpkin sections, add echo quilting to highlight the shape, or use free-motion quilting for a more decorative look.
Q: Where can I find a free Pumpkin quilt block – Pattern?
A: Many quilting blogs, Pinterest boards, and fabric company websites offer free versions. Search for “free Pumpkin quilt block – Pattern” to find downloadable templates.
Conclusion
Creating a Pumpkin quilt block – Pattern is a delightful way to celebrate the season, use up your fabric scraps
, and make something handmade that brings joy. From gathering materials and sewing the block to exploring creative projects like pillows, runners, and quilts, this pattern is flexible and full of potential for makers of all levels.
Now that you’ve learned the techniques, tools, and ideas for the Pumpkin quilt block – Pattern, you’re ready to create something truly special. If you’ve made one, we’d love to hear your thoughts—leave a sincere comment below sharing your experience, what you learned, or ideas for future blocks. Your feedback helps build a stronger, more creative quilting community.