Nothing adds charm and heartfelt tradition to holiday décor like a handmade crochet angel ornament for Christmas tree – pattern. These delicate and graceful decorations represent peace, love, and joy—making them perfect symbols for the holiday season. Whether you’re crafting for your own tree, giving as gifts, or making keepsakes for loved ones, these little angels are a timeless expression of holiday spirit.
One of the most beautiful aspects of using a crochet angel ornament for Christmas tree – pattern is how versatile and meaningful each piece can be. You can make them as simple or detailed as you like, using different yarns, threads, and embellishments to match your holiday color scheme. Beginners and experienced crocheters alike will enjoy the creativity and satisfaction that comes with these quick and meaningful projects.
In this guide, we’ll walk you through everything you need to create your own crochet angel ornament for Christmas tree – pattern—from choosing the right materials and understanding the design to crocheting each part step by step. This is a perfect project to begin as the holidays approach and a wonderful way to bring homemade joy into your seasonal decorating.
1. Choosing Materials for Your Crochet Angel Ornament
Selecting the right materials is the foundation for a beautiful crochet angel ornament for Christmas tree – pattern. Your choices here will affect the look, texture, and durability of your finished piece.
Start with yarn or thread. For delicate and lacy angels, crochet thread (like size 10 cotton) is ideal. It creates fine detail and a light, airy appearance. If you prefer a more substantial ornament, use a light-weight yarn such as DK or sport weight in white, ivory, or metallics.
Choose the right crochet hook to match your material. For crochet thread, a steel hook size 1.5 mm to 2.0 mm works well. For yarn, a regular aluminum or ergonomic hook between 3.0 mm and 4.0 mm is typically recommended. A smaller hook keeps the stitches tight and the shape crisp.
You’ll also need a yarn needle for weaving in ends, scissors, and optional accessories such as ribbon, tiny beads, or glittery accents. These can be used to add halos, wings, or decorative elements once the crocheting is complete.
If your angel needs to stand up or hold its shape, consider stiffening the finished piece with a water-based fabric stiffener or a homemade mixture of glue and water. This gives your ornament structure and helps it hang perfectly on the tree.
Metallic yarns and sparkle threads can add an ethereal shimmer, making your angel catch the light among your tree’s ornaments. Just be aware that some specialty yarns can be tricky to work with—especially for beginners.
Once you’ve gathered your materials, you’re ready to dive into the design and start crafting your crochet angel ornament for the Christmas tree with love and care.
2. Understanding the Structure and Pattern Design
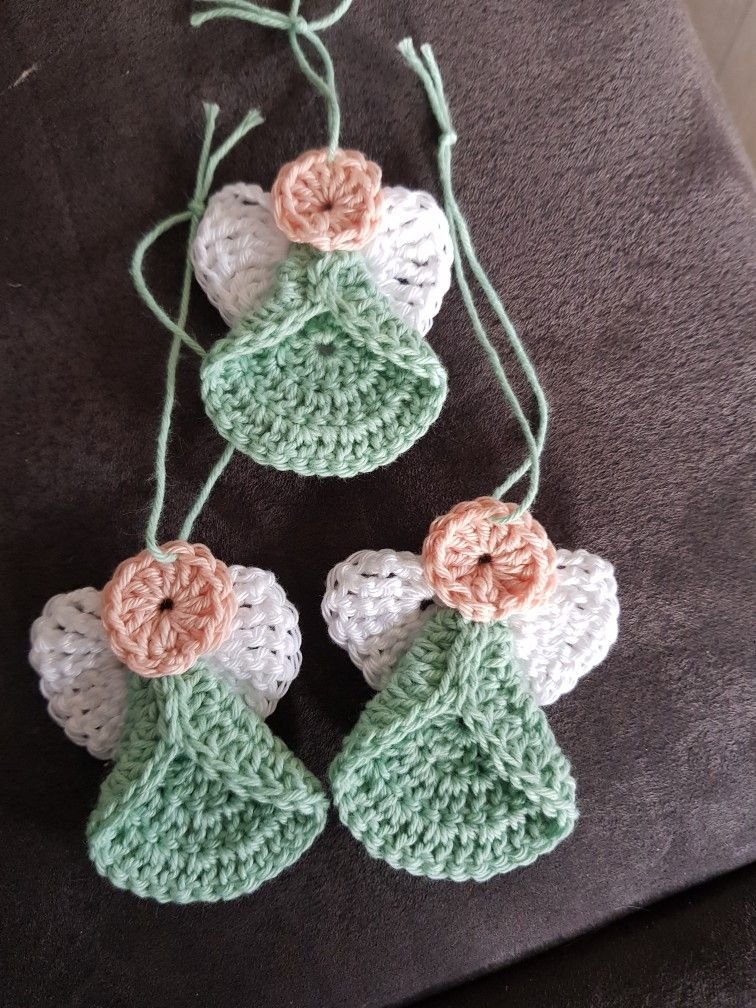
Before picking up your hook, it’s helpful to understand the basic components of a crochet angel ornament for Christmas tree – pattern. Most angels consist of a head, body (usually shaped like a cone or dress), wings, and sometimes arms or a halo.
The head is typically a small round ball, crocheted in the round using basic stitches like single crochet. You can stuff it lightly with fiberfill to keep its shape. Some crafters also use wooden beads or small felt balls for the head if they want a different look.
The body is the largest part and is usually made using an increasing pattern, starting at the neck and expanding outward into a bell or cone shape. Shell stitches, picots, or lace patterns can add texture and detail to the skirt.
Wings can be made separately and sewn or crocheted onto the back. Popular shapes include simple ovals, heart-like shapes, or even starbursts. Many patterns use chain loops or shell stitches to create the impression of feathers and movement.
For the halo, a small ring made of gold or silver thread adds a beautiful finishing touch. You can crochet it separately and stitch it to the top of the head, or use metallic wire for a lightweight alternative.
Some designs include outstretched arms or hands joined in prayer. These are often just small crocheted tubes or chain loops stitched under the angel’s head. They’re not necessary but do add personality to your ornament.
Once you understand how each piece works, it becomes easier to follow or even modify a crochet angel ornament for Christmas tree – pattern to fit your own vision and style.
3. Step-by-Step Crochet Instructions
Now, let’s get into the step-by-step process of crocheting a basic crochet angel ornament for Christmas tree – pattern. While patterns may vary, this structure offers a solid foundation for customization.
Step 1: Start with the Head
Begin with a magic ring and work 6 single crochets into it. Join to form a circle. Continue crocheting in the round, increasing evenly until you have a small sphere. Stuff lightly with fiberfill before closing the top. Fasten off and leave a long tail for sewing.
Step 2: Create the Body
Attach your yarn to the bottom of the head. Chain 2, and begin working half-double crochets or double crochets in the round, increasing as needed to form a bell shape. Continue for 10–15 rows depending on your desired length. You can switch to shell stitches to create a lacy effect at the bottom.
Step 3: Crochet the Wings
Make two identical wings using a separate piece of yarn. A common method is chaining 10, then working a row of single, half-double, and double crochets, then turning and working back to create a symmetrical wing. Finish with a picot or shell border if desired.
Step 4: Assemble the Pieces
Sew or crochet the wings onto the back of the body, placing them evenly on either side. Make sure they’re symmetrical and secure.
Step 5: Add Halo and Optional Arms
To create the halo, chain 12 with gold thread and join to form a ring. Stitch it to the top of the head using the yarn needle. Arms can be made with chain loops and sewn just under the head or across the front in a praying position.
Step 6: Block and Stiffen (Optional)
If your ornament needs more structure, block it by pinning it into shape and applying stiffener. Let it dry completely before hanging. Add a loop of yarn or ribbon to the top so you can hang your angel on the tree.
4. Customizing Your Angel Ornament
Once you’ve completed the basic crochet angel ornament for Christmas tree – pattern, you can have fun customizing it to suit different styles, themes, and personalities. This is where your creativity really shines.
Choose colors based on your holiday theme. Traditional angels are white or cream, but you can use pastels, gold, or even red and green for a festive twist. Metallic yarn adds sparkle and is perfect for elegant or formal tree styles.
Use beads or sequins for embellishment. Tiny seed beads can be sewn onto the wings or body to mimic stars or snowflakes. Pearls or crystal beads also add a touch of luxury and shine.
Add embroidery or surface crochet to give texture and extra details to the angel’s dress. Little hearts, snowflakes, or cross-stitch motifs can be added after the piece is completed.
Make sets of angels in different sizes for a tiered display. A smaller hook and thread make mini angels, while a larger hook and thicker yarn can create statement pieces for the tree or mantel.
If you’re gifting your crochet angel, include a printed tag with a sweet message or Bible verse. It adds a sentimental touch that makes the ornament feel extra special and keepsake-worthy.
For a rustic feel, use jute twine or natural cotton and avoid embellishments. This gives your angel a farmhouse style that’s simple and charming—perfect for a country-inspired Christmas theme.
FAQ – Crochet Angel Ornament for Christmas Tree – Pattern
Q1: Is the crochet angel ornament suitable for beginners?
Yes! Many basic patterns use simple stitches like single crochet, double crochet, and chain stitches. With practice, beginners can complete one easily.
Q2: What size should the finished ornament be?
Most crochet angel ornaments measure between 4 to 6 inches tall, but you can adjust the size by changing the yarn or hook size.
Q3: Do I need to stiffen the ornament?
Stiffening is optional but recommended if you want your angel to hold its shape better, especially if it’s made with thread or very fine yarn.
Q4: Can I use colored yarn instead of white?
Absolutely! Angels can be made in any color that matches your décor. White is traditional, but silver, gold, or pastels also work beautifully.
Q5: What’s the best way to hang the angel on the tree?
Add a loop of yarn, ribbon, or a small ornament hook at the top of the head or halo to hang your angel securely from the branch.
Q6: How long does it take to make one angel ornament?
Depending on the pattern complexity and your skill level, it can take 1–3 hours to complete one ornament.
Conclusion
In this guide, you’ve learned how to create a beautiful **crochet angel ornament for
Christmas tree – pattern**, starting from material selection to customization. This timeless holiday project brings warmth, beauty, and meaning to your decorations and gift-giving traditions.
Whether you’re making one angel or a dozen, each one carries the love and creativity you put into it. Don’t be afraid to personalize your design, try new embellishments, or even design your own pattern based on what you’ve learned.
If you found this guide helpful, please leave a sincere opinion in the comments below and share your ideas or suggestions for future patterns. We’d love to see your creations and hear about your holiday crafting journey. Happy crocheting and Merry Christmas!