If you’re diving into the world of crochet, learning a good crochet square – pattern is one of the most valuable skills you can master. Whether you’re making a cozy blanket, a stylish bag, or a decorative pillow, the humble crochet square can be the foundation for countless beautiful creations. These small yet versatile projects are ideal for both beginners and experienced crafters looking for quick wins and creative expression.
A well-made crochet square isn’t just practical—it’s deeply satisfying. These motifs can be as simple or as intricate as you like, and they’re easy to customize with colors, textures, and joining techniques. Once you’ve got the basics down, you’ll be able to mix and match square patterns to create unique pieces that reflect your personal style or seasonal themes.
In this article, we’ll explore how to make a basic crochet square – pattern, how to build on it with texture and color, ways to connect multiple squares into larger projects, and tips for customizing your own designs. Whether you’re stitching for fun, function, or fashion, crochet squares are a timeless and essential part of any crocheter’s toolkit.
1. Understanding the Basics of a Crochet Square – Pattern
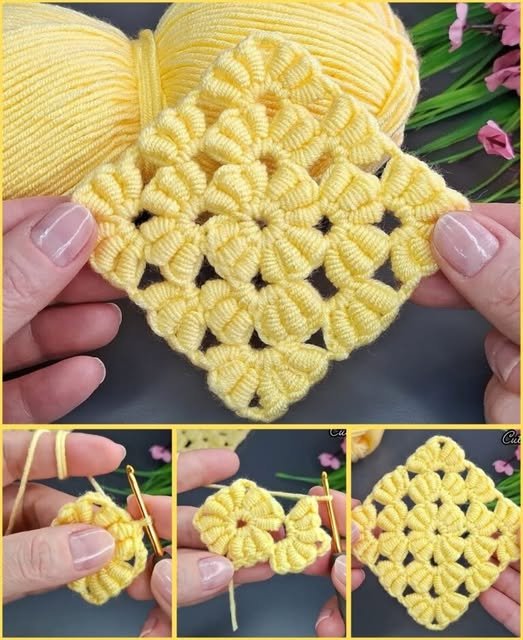
A crochet square – pattern typically begins with a small center and expands outward using repeated stitch patterns. One of the most well-known types is the classic “granny square,” which starts in the center and grows by working in rounds.
To get started, choose a medium-weight yarn and an appropriately sized hook—usually between 4mm and 5.5mm for worsted-weight yarn. These tools offer good control and produce squares that are easy to work with.
Start your square with a magic ring or a simple chain loop. This forms the center of your square. From here, work your first round—often consisting of clusters of double crochets (US terms) separated by chain spaces. These initial clusters will lay the foundation of the square’s structure.
In each subsequent round, you’ll increase the size of the square by adding more stitches between corners and continuing your chosen stitch pattern. The corners are typically formed by working multiple stitches into the same space, such as 3 double crochets, chain 2, and 3 more double crochets.
After a few rounds, you’ll have a neat and balanced square. You can stop here or continue expanding your square depending on your desired size. Be sure to count your stitches as you go to maintain symmetry and avoid warping.
Once the square is complete, fasten off your yarn and weave in the ends using a yarn needle. At this stage, many crocheters choose to block their squares by pinning them flat and steaming them lightly to ensure even edges and sharp corners.
2. Exploring Different Types of Crochet Square Patterns
Not all crochet squares are created equal. While the classic granny square is the most iconic, there are many other crochet square – patterns that bring different textures, shapes, and styles to your work.
The solid square is a great variation that offers a denser, warmer fabric. It replaces chain spaces with single or half-double crochets to create a more solid surface. These are ideal for items like bags, scarves, or warm throws.
Lacy squares, on the other hand, use openwork patterns like mesh, fans, or shell stitches to create delicate and decorative designs. These are perfect for lightweight projects such as shawls, curtains, or decorative table covers.
Textured squares incorporate raised stitches like popcorn, bobbles, or front post double crochets to add dimension. These patterns are fun to make and give your project a tactile, 3D effect that stands out.
Colorwork also plays a big role in crochet squares. Color-changing squares, such as those made with tapestry or mosaic crochet, use multiple colors to create bold patterns, geometric designs, or even pictures. This technique requires a bit more planning but produces stunning results.
If you’re looking for a more challenging project, try 3D crochet squares where flowers, stars, or layered shapes emerge from the center. These are eye-catching and make fantastic focal points for pillows or wall art.
When working with different square types in one project, make sure they are all the same final size before joining. You can adjust the size by adding extra rounds or borders to smaller squares so they align correctly.
3. Joining Crochet Squares into Bigger Projects
Once you’ve made several pieces from your favorite crochet square – pattern, it’s time to think about how to put them together. Joining your squares correctly is essential to achieving a polished and unified final product.
The simplest joining method is whip stitch—done with a yarn needle by sewing through the edges of two squares. This method creates a nearly invisible seam and is great when you want the design to appear continuous.
If you want a more decorative seam, try single crocheting the squares together. This method creates a raised ridge and works well for afghans or blankets that benefit from a bit of texture.
The join-as-you-go (JAYG) technique is another popular option, especially when working in rounds. Instead of sewing squares together after they’re complete, you connect each new square to the previous ones while crocheting the final round. This method saves time and creates a seamless look.
Slip stitch joining is a minimalistic approach that uses your hook to connect squares with very little bulk. It’s neat, fast, and good for projects like bags or wearable items where flexibility is key.
Borders can also help unify your project. Before joining, consider adding a final round in a neutral or contrasting color to each square. This gives them a consistent edge and makes the seams more even.
No matter which joining method you choose, lay out all your squares before attaching them. Arrange them by color, pattern, or texture so the overall project has visual balance and harmony.
4. Customizing and Creating Your Own Square Patterns
Once you’re confident with the basic crochet square – pattern, you can begin to develop your own designs. Customizing squares is both creative and rewarding, allowing you to put a personal touch on every project.
One way to personalize your square is through color combinations. Try using gradient yarns, alternating rows of contrasting colors, or creating a central motif that changes color each round. Planning your color palette in advance will help achieve your desired aesthetic.
You can also play with stitch variation. Combine standard stitches with texture stitches like puff, popcorn, or cross-stitch. This experimentation often leads to unique squares that feel completely your own.
Consider incorporating themes or shapes, like hearts, stars, or initials, into the center of your square. This is often done using tapestry crochet or overlay crochet, which lets you crochet pictures into your square.
Adding borders is another simple way to enhance a plain square. A scalloped edge, picot trim, or shell stitch can take a basic square from simple to stunning with very little extra effort.
Don’t forget about sizing. By adjusting your hook size or yarn weight, you can scale your squares up or down for different projects. Use smaller squares for baby items or accessories, and larger ones for throws or cushion covers.
Finally, document your creations. Keep notes of what works, what doesn’t, and what yarns and hooks you used. Over time, you’ll build your own library of personal crochet square – patterns to revisit or share with others.
FAQ – Crochet Square – Pattern
Q1: What is the best size crochet hook for a beginner working on crochet squares?
A: A 5mm (H-8) crochet hook is great for beginners using medium-weight yarn. It offers control and comfort while producing standard-sized squares.
Q2: Why is my crochet square curling at the edges?
A: Curling usually means your tension is too tight, or you may be missing corner stitches. Try using a larger hook or blocking the square after finishing.
Q3: How do I make all my crochet squares the same size?
A: Use the same yarn, hook size, and stitch count for each square. Blocking after completion helps ensure uniform sizing.
Q4: Can I mix different square patterns in one project?
A: Yes, but make sure each square ends up the same size. You can add extra border rounds to smaller squares to help them match larger ones.
Q5: What is the easiest crochet square for beginners?
A: The classic granny square is the easiest to start with. It uses simple stitches and has a repetitive, easy-to-follow pattern.
Q6: What can I make with crochet squares besides blankets?
A: You can make bags, pillow covers, coasters, scarves, table runners, wall hangings, and even garments like tops or cardigans.
Conclusion
Learning how to make a crochet square – pattern opens up a world of possibilities for creativity and handmade joy. From simple granny squares to intricate custom designs, these versatile motifs are the heart of many crochet projects.
We covered the basics of construction, explored different pattern styles, discussed joining techniques, and even looked at ways to design your own custom squares. No matter your skill level, crochet squares offer a fun and fulfilling way to express yourself with yarn.
If you found this article helpful, please leave a sincere opinion and share your suggestions or favorite square patterns in the comments. Your feedback helps uscontinue creating content that inspires and supports your crochet journey. Happy stitching!