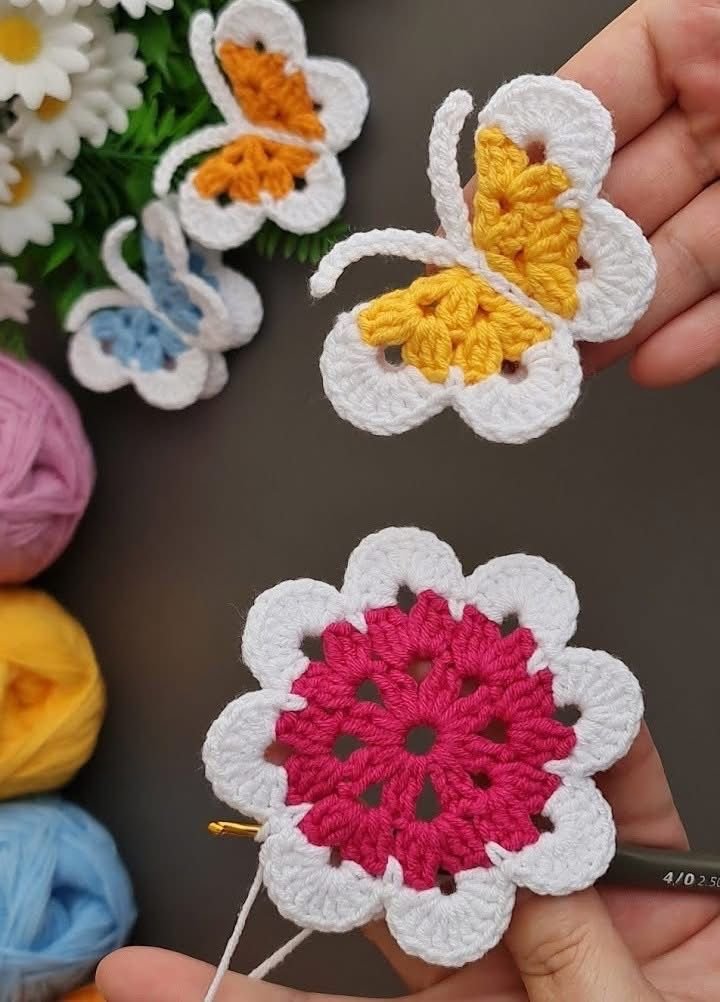
If you’re looking for a simple, charming, and fast project to add to your crochet collection, a crochet butterflies – pattern is the perfect place to start. These delicate creations can be used in countless ways—from decorating baby blankets and headbands to embellishing clothing, gift wrap, or even turning them into fridge magnets or keychains. They’re not just adorable; they’re practical and can be made with leftover yarn, making them a sustainable and budget-friendly option.
One of the best things about following a crochet butterflies – pattern is the versatility. You can make them tiny and dainty or larger and bold, depending on the yarn and hook you use. Plus, with just a few basic stitches, you can bring a flutter of handmade beauty into your world. Even beginners can complete a butterfly in under 30 minutes once they get the hang of it.
Whether you’re making crochet butterflies for a craft fair, classroom gift, or to simply decorate your home, this pattern offers something for everyone. In this guide, we’ll walk through the best tools to use, basic techniques, creative variations, and ways to make your butterflies stand out.
1. Materials and Tools for Crochet Butterflies – Pattern
To begin your journey with a crochet butterflies – pattern, you’ll want to gather the right tools and materials. Fortunately, this project doesn’t require a huge investment, and you likely already have many of the items in your crochet kit.
First, select your yarn. Since butterflies are often small and decorative, lightweight yarn like cotton (DK or worsted) is an excellent choice. Cotton yarn holds its shape well, offers vibrant color options, and makes your butterfly crisp and defined. You can also use scrap yarn from previous projects.
Next, choose an appropriate hook size. For small, tight butterflies, a 3.5 mm to 4 mm crochet hook works great. A smaller hook makes the stitches tighter, which is ideal for items that need structure, like magnets or brooches. For larger or softer butterflies, you can go up to a 5 mm or 5.5 mm hook.
You’ll also need scissors, a yarn needle for weaving in ends, and optionally, embellishments like beads, buttons, or small jewels if you’d like to add detail to your butterfly’s body or wings.
Keep some stitch markers handy if you’re working on a more intricate butterfly design. Although many butterfly patterns are simple, some use magic circles, chain spaces, and multiple rounds which can be easier to follow with markers.
Lastly, decide if you want your butterflies to be stiffened. If so, grab some fabric stiffener or a homemade mixture of glue and water. This will help your butterflies retain shape when used as appliqués or hanging décor.
2. How to Crochet Basic Butterflies Step-by-Step
Now that you have your materials ready, it’s time to start crocheting. The most common crochet butterflies – pattern uses a few basic stitches and is worked in the round. These butterflies often begin with a magic ring or small chain circle.
Start with a magic circle or chain 4 and slip stitch to form a ring. This becomes the center of your butterfly. Next, you’ll crochet multiple sets of chains and double crochets into this center ring. These form the wings. For example, one wing might be made with a chain 3, 3 double crochets, and chain 3 again before slip stitching back into the ring.
Repeat the same process on all four sides to make the butterfly’s top and bottom wings. Typically, you’ll work four “petal-like” clusters around the center ring. The symmetrical layout creates that classic butterfly shape.
Once your wings are done, you’ll fasten off and leave a long tail to wrap around the center of the butterfly. This “body wrap” creates the butterfly’s center and can also act as antennae. You can tie it in a small bow at the top, or use contrasting yarn for extra visual interest.
For a cleaner look, weave in the loose ends using your yarn needle. If you’re planning to stiffen the butterfly, this is the time to soak it lightly in your solution and lay it flat to dry on wax paper or a blocking board.
Even with the most basic crochet butterflies – pattern, you can vary wing sizes and colors easily by changing the number of stitches or rounds. This encourages creativity while still following a consistent structure.
3. Creative Variations of the Crochet Butterflies – Pattern
Once you’ve mastered the basics, it’s time to have some fun experimenting with different variations of your crochet butterflies – pattern. This is where your personality and creativity can really shine through.
Start by playing with color combinations. Use contrasting colors for the upper and lower wings to make your butterfly pop. Ombre yarns also work wonderfully for a gradient effect across the wings.
Try making layered butterflies by creating two sets of wings and stitching them together slightly offset. This adds a 3D effect that is perfect for accessories like pins or hair clips.
Experiment with textured stitches like popcorn stitch, picot edges, or puff stitch. These can add visual interest and a unique feel to your butterfly, making it more than just a flat motif.
Incorporate metallic yarns or embroidery floss for shimmer. A subtle sparkle adds elegance, especially if you’re using butterflies for holiday decor or wedding embellishments.
Consider adding beads or sequins to the wings or body. You can sew them in with a needle or crochet them into place if using bead-compatible thread.
Finally, modify the size of your butterfly pattern. Use fingering yarn and a 2.5 mm hook for mini butterflies, or bulky yarn and a 6 mm hook for jumbo versions. These size changes make them suitable for everything from keychains to wall art.
4. Practical Uses for Crochet Butterflies
You’ve followed your crochet butterflies – pattern and now have a fluttering collection of beautiful handmade butterflies. So what can you do with them? The possibilities are endless.
Use them as appliqués on blankets, hats, scarves, or baby clothing. A soft butterfly on a baby hat adds charm and is a lovely gift idea for showers.
Turn your butterflies into fridge magnets by attaching a magnet to the back with hot glue. This is a fun way to display your work around the house.
Make a collection of butterflies into a garland or mobile. This works beautifully for nurseries, spring décor, or themed parties. Just thread them onto a long string and hang them in front of a window or wall.
Create jewelry or wearable items. A small butterfly can become a brooch, pendant, or even a pair of earrings. Attach findings or clips and you have a handmade, unique accessory.
Add butterflies to gift wrap or greeting cards for a personal touch. It’s a great way to use extra yarn and show that extra level of care in handmade gifting.
Lastly, donate them. Many charities accept handmade items like butterflies to place in care packages, hospitals, or nursing homes as comforting keepsakes.
FAQ – Crochet Butterflies – Pattern
Q1: What stitches are used in a basic crochet butterfly pattern?
Most patterns use basic stitches like chain (ch), double crochet (dc), and slip stitch (sl st). Some versions include puff or picot stitches for added detail.
Q2: How long does it take to make one crochet butterfly?
For most patterns, a butterfly takes about 20–30 minutes to complete, making it a quick project for any skill level.
Q3: What yarn is best for making crochet butterflies?
Cotton yarn is ideal for structure and stitch definition. Acrylic and blends also work well, especially for decorative purposes.
Q4: Can I wash crochet butterflies?
Yes, if you use washable yarn like cotton or acrylic. However, avoid washing if you’ve used fabric stiffener unless it’s washable too.
Q5: Are crochet butterflies suitable for beginners?
Absolutely. Basic butterfly patterns are beginner-friendly and provide great practice for working in the round and learning increases.
Q6: How do I stiffen crochet butterflies for decorations?
You can use commercial fabric stiffener or a DIY solution (equal parts glue and water). Apply lightly and let the butterfly dry flat.
Conclusion
Making your own crochet butterflies – pattern is a fulfilling, creative way to bring color and joy into your crafting life. From simple motifs to embellished masterpieces, these butterflies are fun to make and full of possibilities.
You’ve learned how to gather materials, follow a basic pattern, experiment with custom designs, and explore many practical uses. With just a bit of yarn and imagination, you can create something truly magical.
Have you tried making crochet butterflies before? If so, we’d love to hear from you. Leave a sincere comment below with your experience or suggestions. Sharing your insights helps inspire and support others in the crochet community. Happy crocheting! 🦋