If you’re looking for a vibrant, eye-catching quilting design that combines modern flair with traditional charm, the Color Block Stars – Pattern is a perfect choice. This design brings together bold blocks of color and classic star motifs, resulting in a quilt that’s as fun to make as it is beautiful to display. Whether you’re a beginner eager to start your first quilting project or an experienced quilter looking for fresh inspiration, the Color Block Stars – Pattern offers versatility and creative freedom.
The beauty of the Color Block Stars – Pattern lies in its simplicity and impact. By using blocks of solid or tonal fabric, you can create high contrast and stunning visuals. The star shapes can be tailored to different sizes and arrangements, making this pattern suitable for everything from throw pillows to full-sized bed quilts. It’s also a fantastic way to use up fabric scraps or play with color theory in a hands-on way.
This article will guide you through understanding the design concept, choosing fabrics, cutting and piecing techniques, and ways to customize your quilt. With easy-to-follow instructions and expert tips, you’ll learn how to master the Color Block Stars – Pattern and create a quilt that reflects your personal style. Read on to discover how to bring this dynamic pattern to life in your own unique way.
1. Understanding the Color Block Stars – Pattern
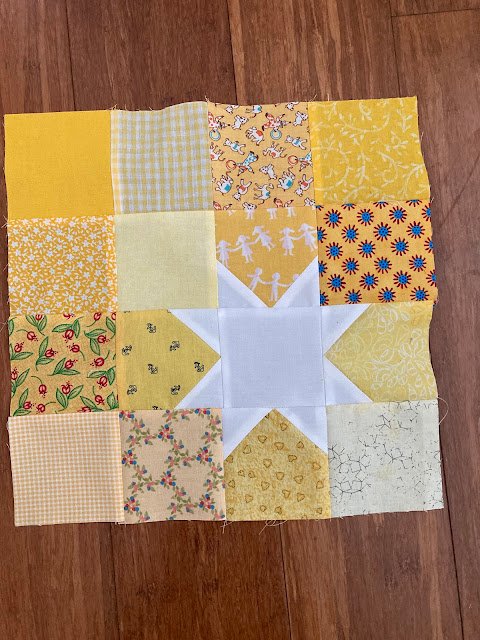
The Color Block Stars – Pattern is a design that features star motifs created from large, solid-colored fabric blocks. Unlike traditional star quilts that rely on small, intricate pieces, this pattern simplifies the construction while maintaining a bold and modern aesthetic. The result is a quilt that’s visually impactful and easier to assemble than it looks.
At its core, this pattern uses basic shapes—squares, half-square triangles, and rectangles—to form star points. By placing these shapes strategically within a grid, the stars emerge clearly against the background blocks. You can vary the scale of the stars, change their orientation, or even mix different color palettes to create a truly unique piece.
One reason the Color Block Stars – Pattern is so popular is its adaptability. It works with a wide range of fabrics, from solids and batiks to printed cottons. You can keep your quilt monochromatic for a minimal look or use the entire color wheel for a rainbow-inspired project.
The block-based structure makes this pattern beginner-friendly, but it still offers plenty of design options for advanced quilters. You can experiment with negative space, layered effects, or even combine it with other blocks for a sampler-style quilt. This creative flexibility makes it one of the most enjoyable quilt patterns to work on.
Another advantage of this pattern is its scalability. Each star block can be made in various sizes to suit different projects. Whether you’re making a baby quilt, wall hanging, or king-size bedspread, the Color Block Stars – Pattern can be adapted to fit your needs without losing its charm.
Lastly, it’s a great pattern to use when teaching others how to quilt. The large fabric blocks are easy to cut and sew, and the star motif adds excitement to the process. It’s especially satisfying for new quilters to see a recognizable shape form as they piece their first blocks together.
2. Choosing Fabrics and Preparing Your Blocks
Selecting the right fabrics is crucial to the success of your Color Block Stars – Pattern. The goal is to create contrast between your star elements and the background so that the design stands out. Solid fabrics work best, but tone-on-tone prints or blenders can add subtle texture while maintaining clarity.
Start by choosing a color palette. A popular method is to pick one or two main colors for the stars and use a light or dark neutral for the background. For example, bright yellow stars on a navy blue background offer a striking effect, while pastel pink stars on white create a soft, dreamy aesthetic.
Pre-wash your fabrics to avoid shrinkage and color bleeding. This step is especially important when using contrasting colors, as dark dyes may run in the wash. Iron your fabrics flat before cutting to ensure accuracy and clean lines when piecing your blocks.
Measure and cut your fabric using a rotary cutter, quilting ruler, and self-healing mat. Precision is key in the Color Block Stars – Pattern because misaligned blocks can disrupt the visual symmetry of your quilt. Cut all your squares and triangles with care, labeling them if needed to keep track of their positions.
Lay out your blocks before sewing to test your color placement. This visual preview lets you swap colors or adjust positions to improve balance and harmony in your quilt. Take a photo of your layout so you can reference it during assembly.
When sewing, use a consistent seam allowance—typically 1/4 inch—to keep your blocks uniform. Press your seams open or to one side, depending on preference, and make sure your star points are sharp by aligning the corners accurately. This attention to detail will make your stars crisp and professional-looking.
Finally, trim your blocks to ensure they are all the same size before assembling the rows. This step prevents distortion in your final quilt top and makes quilting easier. With your fabric choices in place and blocks prepared, you’re ready to piece everything together.
3. Piecing and Assembling the Quilt Top
With your blocks cut and laid out, it’s time to start piecing your Color Block Stars – Pattern. Begin by assembling each star unit, starting with the star points. These are typically made from half-square triangles, which can be created by sewing two squares together along the diagonal and cutting them apart.
Once you have your triangles, arrange them to form the star shape. The center square and surrounding triangles create the illusion of a shining star. Make sure your points align properly by pinning before sewing and pressing the seams carefully to reduce bulk.
After your star blocks are complete, sew them together with the background blocks to form rows. Double-check your layout before sewing the rows together to ensure the stars are positioned as planned. Pay close attention to alignment so that the points of adjacent blocks match neatly.
Join the rows using the same 1/4 inch seam allowance, pressing each seam as you go. Pressing seams in alternating directions for each row can help reduce bulk and make it easier to match points. This step is critical for a smooth, flat quilt top.
Once all rows are joined, give your quilt top a final press. At this stage, you can step back and admire your work. The colorful stars against the block background will start to shine, and your quilt will take on its full personality.
If desired, you can add a border to frame the quilt or make it slightly larger. A solid border can help focus attention on the star design, while a pieced border adds extra flair. Choose what suits your vision and complements the colors of your Color Block Stars – Pattern.
4. Finishing Touches: Quilting and Binding
After assembling your quilt top, it’s time to prepare the quilt sandwich. This involves layering the quilt top, batting, and backing fabric. Lay the layers flat and smooth out any wrinkles. Baste them together using safety pins or temporary spray adhesive to keep them secure during quilting.
The quilting step enhances both the look and durability of your project. For the Color Block Stars – Pattern, you might choose straight-line quilting to emphasize the geometric shapes or free-motion quilting for a softer, more whimsical finish. Match the thread color to your design—either blend in or make it pop.
If you’re quilting by machine, a walking foot helps feed the layers evenly and prevents puckering. Start quilting from the center and work outward to keep everything aligned. Check your tension regularly to ensure even stitching across all sections.
After quilting, trim the excess batting and backing to match the quilt top. Now you’re ready to bind the quilt. Binding is the fabric strip that encases the raw edges and gives the quilt a clean, finished look. You can purchase pre-made binding or make your own from matching or contrasting fabric.
Attach the binding using a sewing machine, then fold it over the edge and either hand-stitch or machine-stitch it down on the back. This final step gives your quilt a polished appearance and reinforces the edges against wear and tear.
Finish your quilt with a personalized label, noting the date, recipient, or a special message. This adds a personal touch and turns your quilt into a meaningful keepsake. Whether it’s for yourself, a loved one, or a customer, a finished Color Block Stars – Pattern quilt is something to be proud of.
FAQ: Color Block Stars – Pattern
Q1: What is the best fabric to use for the Color Block Stars – Pattern?
A1: 100% cotton fabric is ideal. It’s easy to work with, holds its shape well, and offers vibrant color options that make the stars pop.
Q2: Can beginners make the Color Block Stars quilt?
A2: Yes, the Color Block Stars – Pattern is beginner-friendly. It uses basic shapes like squares and triangles, and there are many tutorials available to help.
Q3: How do I avoid my star points getting cut off?
A3: Precision cutting and consistent seam allowances are key. Pinning accurately and pressing seams properly will help maintain sharp star points.
Q4: What size should my blocks be?
A4: That depends on your final quilt size. Common block sizes range from 8 to 12 inches. Adjust based on your project and pattern instructions.
Q5: Can I use prints or only solid fabrics?
A5: You can use either. Solids highlight the block structure more clearly, but tone-on-tone prints or small patterns can add depth without overwhelming the design.
Q6: Do I need a pattern template?
A6: While not strictly necessary, having a Color Block Stars – Pattern template or guide helps with planning and ensures all pieces fit together perfectly.
Conclusion
The Color Block Stars – Pattern is a fun,
flexible, and visually striking quilting design that appeals to all skill levels. From fabric selection to the final stitch, it offers opportunities for creativity, precision, and personal expression. Whether you’re quilting for relaxation, gifting, or selling, this pattern is a rewarding choice that delivers both beauty and impact.
We hope this guide has inspired you to start your own Color Block Stars – Pattern project. If you’ve tried this pattern or have questions, tips, or thoughts, please leave your honest opinion or suggestions in the comments. Your input helps the quilting community grow and thrive—happy quilting!