If you’re looking for a stylish and spooky accessory to add to your handmade wardrobe, a Spider web bandana crochet – Pattern is the perfect project. Combining gothic charm with delicate craftsmanship, this type of crochet work blends aesthetics with functionality. Whether for Halloween, cosplay, festivals, or just for fun, the spider web design is both eye-catching and surprisingly versatile.
A Spider web bandana crochet – Pattern typically uses openwork lace techniques, giving the bandana a lightweight feel and dramatic look. It’s perfect for crocheters who enjoy creating accessories that stand out and carry a touch of mystery. Plus, it’s a great way to practice working with finer yarns and increasing stitch control while keeping the project relatively small and beginner-friendly.
In this guide, you’ll learn everything you need to know about choosing the right materials, understanding the stitch structure, customizing your design, and preserving your finished bandana. Whether you’re an experienced crocheter or just starting, this step-by-step resource will walk you through making your own beautiful, web-like creation.
1. What Makes the Spider Web Bandana Unique
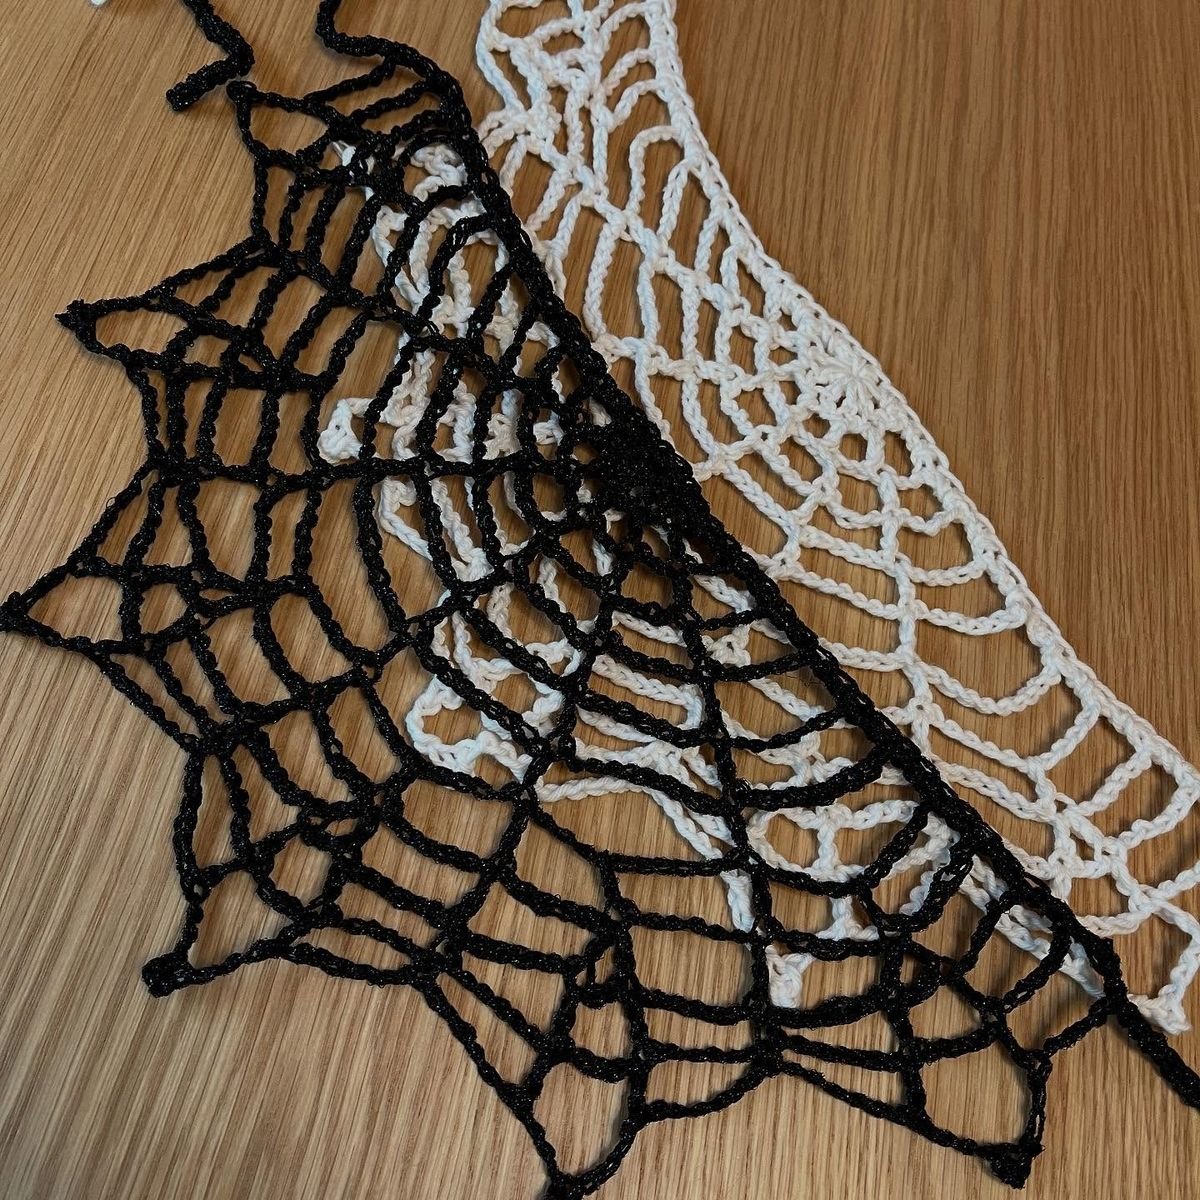
One of the most appealing aspects of the Spider web bandana crochet – Pattern is its visual complexity contrasted with its straightforward construction. At first glance, the open, lacy design may seem intricate, but it’s usually made up of basic stitches like chains, single crochets, and double crochets, arranged in a radial format to mimic the structure of a spider’s web.
The triangular shape of the bandana lends itself well to the web motif. Starting from the center point, crocheters work outward in rounds or rows, increasing the stitch count to create a growing web. This radial design is not only practical but also very forgiving, making it ideal for those new to lace or chart-based crochet patterns.
The motif is a favorite during the fall season, especially around Halloween, but it also works beautifully in boho or alternative fashion year-round. When done in black, white, or metallic threads, the bandana can become a statement piece that complements a variety of styles and outfits.
Because it sits comfortably on the head and ties at the back, the spider web bandana can also be used as a head wrap, kerchief, or even a neckerchief. Some crocheters even adapt the pattern into shawlettes or decorative scarves, adding beads or sequins to create a glamorous version of the web design.
You can adjust the size easily by changing yarn weight or continuing the stitch pattern for more rounds. This flexibility is what makes the Spider web bandana crochet – Pattern so appealing—it can be tailored for different uses and occasions with minimal alterations.
In essence, this crochet pattern is both a celebration of spooky aesthetics and a fun, creative challenge for crafters who want to try something bold and beautiful.
2. Materials and Tools for the Perfect Web
To bring your Spider web bandana crochet – Pattern to life, you’ll want to gather the right supplies. While this project doesn’t require a lot of materials, choosing the correct type will have a big impact on the final look and feel of the piece.
Most crocheters opt for lightweight yarns such as cotton thread, lace weight, or fine fingering yarns. These yarns allow for better stitch definition and help the intricate web design stand out. Cotton is especially good for bandanas as it’s breathable and holds its shape well.
Your crochet hook size will depend on the yarn you select, but commonly used hooks range from 2.25mm to 3.5mm. Using a smaller hook ensures a tighter, neater finish, which helps preserve the shape of the web structure even after extended wear.
Other tools include a yarn needle for weaving in ends and stitch markers if your pattern includes specific increases or directional changes. Some crafters also recommend blocking mats and pins for shaping the final piece—especially important for achieving the perfect triangle and ensuring the web-like tension in the openwork.
When selecting yarn color, black is a classic choice for a traditional spider web look, but silver, deep red, or even glow-in-the-dark yarns can add a creative twist. Experimenting with variegated yarns can also produce a stunning ombré effect across the web.
If you want to add some flair, you can embellish your bandana with tiny crochet spiders, beads that look like dew drops, or glitter thread for sparkle. These small details can elevate your Spider web bandana crochet – Pattern from a simple accessory to a statement piece.
Don’t forget to consider comfort—if the bandana will be worn for long periods, choose yarns that are soft and not itchy against the skin. After all, the goal is to make something that feels as good as it looks.
3. How to Crochet a Spider Web Bandana Step-by-Step
Creating your Spider web bandana crochet – Pattern is an exciting process. While every pattern has its unique instructions, most follow a similar structure. Here’s a general overview of the steps involved, which you can follow or adapt according to your pattern.
Begin with a magic ring or a small chain loop, which will be the center of your web. From this point, you’ll work in the round (or triangular rows) using chain spaces and double crochets to form the web’s foundation. This center is key, so take your time to get the tension right.
The next few rounds will involve creating radiating lines that mimic the web strands. Chain stitches often form the connecting spaces, while taller stitches form the structural lines. You’ll typically increase the stitch count gradually as the bandana expands outward.
Pay close attention to your stitch count in each round. Even one missed or extra stitch can throw off the web symmetry. Use stitch markers if needed to track your rows and turning points, especially if working in a triangle format rather than a full circle.
Once the web shape reaches the desired size, finish with a clean border. Many patterns suggest a scalloped or picot edge to enhance the web look. This gives the bandana a neat finish and makes it more visually appealing.
Before wearing or gifting, block your bandana by pinning it in shape and lightly steaming or wetting it. This sets the stitches and gives the web a perfect tension. A well-blocked web pattern will hold its shape and lie flat, which is essential for both appearance and comfort.
After it’s dry, weave in all loose ends with a yarn needle. You now have a finished Spider web bandana crochet – Pattern ready to wear or share. Whether for spooky season or year-round style, you’ve created a truly unique piece.
4. Customization Ideas and Styling Tips
One of the best parts of working with a Spider web bandana crochet – Pattern is the ability to personalize your design. With just a few creative changes, you can adapt the same base pattern into multiple versions for different moods, outfits, or occasions.
Try changing the shape slightly—some bandanas are perfect triangles, while others are more rounded or even pentagonal. You can tweak the increases and rows to create your preferred shape without altering the essence of the spider web design.
Add color changes to mimic spider web dew or moonlight. Using gradient yarns or switching yarn colors every few rounds can give a stunning dimensional effect. Metallic threads or yarns with a bit of sheen will reflect light and add drama.
You can even make matching accessories such as fingerless gloves, chokers, or earrings using the same stitch patterns and motifs. This makes your ensemble feel cohesive and elevates your handmade wardrobe with minimal extra effort.
For a gothic or steampunk vibe, consider adding lace trims, metal charms, or even small chains to your finished piece. Just make sure any additions are secure and comfortable to wear. These details can help transform your Spider web bandana crochet – Pattern into a fashion statement.
Adjust the size of the bandana to suit your styling needs. A smaller version works well as a head wrap or neck scarf, while a larger one can double as a lightweight shawl. You can even use the pattern as a base for a larger garment like a capelet or poncho.
When styling your finished bandana, pair it with dark clothing or neutral tones to really let the spider web pop. For Halloween, it makes a great accessory for witch, vampire, or gothic costumes. But thanks to its elegance, it also fits everyday wear with the right outfit.
FAQ: Spider web bandana crochet – Pattern
Q1: Is the Spider web bandana crochet – Pattern beginner-friendly?
Yes, many versions use simple stitches like chains and double crochets. Some patterns may include charts, which beginners can learn with a little practice.
Q2: What type of yarn is best for this pattern?
Lightweight yarns such as cotton, bamboo, or lace-weight acrylic are ideal. These hold shape well and highlight the openwork design.
Q3: Can I make the bandana larger or smaller?
Absolutely. You can easily adjust the size by adding more rounds or using thicker yarn and a larger hook.
Q4: How do I block the finished bandana?
Use a blocking mat and pins to shape the triangle evenly. Then steam or dampen it slightly and let it dry flat to set the stitches.
Q5: How long does it take to crochet a spider web bandana?
Depending on skill level and complexity, it usually takes 4 to 8 hours. Some experienced crocheters can complete it in a single day.
Q6: Where can I find a reliable Spider web
bandana crochet – Pattern?
Many websites like Etsy, Ravelry, and independent crochet blogs offer both free and paid patterns. Look for those with detailed instructions and photos.
Conclusion
The Spider web bandana crochet – Pattern is more than just a seasonal accessory—it’s a creative expression of style, skill, and personality. From spooky Halloween vibes to everyday gothic elegance, this pattern offers endless possibilities for customization and fun.
You’ve learned about the materials, the structure of the web, steps to crochet it, and ways to make it truly yours. With practice, patience, and a little creativity, your spider web bandana will become a beloved piece in your handmade collection.
If you enjoyed this guide or have experience with your own spider web crochet projects, please leave a sincere opinion or suggestions in the comments. We’d love to hear your thoughts and help you continue creating magical crochet pieces.
Let me know if you’d like this formatted for blog publishing or need a downloadable version.