Learning how to quilt can be one of the most rewarding and creative hobbies you’ll ever pick up, and the Block Geese Quilt for Beginners – Pattern is the perfect way to begin. With its simple shapes, clean lines, and endless fabric possibilities, this classic quilt block offers a beginner-friendly introduction to the world of patchwork quilting. It’s an ideal project for building confidence while producing something beautiful and functional.
The Block Geese Quilt for Beginners – Pattern is based on the traditional flying geese unit—a time-honored quilt block that’s easy to learn but incredibly versatile. What makes it beginner-friendly is its repetitive structure, straightforward sewing techniques, and the ability to practice fundamental quilting skills such as accurate cutting, piecing, and pressing. This pattern is both a learning tool and a design statement.
In this article, you’ll discover how to get started with your own Block Geese Quilt for Beginners – Pattern, from choosing fabrics and cutting pieces to sewing blocks and assembling your quilt. Whether you’re brand new to quilting or looking for a relaxing, no-stress pattern, this guide will walk you through the process step by step with helpful tips along the way.
1. What Is a Block Geese Quilt and Why Is It Great for Beginners
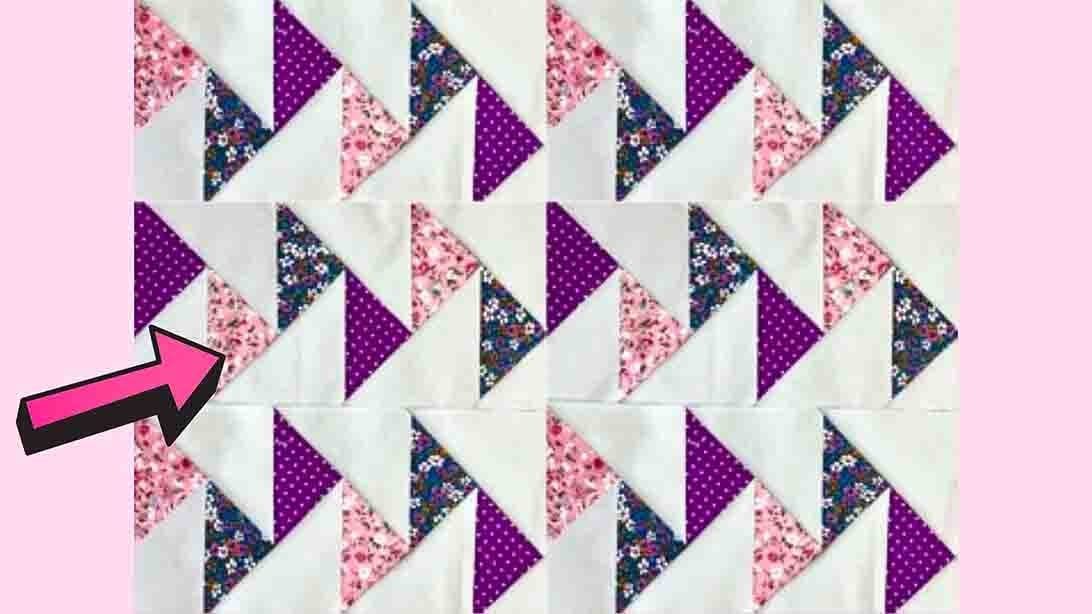
A Block Geese Quilt is a patchwork design made primarily with flying geese blocks—rectangles that contain one large triangle in the center (the “goose”) and two smaller triangles on either side (the “sky”). These units are often repeated across rows to create a bold and rhythmic visual pattern.
The flying geese block has been a staple in quilting for centuries, appreciated for its simplicity and strong geometric appeal. For beginners, it’s the perfect opportunity to learn how to sew precise angles, practice 1/4″ seams, and understand how different fabric values affect the finished design.
The Block Geese Quilt for Beginners – Pattern focuses on using this one core unit throughout the quilt, making it easy to learn by repetition. This approach removes the overwhelm that can come with complex patterns, while still offering a finished quilt that looks sophisticated and well-balanced.
Another reason this quilt is so beginner-friendly is its flexibility. You can make the blocks in a variety of sizes and arrange them in multiple layouts. Whether you go for a minimalist monochrome look or a vibrant rainbow of scraps, the pattern adapts to your style and fabric stash.
Sewists also love this pattern because it works beautifully with pre-cut fabrics like fat quarters or charm packs, reducing the need for precise measuring and cutting—a huge plus when you’re just starting out.
The end result is a quilt that teaches you essential techniques and leaves you with a project you’ll be proud to show off or give as a handmade gift.
2. Materials and Tools for a Block Geese Quilt
To get started with the Block Geese Quilt for Beginners – Pattern, you’ll need a handful of basic quilting tools and materials. Don’t worry—many of these are beginner staples and easy to find at local craft stores or online.
First, gather your fabrics. For the flying geese blocks, you’ll need two main groups: one for the geese triangles (often the focus fabrics) and one for the sky triangles (background fabrics). You can choose solids, prints, or even mix both for a scrappy look.
You’ll need a rotary cutter, quilting ruler, and a cutting mat to measure and trim your fabric pieces accurately. These tools help ensure straight cuts and precise shapes, which are key to successful piecing.
A sewing machine with a 1/4″ presser foot is also recommended. While hand sewing is possible, a machine will speed up the process and produce more uniform seams. Make sure you’re using a sharp needle and quality thread for best results.
Other useful items include fabric marking tools for drawing diagonal sewing lines, straight pins or clips to hold your pieces together, and an iron for pressing seams as you go. Pressing after each step improves accuracy and makes your quilt blocks lie flat.
For batting and backing, choose materials based on your desired quilt use. Cotton batting is great for a soft, lightweight quilt, while polyester adds loft. For backing, wide quilt fabric or pieced yardage will do the trick.
Finally, you’ll need binding fabric to finish the edges of your quilt. This gives your quilt a clean, professional look and helps hold everything together through washing and use.
3. How to Sew a Flying Geese Block
The basic unit of the Block Geese Quilt for Beginners – Pattern is the flying geese block, and there are several ways to sew it. The most beginner-friendly method is the “stitch and flip” or “rectangle and square” technique.
To start, cut one rectangle for the goose and two smaller squares for the sky. Place one square right side down on one corner of the rectangle and draw a diagonal line from corner to corner. Sew directly on the line, then trim away the excess, leaving a 1/4″ seam.
Fold and press the triangle open to complete one side of the block. Repeat the process on the opposite corner with the second square. When pressed open, you’ll have a finished flying geese block with clean lines and sharp points.
Consistency is key when making multiple blocks. Try to use a chain-piecing method to sew several units in a row. This saves time and helps keep your rhythm as you sew.
After sewing all your blocks, trim them to size using your quilting ruler. A well-trimmed block helps ensure accurate alignment when you assemble the quilt top. Don’t skip this step, even if your blocks look neat.
Always press your seams as you go. Pressing away from the triangle (toward the background) usually works best, as it helps the blocks lie flatter and keeps the bulk in check.
Once you’ve made enough blocks, you can begin laying them out in rows. Arrange them by color, direction, or even randomly for a more eclectic look. Have fun with this step—it’s where the magic of the Block Geese Quilt for Beginners – Pattern really comes to life.
4. Assembling and Finishing Your Block Geese Quilt
Once your flying geese blocks are completed and trimmed, it’s time to assemble your quilt top. Begin by arranging your blocks on a design wall or floor to plan your layout. You can keep all geese flying in the same direction or alternate rows for a zig-zag effect.
Sew the blocks into rows, using a consistent seam allowance and pressing seams between each step. Pinning at intersections will help keep your points aligned and your rows straight.
After your rows are complete, sew them together to form the full quilt top. Check your alignment as you go to ensure that corners and edges match up for a polished appearance.
Next, layer your quilt sandwich: backing fabric on the bottom, batting in the middle, and quilt top on top. Baste the layers together using safety pins or temporary spray adhesive to prevent shifting during quilting.
Quilt your sandwich using straight-line quilting or gentle curves. If you’re a beginner, stick with simple straight lines along the seams or diagonals. These are easy to manage and still produce a beautiful result.
Finally, trim the edges, attach your binding, and give your finished quilt a good press. Now you can enjoy your handmade Block Geese Quilt for Beginners – Pattern as a cozy lap quilt, wall hanging, or thoughtful gift.
FAQ: Block Geese Quilt for Beginners – Pattern
Q1: What size should a beginner’s Block Geese Quilt be?
A good beginner size is a lap quilt or baby quilt, usually around 36″ x 48″. It’s manageable and lets you complete the project without getting overwhelmed.
Q2: Do I need a quilting machine to finish the quilt?
No. A regular sewing machine works fine for piecing and simple quilting. You can also hand-quilt or tie the layers if you prefer.
Q3: What is the best fabric to use for this pattern?
100% quilting cotton is ideal. It’s easy to work with, holds its shape well, and comes in a huge variety of colors and prints.
Q4: How do I keep my flying geese points sharp?
Accuracy is key. Use a 1/4″ seam, trim carefully, and press gently. Avoid sewing over the point when joining rows.
Q5: Can I use pre-cut fabrics for this quilt?
Yes, fat quarters and charm packs are great for this pattern. They reduce cutting time and offer a wide mix of fabrics.
Q6: How long does it take to complete a Block Geese Quilt?
It depends on the size and your sewing pace. A small quilt might take a weekend, while a larger one could take several weeks.
Conclusion
The Block Geese Quilt for Beginners – Pattern is more than just a starting point for your quilting journey—it’s a fun, educational, and satisfying project that leaves you with a beautiful handmade creation. It introduces you to essential quilting skills while letting your creativity shine through every fabric choice and stitch.
In this article, we covered what makes this pattern ideal for beginners, the tools and materials you need, how to sew flying geese blocks, and how to turn those blocks into a finished quilt. With practice and patience, you’ll soon gain the confidence to try more complex patterns or even design your own.
If you’ve tried this pattern or plan to make your own Block Geese Quilt,we’d love to hear from you. Please leave your honest feedback, suggestions, or share photos of your progress. Your experience can help inspire others just starting their quilting adventure. Happy stitching!