The French braid quilt block – pattern is a captivating design in the world of quilting, known for its flowing movement and elegant appearance. Inspired by the interwoven structure of a traditional French braid hairstyle, this quilt block uses diagonal strips to create a continuous, woven look that adds sophistication to any quilt project. It’s a favorite among modern quilters and traditionalists alike, offering endless possibilities for customization and creativity.
What makes the French braid quilt block – pattern so appealing is its versatility. It can be used to make entire quilt tops, borders, sashing strips, or even smaller items like table runners and wall hangings. With just a few fabric strips and a bit of planning, quilters can achieve a dramatic, layered effect that appears far more complex than it actually is. Despite its intricate appearance, this block is surprisingly beginner-friendly and rewarding to construct.
In this article, we’ll guide you through the history, construction, layout options, and creative applications of the French braid quilt block – pattern. You’ll also learn essential tips on fabric selection, cutting, piecing, and quilting to help you make the most of this striking design. Whether you’re looking to make a statement quilt or add flair to your current project, the French braid block will deliver visual impact and timeless beauty.
1. Understanding the French Braid Quilt Block – Pattern
The French braid quilt block – pattern is built from diagonal strips arranged in a mirrored V shape that mimics the flow of a braid. This pattern creates a sense of movement and direction across a quilt, making it a great choice for eye-catching quilt layouts. It’s commonly mistaken for complex piecing, but the construction is surprisingly straightforward when broken down into basic steps.
Each block or strip starts with a central spine or axis, along which fabric strips are added alternately on each side at an angle. This method creates a chevron effect, with sharp points and directional flow. The pattern can be sewn as continuous vertical columns or assembled into individual blocks for more design flexibility.
Traditionally, the French braid quilt block – pattern was used for long panels or borders in larger quilts, but it has since evolved into a central design element in full quilts, runners, and even pillows. This block works well with both scrappy and planned fabric layouts, offering visual variety depending on your chosen color scheme.
One of the key strengths of this pattern is how well it showcases fabric collections or color gradients. Ombre fabrics and batiks look particularly stunning in this design, as the gradual color transitions enhance the braid’s flowing appearance. Whether using bold contrast or subtle tones, the French braid always catches the eye.
This pattern also allows for creative direction. You can rotate or mirror the braids to point inward or outward, building secondary patterns like diamonds, arrows, or fans when multiple braids meet. These layouts are perfect for center medallions, art quilts, or symmetrical bed quilts.
Overall, the French braid quilt block – pattern offers both structure and flexibility. It’s a fantastic option for quilters who enjoy symmetry and repetition but still want to play with color, direction, and design variations.
2. Materials and Fabric Choices for French Braid Blocks
Creating a stunning French braid quilt block – pattern starts with selecting the right materials. Since the design relies heavily on color flow and contrast, choosing your fabric palette with care is essential. Whether you go for a rainbow gradient, a monochrome palette, or a seasonal theme, your choices will directly impact the finished look.
The pattern requires strips of fabric, typically cut from width-of-fabric (WOF) pieces. You can use jelly rolls (precut 2.5″ strips) or cut your own strips to the desired width. Most quilters use strips between 2″ and 3″ wide depending on the size of the block or strip they want to make.
Choose a mix of light, medium, and dark fabrics if you want to highlight the braid’s dimension. Arranging colors from dark to light (or vice versa) on each side of the center line creates a 3D effect. If you’re using prints, make sure the patterns don’t clash too much or disrupt the flow of the braid.
For the spine (center strip), many quilters choose a neutral or bold solid to anchor the design. This spine serves as the axis and adds structure to the movement of the surrounding fabrics. You can experiment with metallics, black, white, or even pieced spines for added flair.
Backing and batting materials should be chosen based on your final quilt’s purpose. A wall hanging or art quilt may benefit from firmer batting and a coordinating backing, while a soft cotton batting is ideal for bed quilts or throws.
Additional tools include a rotary cutter, ruler with a 45-degree angle marking, cutting mat, sewing machine, pins or clips, and an iron. Accurate cutting and consistent seam allowances are key to achieving sharp points and smooth lines in the French braid quilt block – pattern.
Once you’ve selected and cut your fabrics, organize them in the order you plan to sew them. Laying out the entire strip in advance (or using a design wall) allows you to visualize the braid and make color adjustments before sewing begins.
3. How to Construct the French Braid Quilt Block – Pattern
Sewing a French braid quilt block – pattern is a satisfying and relatively simple process once you understand the method. The construction begins with the spine or center strip, to which angled fabric strips are sewn alternately from each side, forming the braided effect.
Start by cutting all your fabric strips to the same width. The length can vary depending on how long you want the braid to be. You’ll also need a base rectangle (or foundation) to help align the strips if you’re using a foundation-pieced method, though many quilters sew the strips freehand with careful alignment.
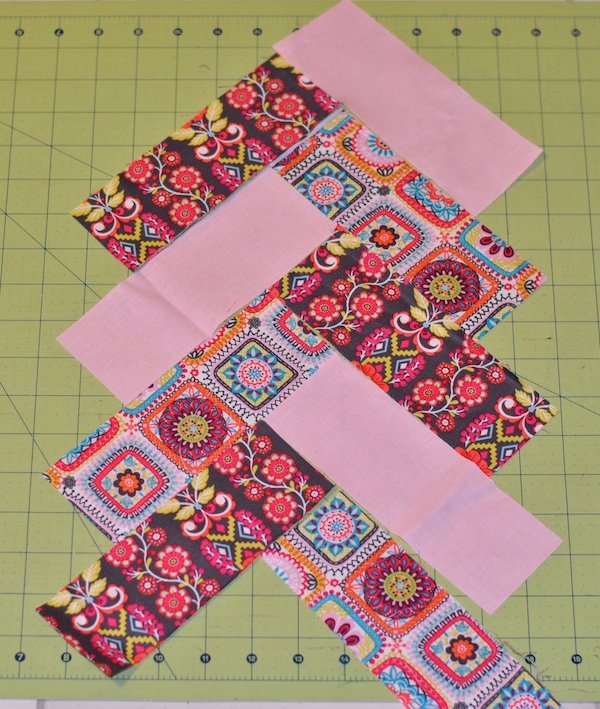
Lay your spine strip vertically on your cutting surface. Place your first angled strip (right side down) on one side of the spine, aligning the raw edges. Sew using a consistent quarter-inch seam, then press the strip outward. Repeat this process on the opposite side of the spine with your next strip, alternating sides as you build the braid.
Each time you add a strip, you’ll notice the braid growing longer and the angled points forming at the edges. It’s important to trim the bottom edges straight before adding new strips to keep everything aligned. Using a ruler with a 45-degree guide helps maintain clean, accurate angles.
After completing the desired length of the braid, you may need to trim the sides or square up the piece, especially if you’re making individual blocks rather than full-length strips. These trimmed blocks can then be sewn together or integrated into other quilt layouts.
You can join multiple French braid quilt block – pattern units together side-by-side, or separate them with sashing, borders, or alternate blocks to break up the movement and add visual interest. Consider rotating the direction of each braid for dynamic designs.
Pressing is a vital step throughout construction. Since there are many seams in a braid, pressing toward the darker fabric or open pressing may help reduce bulk and keep the piece flat. Take your time with each step to ensure neat, professional results.
4. Creative Layout Ideas and Finishing Tips
The French braid quilt block – pattern lends itself beautifully to creative layouts. Because of its directional flow, the way you position and join multiple braids can dramatically change the look of your quilt. It’s an ideal choice for both symmetrical and free-form designs.
One of the most popular layouts is to place multiple braids side by side, all pointing in the same direction, creating a waterfall effect. This style works great for modern quilts and adds a bold, structured visual. You can also mirror braids in adjacent rows to create diamond or V-shaped patterns.
Another option is to use braids as vertical or horizontal borders. Add them to the sides of a central panel or feature them as framing elements for appliqué blocks. This layout is perfect for adding energy and motion to more static quilt centers.
For a unique take, use shorter braid sections to form blocks. You can rotate these blocks in a pinwheel arrangement, build them into chevrons, or alternate them with solid fabric squares for contrast. These layout tricks make the French braid quilt block – pattern feel fresh and modern.
When quilting your finished top, consider designs that echo the movement of the braid. Diagonal lines, zigzags, or echo quilting can enhance the design and give your quilt extra texture. Walking foot quilting or free-motion are both suitable, depending on your skill and equipment.
Binding should complement your braid colors without distracting from the overall design. A solid binding in a color pulled from the braid is often the best choice. You can also use a scrappy binding using leftover strip ends for a cohesive, creative touch.
Finally, label your quilt with your name, date, and any special details. Whether you’re gifting the quilt, displaying it, or keeping it as a family heirloom, documenting your work adds meaning and acknowledges the effort and creativity poured into each French braid quilt block – pattern project.
FAQ: French Braid Quilt Block – Pattern
Q1: Is the French braid quilt block – pattern suitable for beginners?
Yes, it’s beginner-friendly as long as you are comfortable with strip piecing and can maintain a consistent seam allowance. The visual complexity comes from the layout, not difficult techniques.
Q2: What size strips should I use?
Most quilters use strips that are 2” to 2.5” wide. The length depends on the size of your finished braid and the number of pieces you plan to use.
Q3: Do I need a special ruler to cut angles?
No, but a quilting ruler with a 45-degree angle marking will help you cut and align your strips more accurately.
Q4: Can I use precuts like jelly rolls?
Absolutely. Jelly rolls are perfect for this pattern because they provide a wide range of coordinating fabrics already cut into 2.5” strips.
Q5: How can I avoid bulk at the center seam?
Press your seams carefully and consistently. Pressing them open or alternating directions can help reduce bulk at intersection points.
Q6: What quilting designs complement the French braid layout?
Diagonal lines, echo quilting, or gentle curves enhance the movement of the braid. Try to follow the direction of the braid for the best visual effect.
Conclusion
The French braid quilt block – pattern is a beautiful, versatile design that blends elegance and creativity in one stunning layout. Whether you’re making an entire quilt, a table runner, or a unique wall hanging, this pattern offers plenty of room for personal expression and design innovation.
You’ve learned about the origins of the design, materials needed, step-by-step construction, and layout possibilities. With these tools and tips, you can confidently start your own French braid quilt and create something truly one-of-a-kind.
If this guide helped you or inspired your next project, we invite you to leave a sincere opinion and share your experience or suggestions below. Your feedback supports the quilting community and helps others start their journey with confidence and creativity.