If you’re passionate about sustainable crafting and love making functional accessories, the Marsupial Belt Bag – Sewing with Scraps – Pattern is a perfect project to try. This pattern combines smart design with eco-friendly values, allowing you to create a stylish, hands-free bag entirely from leftover fabric pieces. It’s ideal for quilters, bag-makers, and crafters who want to reduce waste and get creative at the same time.
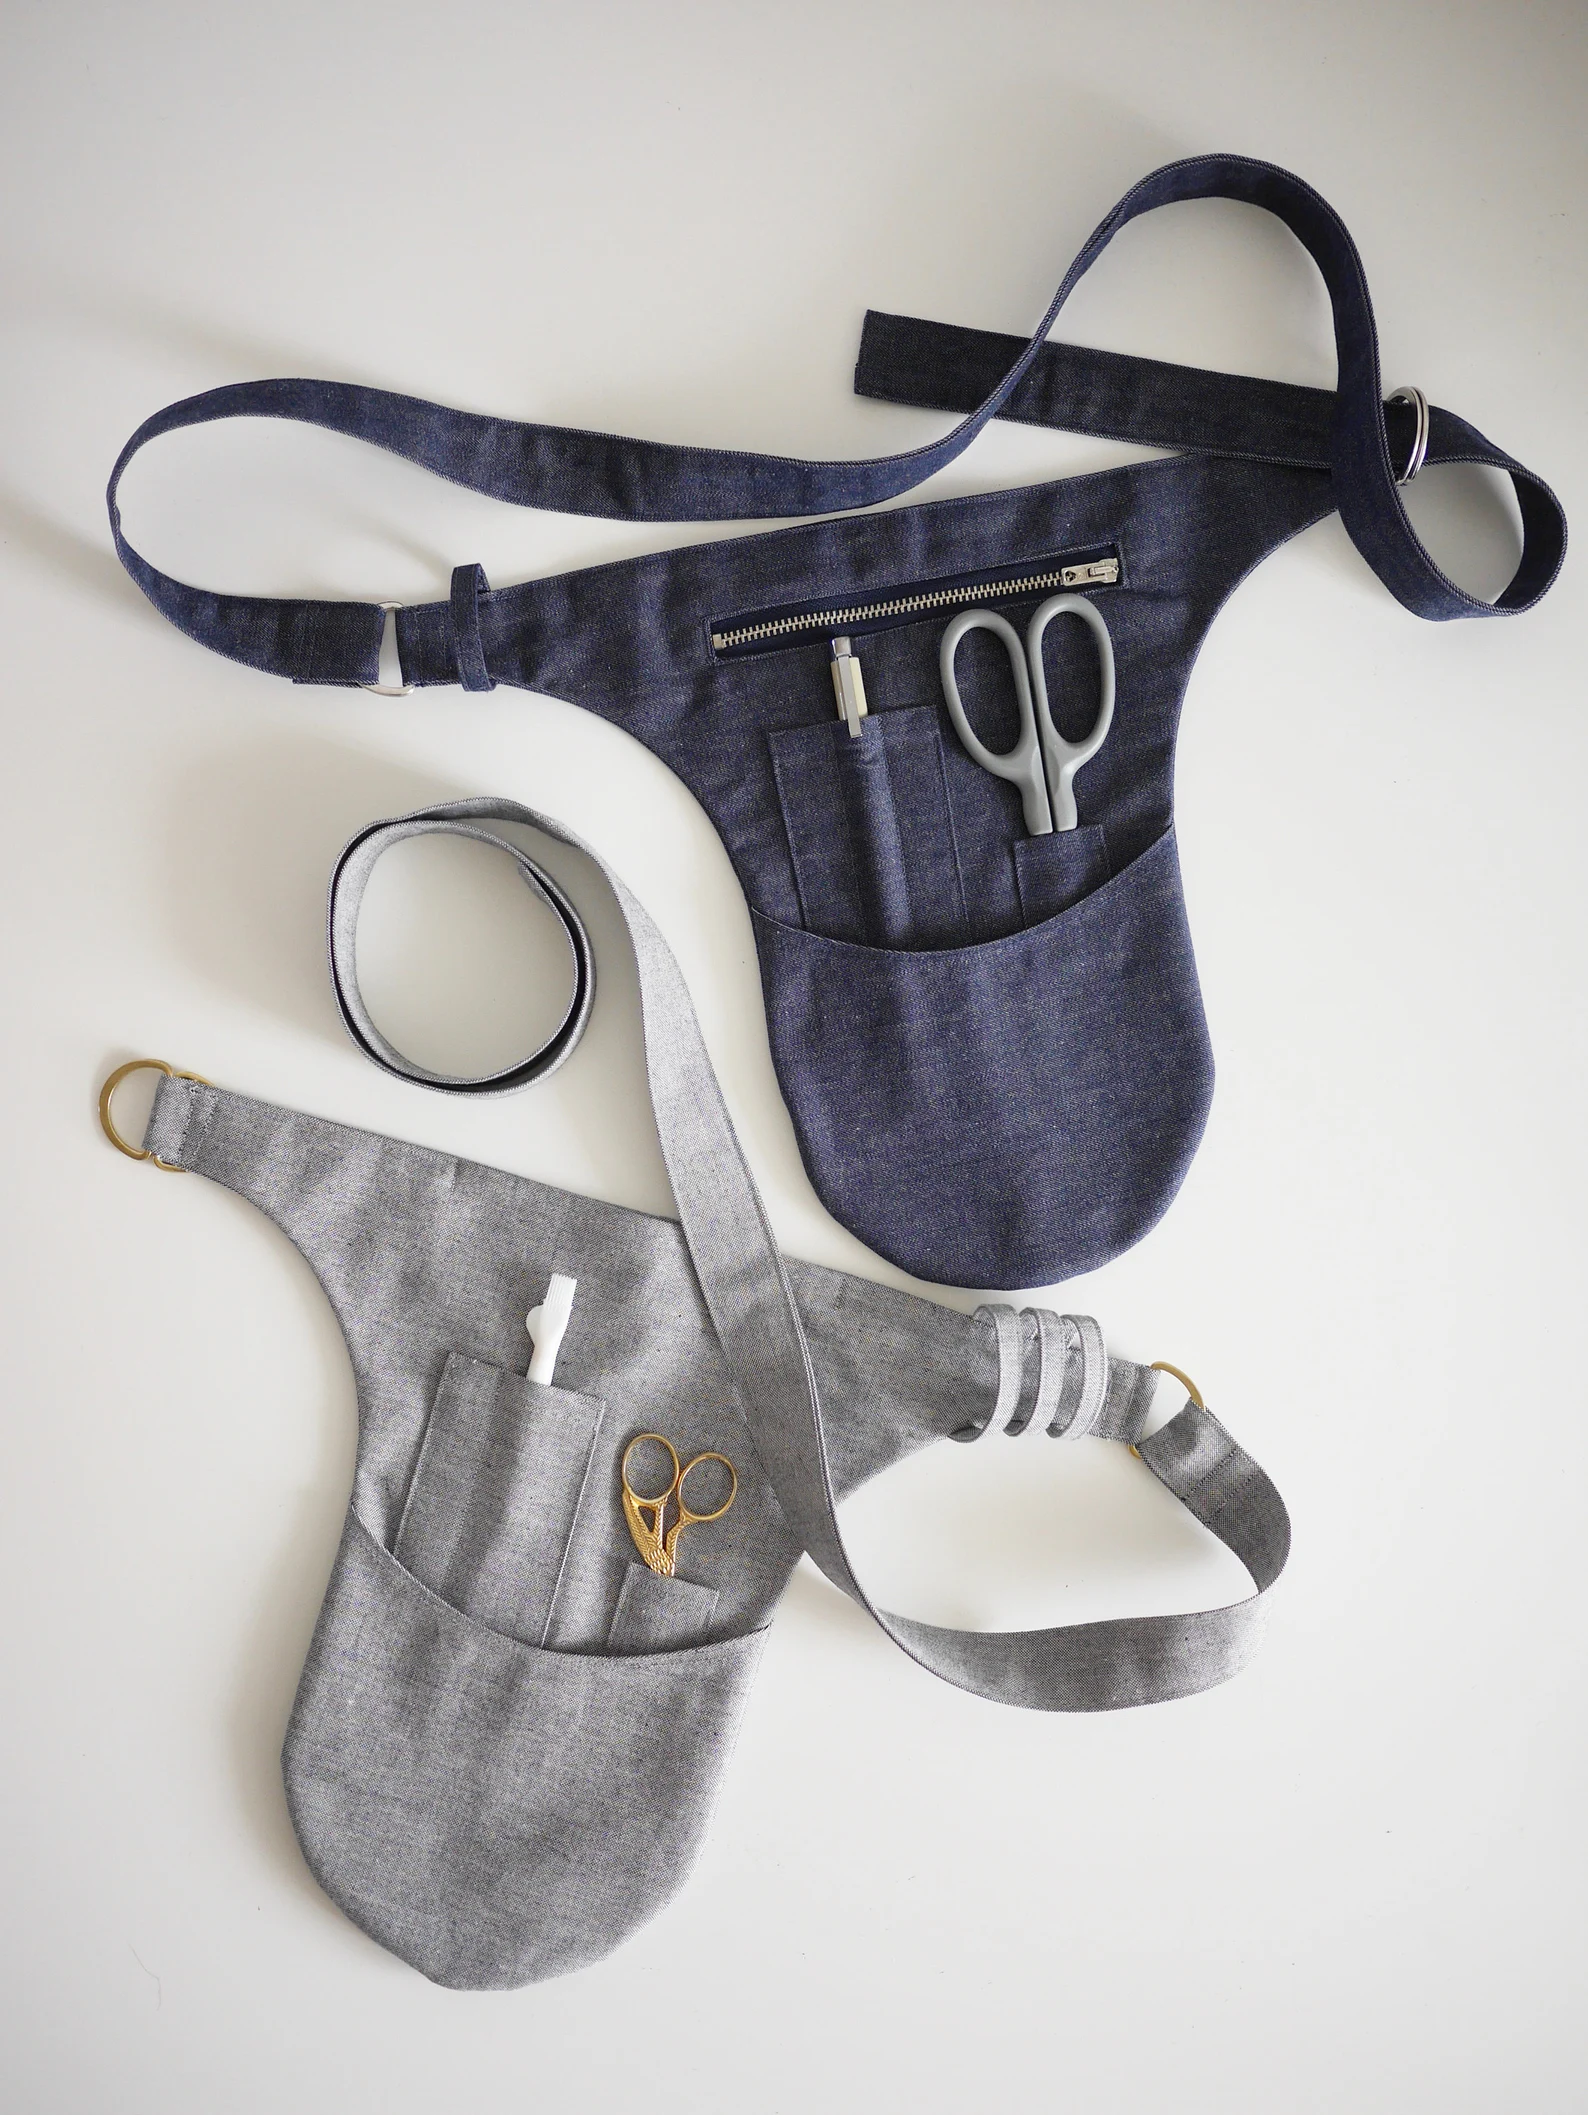
A Marsupial Belt Bag is essentially a compact pouch or pocket that attaches around your waist using a belt or strap. The term “marsupial” comes from the pouch-like structure, much like that of a kangaroo, making it a fun and functional design. When you add the idea of sewing with scraps, this project becomes a rewarding challenge to make something beautiful and practical from what you already have.
In this article, we’ll walk you through everything you need to know about the Marsupial Belt Bag – Sewing with Scraps – Pattern. From gathering materials and understanding the construction steps to adding custom details and exploring creative uses, this guide is here to help you make a unique belt bag that reflects your style while keeping sustainability in mind.
1. Why Choose the Marsupial Belt Bag – Sewing with Scraps – Pattern
One of the most compelling reasons to try the Marsupial Belt Bag – Sewing with Scraps – Pattern is its ability to transform fabric scraps into something practical and fashionable. Every crafter has a stash of leftover fabrics from previous projects, and this pattern offers the perfect excuse to use them thoughtfully instead of letting them pile up.
Unlike full-size tote bags or backpacks, the marsupial belt bag requires a relatively small amount of fabric. You can easily mix and match coordinating scraps to create color-blocked sections, patchwork panels, or even add decorative accents like appliqué or embroidery using smaller pieces.
This pattern is also highly functional. Whether you’re heading to a market, festival, hike, or just walking your dog, having a hands-free bag allows you to carry essentials like your phone, keys, wallet, or snacks comfortably and securely. It’s especially great for travel or busy errands where convenience is key.
From a sewing perspective, the project is both manageable and educational. You’ll learn or practice essential skills such as working with zippers, attaching hardware, lining small bags, and possibly even quilting your fabric panels. These techniques are valuable whether you’re a beginner or an experienced sewist.
Another benefit of the Marsupial Belt Bag – Sewing with Scraps – Pattern is its adaptability. You can scale it up or down depending on your needs and adjust the strap for different sizes. It’s also gender-neutral, making it a great handmade gift for anyone.
Finally, there’s a real sense of satisfaction in creating something completely unique out of materials that might otherwise go unused. It supports a more sustainable approach to crafting while still letting your personality and creativity shine through.
2. Materials and Preparation for Your Belt Bag
Before you begin sewing your Marsupial Belt Bag – Sewing with Scraps – Pattern, it’s important to gather all your supplies and prep your workspace. Because this project is scrap-friendly, most of your materials can come from your leftover stash, which makes it an economical and environmentally friendly endeavor.
Start with fabric scraps that are at least 4″ x 6″ or larger. You’ll need pieces for the front, back, lining, and possibly inner pockets. Cotton or canvas are ideal for structure and durability. If you’re mixing prints, consider color coordination or theme continuity to create a visually pleasing final product.
For the interfacing, medium-weight fusible interfacing works well to give your fabric pieces some body without making them too stiff. If you want a more padded feel, consider fusible fleece. This adds both protection and a slightly quilted look, which works nicely with patchwork designs.
You’ll also need a zipper for the main pouch—typically 7″ to 9″ in length depending on your pattern dimensions. Make sure it’s a good quality nylon or metal zipper, and test it before sewing. Some versions of the bag include a flap closure or secondary zippered pocket, so be prepared with extras.
For the strap, you can sew your own using fabric scraps and interfacing, or use pre-made webbing for a sturdier and quicker option. Add hardware such as D-rings, strap adjusters, or buckles if you want to make the strap adjustable or detachable.
Standard sewing supplies like a rotary cutter, ruler, cutting mat, sewing clips, and a zipper foot for your sewing machine will help you stay accurate and efficient. Ironing your scraps before cutting will ensure clean lines and easier piecing.
Before you start sewing, take a moment to lay out your scraps like a puzzle. This helps you visualize the front and back panels, align directional prints, and ensure you have enough fabric variety to make the bag interesting and balanced.
3. Step-by-Step Assembly of the Marsupial Belt Bag
The construction of the Marsupial Belt Bag – Sewing with Scraps – Pattern is straightforward but requires attention to detail, especially when piecing together small fabric sections and installing the zipper correctly. Here’s a simplified breakdown of the assembly process.
Start by assembling the outer panel. If you’re doing patchwork, piece together your fabric scraps until you reach the desired size. Use a ¼” seam allowance and press all seams open or to one side. Once complete, fuse the interfacing to the wrong side of the panel.
Repeat the process for the back panel. You can choose to make it from one solid scrap piece or continue with patchwork. Add any external pockets at this stage if desired. Topstitch for strength and decoration, and fuse the interfacing.
Prepare the lining panels by cutting them to match your outer panels. You can include an internal slip or zipper pocket here for additional storage options. Interface the lining lightly if you want more structure.
Install the zipper to the top edge by sewing it between the outer panel and the lining, right sides facing. Use your zipper foot for accuracy and smooth stitching. Once attached, press and topstitch along the zipper edge to prevent the fabric from getting caught in the teeth.
Sew the outer panels together, right sides facing, and repeat with the lining—but leave a small opening in the lining’s bottom seam to turn the bag. Make sure to clip corners and trim any bulky seams to reduce bulk.
Turn the bag right side out through the lining, push out the corners gently, and stitch the lining closed. Tuck it into the bag and give the entire piece a good press. Add the strap or belt loops securely using reinforced stitching to ensure durability.
4. Customization, Style Variations, and Practical Uses
The Marsupial Belt Bag – Sewing with Scraps – Pattern invites creative interpretation. Once you’ve sewn the basic version, there are countless ways to personalize your belt bag and tailor it to different lifestyles or fashion preferences.
For a sporty version, use ripstop nylon or water-resistant fabric combined with bold zippers and reflective trim. This is ideal for joggers, cyclists, or festival goers who need something lightweight and functional.
To make a boho or cottagecore-inspired design, incorporate lace, floral prints, or vintage fabrics from old clothes. Add embroidery or a hand-stitched patch for a personal, artisanal touch. Mixing textures can also give your bag more character.
If you want a minimalist look, stick to solids or monochrome palettes and eliminate extra hardware. Use invisible zippers and hidden pockets for a sleek, streamlined design. This type of bag pairs well with everyday outfits or office casual wear.
Add personalization by incorporating initials, printed labels, or even QR codes that link to a digital business card or website if you’re giving the bag as a handmade gift or selling it at markets.
Scale the bag larger or smaller based on your specific needs. A larger version might fit a small tablet or travel notebook, while a mini version can be worn across the chest for a trend-forward style. You can even make a kids’ version using playful prints and adjustable elastic waistbands.
Beyond personal use, the Marsupial Belt Bag – Sewing with Scraps – Pattern is great for gifting. Make one for a teacher, friend, or family member who loves practicality and style. Each bag is unique, making it extra meaningful.
FAQ – Frequently Asked Questions
Q1: Is the Marsupial Belt Bag beginner-friendly?
Yes! The pattern is ideal for confident beginners who have basic sewing experience. It introduces useful skills like zippers and bag construction without being overwhelming.
Q2: Can I use all kinds of scraps?
Mostly yes—cotton, canvas, denim, and linen scraps work well. Just avoid stretchy or slippery fabrics unless you’re experienced with them.
Q3: What size should the finished bag be?
Most versions are around 7-9 inches wide and 5-7 inches tall, but this can be adjusted. The key is to ensure it’s big enough for essentials like a phone and wallet.
Q4: How do I clean the finished bag?
If made with washable materials, the bag can usually be spot-cleaned or hand-washed. Avoid machine washing if it includes interfacing or non-washable hardware.
Q5: Can I sell belt bags made from this pattern?
Yes, many designers allow handmade sales from their patterns. Always check the terms if you downloaded or purchased the pattern from a specific creator.
**Q6: What if I
don’t have a zipper?**
You can substitute with a flap closure, Velcro, or snap buttons. It’s a flexible project, so adapt it to the supplies you have on hand.
Conclusion
The Marsupial Belt Bag – Sewing with Scraps – Pattern is the perfect example of sustainable creativity. It combines thoughtful design with practical use, all while helping you reduce fabric waste and build valuable sewing skills. Whether you’re crafting for fun, function, or gifts, this pattern delivers.
We hope this guide helped you feel confident and inspired to create your own unique Marsupial Belt Bag. Have you made one already? Or do you have a creative twist to share? Leave your honest opinion and suggestions in the comments—we’d love to hear your thoughts and ideas!