The Path and Stiles Quilt Block – Pattern is a timeless design that combines simplicity with visual charm, making it an excellent choice for both beginner and experienced quilters. With its clean lines and balanced symmetry, this classic block brings structure and a sense of order to any quilt. Often found in traditional quilts, this pattern has stood the test of time and remains a popular favorite across generations.
At first glance, the Path and Stiles Quilt Block – Pattern may appear modest, but its grid-based layout offers countless opportunities for creative interpretation. Its alternating paths and “stiles” (vertical bars) create subtle movement, allowing quilters to experiment with color placement and layout variations. Whether you’re crafting a full-size quilt or a smaller decorative piece, this block is versatile enough to suit a wide range of quilting projects.
One of the best things about the Path and Stiles Quilt Block – Pattern is that it’s approachable yet allows room for customization. From fabric choices to modern arrangements, this design encourages personal expression while maintaining a solid, structured foundation. In the sections below, we’ll explore how to choose materials, piece the block, adjust layouts, and finish your quilt like a pro.
1. Fabric Selection and Color Planning
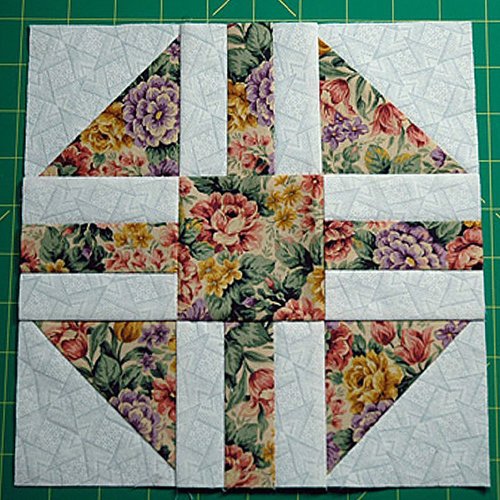
Choosing the right fabric is key to achieving a successful Path and Stiles Quilt Block – Pattern. This pattern typically uses a three-color combination: a background fabric, a contrasting fabric for the “stiles,” and a central focus fabric for the squares. Keeping the contrast strong between these elements is important to maintain the visual structure of the block.
Start by selecting a light or neutral background fabric. This helps the design appear clean and ensures that the other elements stand out. White, cream, or light gray are common choices, but you can choose any tone that complements your color scheme.
Next, pick a bold or patterned fabric for the stiles. These vertical and horizontal strips frame the center square and define the “path” in the block. Using a darker or more saturated tone creates strong definition and helps guide the eye across the quilt.
The central square is a great place to add a pop of color or a fun print. Florals, geometric prints, or even fussy cuts from novelty fabrics can all work well. This part of the Path and Stiles Quilt Block – Pattern draws attention and can be used to tie together a quilt’s theme.
If you’re making a full quilt, try planning your color palette in advance using fabric swatches or a digital quilt design tool. Alternating block colors or using a gradient effect can add dimension and flow to your final piece.
Prewashing your fabrics is always recommended, especially if you’re combining lights and darks. This prevents bleeding and ensures the finished quilt holds up well after washing and daily use.
Lastly, consider how the fabrics will look when the blocks are repeated. The simplicity of the Path and Stiles Quilt Block – Pattern allows for secondary patterns to emerge when blocks are joined—making color placement even more impactful.
2. Cutting and Piecing Instructions
Precision is essential when working with the Path and Stiles Quilt Block – Pattern. Since this block relies on straight lines and clean intersections, accurate cutting and careful piecing will make a big difference in the final result.
Begin by cutting your fabric into the necessary pieces: one center square, four small corner squares, and four strips for the stiles. The size of these pieces will vary based on your desired block size, but maintaining a consistent seam allowance (usually ¼ inch) is crucial for uniform blocks.
Lay out your pieces before sewing. Start by assembling the three-row layout—each block consists of a top row (square, strip, square), a middle row (strip, center square, strip), and a bottom row (square, strip, square). This helps you visualize the design and catch any layout errors early.
Sew each row individually, pressing seams as you go. For best results, press seams toward the darker fabric or open them to reduce bulk. Use a hot iron and a bit of steam to keep the pieces flat and crisp.
Once all rows are completed, join them together carefully. Align corners and edges to ensure the stiles meet evenly across the center. Pin the rows together if needed, especially when working with slippery or delicate fabrics.
After piecing the full block, press it flat and measure it to ensure it matches the intended size. If needed, trim the edges slightly to square it up. Repeating this process with each block will make final quilt assembly smoother.
Repeat these steps for as many blocks as your project requires. With consistent piecing and attention to detail, your Path and Stiles Quilt Block – Pattern will come together beautifully and with precision.
3. Layout Possibilities and Design Variations
One of the joys of using the Path and Stiles Quilt Block – Pattern is the wide range of layout possibilities. Although each block is identical in structure, slight variations in color placement or rotation can create entirely new visual effects.
A traditional grid layout with all blocks aligned creates a structured, checkerboard-like quilt. This approach is ideal for showcasing a repeating color scheme and maintains a clean, organized look.
For more visual interest, try alternating the direction of the blocks. Rotating every other block 90 degrees can create a weaving or basket-like effect that enhances the sense of movement across the quilt top.
Another fun variation involves using negative space. By setting blocks with sashing or spacing between them, the overall design appears lighter and more modern. You can also use this technique to highlight individual blocks or motifs within the quilt.
Scrappy versions of the Path and Stiles Quilt Block – Pattern are also very popular. Use different fabrics for each center square or stile strip to create a vibrant, eclectic look. This is a great way to use leftover fabric or charm packs from your stash.
You can also enlarge the block to create a bold, statement piece or shrink it to make smaller accent projects like pillows, table runners, or wall hangings. The pattern adapts well to all sizes, making it incredibly versatile.
Try adding a border or mixing this block with others in a sampler quilt. The Path and Stiles Quilt Block – Pattern works well alongside many traditional and modern block types, giving you freedom to personalize your quilt with creative combinations.
4. Finishing Your Quilt with Confidence
Once your blocks are complete and laid out in your desired arrangement, it’s time to move on to assembling the quilt top. Sew the blocks together row by row, making sure seams and points stay aligned. Take your time to check for accuracy.
When the quilt top is fully assembled, press all seams flat and prepare your quilt sandwich by layering the backing, batting, and quilt top. Baste the layers together using safety pins, spray adhesive, or traditional hand-basting, depending on your preference.
Quilting designs for the Path and Stiles Quilt Block – Pattern can be as simple or elaborate as you like. Straight-line quilting along the block seams enhances the clean, structured look. For added texture, consider diagonal or crosshatch patterns.
If you’re using a domestic sewing machine, start quilting from the center outward to avoid fabric shifting. Walking feet or quilting gloves can provide better control, especially for larger quilts.
Once quilting is complete, trim the edges evenly and prepare to bind the quilt. Choose a binding fabric that complements the rest of your design. A contrasting binding can frame the quilt nicely, while a matching one provides a more seamless finish.
Finally, label your quilt with the date and any personal details you’d like to include. Whether gifted, sold, or kept as a keepsake, every quilt has a story, and finishing it with care ensures it’s both beautiful and long-lasting.
Frequently Asked Questions (FAQ)
What is the Path and Stiles Quilt Block – Pattern?
The Path and Stiles Quilt Block – Pattern is a traditional quilt design made from a central square surrounded by strips and corner squares. It’s known for its balance, simplicity, and versatile layout options.
Is the Path and Stiles pattern good for beginners?
Yes, this pattern is ideal for beginners. It involves basic shapes like squares and rectangles, and the construction is straightforward. It’s a great way to learn piecing and block alignment.
What size should I make each block?
Standard sizes are 9”, 10”, or 12” finished blocks. However, you can scale the block up or down depending on your project needs. Just make sure to adjust all measurements proportionally.
Can I make this quilt scrappy?
Absolutely. The Path and Stiles Quilt Block – Pattern is perfect for scrappy quilting. Using different fabrics in the center squares or stiles adds charm and personality to your quilt.
What is the best quilting design for this block?
Straight-line quilting works well with this block, especially following the seams. You can also try crosshatch quilting or minimal geometric patterns to keep the focus on the block design.
How many blocks do I need for a full quilt?
That depends on your desired quilt size and block dimensions. For example, a 60” x 72” quilt using 12” blocks would require 30 blocks (5 across by 6 down).
Conclusion
The Path and Stiles Quilt Block – Pattern is a versatile and beginner-friendly design that offers endless creative possibilities. From fabric selection and precise piecing to layout variations and finishing touches, this block
proves that simplicity can be powerful. Whether you’re making a classic quilt or putting a modern twist on a traditional pattern, this block is a rewarding and enjoyable choice for any quilting project.
We hope this guide has inspired you to try the Path and Stiles Quilt Block – Pattern in your next quilt. If you’ve made one before or plan to try it soon, please share your honest opinion, experiences, and suggestions in the comments. Your insights help other quilters grow and create with confidence!