If you’ve ever needed to transport a hot dish to a family gathering, potluck, or picnic, a Casserole Carrier – Pattern is a must-have project. Practical, stylish, and easy to personalize, this sewing project is one of the most useful items you can make for your kitchen—or as a thoughtful handmade gift. Whether you’re an experienced sewist or just learning the ropes, the Casserole Carrier – Pattern is an excellent way to combine functionality with creativity.
The appeal of making your own casserole carrier lies in the control you have over the size, fabric, insulation, and design. With the right Casserole Carrier – Pattern, you can craft a custom item that fits your favorite dish perfectly while also showcasing your sewing skills. Best of all, it saves you from juggling awkward trays with towels or trying to find a safe way to transport hot food.
In this article, we’ll break down everything you need to know about choosing the right Casserole Carrier – Pattern, how to sew it, which materials work best, and ideas to personalize your carrier. You’ll also find answers to the most commonly asked questions and a clear, helpful conclusion that ties everything together for your next sewing project.
1. What Is a Casserole Carrier and Why You Need One
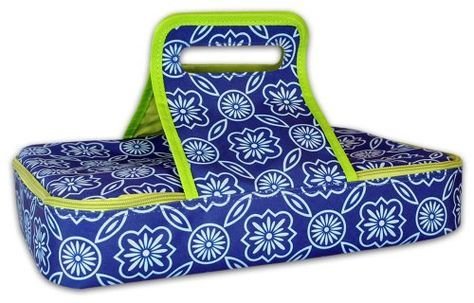
A Casserole Carrier – Pattern gives you a sewing template to create a portable, insulated holder for casserole dishes. These carriers are designed to maintain the temperature of your food while making transport easy and secure. Whether you’re carrying a glass dish, baking pan, or even a slow cooker insert, a well-designed carrier ensures your food arrives safely and still hot.
The beauty of a casserole carrier is in its versatility. Most patterns can be adapted to different sizes and shapes, whether you’re transporting a square baking dish, a round pie plate, or a deep roasting pan. The Casserole Carrier – Pattern can be customized with handles, closures, or even pockets for utensils or serving spoons.
One of the main reasons people love casserole carriers is the added insulation. With heat-resistant materials like Insul-Bright or thermal batting, your carrier keeps food warm for longer, making it perfect for potlucks, family dinners, or church events.
A handmade casserole carrier also makes an excellent gift. If you’re looking for a housewarming, bridal shower, or holiday present, a carrier made from a personalized Casserole Carrier – Pattern shows thoughtfulness and practicality. Choose fabrics that reflect the recipient’s style or kitchen decor for an extra special touch.
Beyond practicality, creating your own casserole carrier is also a satisfying sewing project. It allows you to work with layers, practice straight stitching, and use bias tape or Velcro closures, which are valuable techniques for beginners to intermediate sewists.
Whether you’re sewing for yourself or someone else, a casserole carrier brings convenience, safety, and style to the way you share meals and transport your favorite dishes.
2. Materials and Tools Needed to Sew a Casserole Carrier
Before you start sewing your Casserole Carrier – Pattern, gathering the right materials will help you avoid frustration and ensure a high-quality result. Most patterns are straightforward and don’t require advanced tools, making this a great weekend project.
Begin with the fabric. You’ll need an outer fabric, a lining fabric, and an insulating layer. Cotton is an excellent choice for the exterior because it’s durable and easy to sew. For the lining, you can also use cotton or opt for something easy to clean, like a food-safe laminate.
Insulation is key to keeping your dish warm. Products like Insul-Bright are specifically designed for heat retention and are a favorite for projects like casserole carriers, pot holders, and lunch bags. Some patterns suggest adding a layer of cotton batting for extra cushioning and insulation.
You’ll also need thread, preferably polyester for strength, and a sewing machine capable of handling multiple layers. Use a walking foot if available—it helps feed thick layers evenly and prevents shifting, which is especially helpful when sewing through the insulated parts.
Additional tools include pins or clips (especially useful for thicker layers), fabric scissors or a rotary cutter, a ruler, and an iron. If your Casserole Carrier – Pattern includes features like handles or Velcro closures, have those materials ready as well.
Lastly, print or draw your Casserole Carrier – Pattern template ahead of time. Many free and paid patterns are available online, and you can even adjust an existing pattern to fit a specific dish you use frequently. Having the right materials and tools on hand makes the sewing process smoother and more enjoyable.
3. Step-by-Step: How to Sew a Casserole Carrier
Sewing a Casserole Carrier – Pattern is a fun and rewarding project that can be completed in just a few hours. Follow these general steps to create a carrier that’s both beautiful and functional.
Start by cutting all your fabric pieces according to the pattern. You’ll typically need a base piece (outer and lining), an insulating layer, and two handle strips. Some designs may also include a flap, pocket, or strap closure—make sure to double-check your specific Casserole Carrier – Pattern.
Layer your materials in the correct order. A common arrangement is outer fabric right-side down, insulation in the middle, and lining fabric right-side up. Secure the layers using clips or pins to keep them from shifting during sewing.
Quilt the layers together by sewing straight lines or a grid pattern across the base. This not only holds everything together but also gives your carrier a polished, professional appearance. Quilting is optional but highly recommended for durability.
Next, prepare the handles. Fold the fabric strips lengthwise, press, and stitch them to create sturdy handles. Sew the handles securely to the outer fabric. Double stitching the handle attachments helps reinforce areas that bear weight.
Assemble the carrier by sewing the outer edges with a binding or bias tape. This finishes the edges cleanly and keeps all the layers enclosed. Some patterns may have you sew right sides together and turn the carrier inside out before adding topstitching.
Add closures such as Velcro, buttons, or ties to secure the casserole dish inside the carrier. This final step gives your project a finished look and ensures the dish stays in place during transport. And just like that, your custom casserole carrier is ready to go.
4. Personalizing and Customizing Your Casserole Carrier
One of the best aspects of using a Casserole Carrier – Pattern is the freedom to personalize your project. From fabric choices to added embellishments, you can make your carrier as simple or as elaborate as you’d like.
Start with fabric selection. Choose prints that reflect the season, holiday, or recipient’s personality. For example, fall-themed fabrics are great for Thanksgiving, while florals or pastels work beautifully for springtime potlucks.
You can monogram the carrier with embroidery or iron-on vinyl. Adding a family name or initial gives the carrier a personal touch and turns it into a cherished keepsake—especially if it’s a gift.
Think about the shape and size of your casserole dish. You can easily adjust the Casserole Carrier – Pattern to accommodate larger or deeper pans. Simply increase the dimensions of the base and adjust the placement of the handles and closures accordingly.
Add extra functionality with features like a small pocket on the side for utensils or a built-in potholder flap. These additions make the carrier more convenient and useful for on-the-go meals.
Try experimenting with reversible designs by using different fabrics for the outer and lining layers. This adds variety and makes your project more visually interesting—especially if you plan to use it in multiple settings.
Don’t forget about finishing touches. Coordinating thread, decorative stitching, or even fabric-covered buttons can elevate your project from basic to boutique-quality. Let your creativity shine while staying true to the functionality of the original Casserole Carrier – Pattern.
FAQ – Casserole Carrier – Pattern
Q1: What size dish does a typical Casserole Carrier – Pattern fit?
A: Most patterns are designed to fit a 9″x13″ baking dish, but you can easily adjust the dimensions to fit your specific casserole or pan size.
Q2: What is the best insulation to use for a casserole carrier?
A: Insul-Bright is highly recommended. It provides heat resistance and helps maintain temperature. Pairing it with cotton batting adds extra thickness and stability.
Q3: Can I wash a casserole carrier?
A: Yes, if you use machine-washable fabrics and avoid materials that degrade with heat or water. Always follow fabric care instructions and avoid the dryer if your carrier contains Insul-Bright.
Q4: Is this a good beginner sewing project?
A: Absolutely. The Casserole Carrier – Pattern is simple enough for beginners but still offers room for growth with quilting, binding, and customization techniques.
Q5: Can I use this pattern for gifts or sell finished carriers?
A: Yes, casserole carriers make fantastic handmade gifts. If using a commercial pattern, check for licensing restrictions if you plan to sell them.
Q6: What closures work best for casserole carriers?
A: Velcro is easy and secure, but you can also use ties, buttons, snaps, or buckles depending on your design preferences and skill level.
Conclusion
The Casserole Carrier – Pattern is more than just a sewing project—it’s a blend of function, creativity, and tradition. Whether you’re making one to use at home, give as a gift, or sell at a craft fair, this practical accessory adds convenience and personality to any meal on the move.
In this article, we’ve explored what a casserole carrier is, the materials you’ll need, step-by-step sewing instructions, and ideas to personalize your project. We also addressed common questions to ensure your experience is smooth andenjoyable.
Now it’s your turn to give it a try. We hope this guide inspires you to create something both useful and beautiful. Leave your honest opinion and suggestions in the comments—we’d love to hear your thoughts and see your creations. Happy sewing!