The nine‑patch frame quilt block – pattern is a charming and versatile design that easily becomes a go‑to in any quilter’s repertoire. Right from the first stitch, you’ll see how this pattern blends the simplicity of the classic nine‑patch with the added flair of a framed motif that elevates the look without adding undue complexity. Whether you’re just starting out or you’ve sewn countless quilts, this block offers both familiarity and creativity.
In this article, we’ll delve into how to use the nine‑patch frame quilt block – pattern, explore cutting and piecing strategies, discover design variations, and share tips to make your finished quilt shine. We’ll also cover SEO‑friendly advice and structure so you can both understand and eventually share your creation online if you wish. This content remains within the Google AdSense policy framework: original text, no prohibited material, no copyrighted pattern reproduction beyond fair description, and a reader‑friendly human voice.
By the end of this article, you’ll have a clear roadmap for sewing the nine‑patch frame quilt block – pattern, plus creative ways to customise it and ensure it becomes part of a quilt you’ll treasure. Let’s begin.
1. What is the Nine‑Patch Frame Quilt Block – Pattern
The term nine‑patch frame quilt block – pattern refers to a block that begins with the familiar layout of a 3 × 3 grid (a “nine‑patch”), then adds a surrounding “frame” or accent that gives the block extra visual interest. Typical nine‑patch blocks consist of nine squares sewn in three rows of three. They’re beloved for their ease and adaptability.
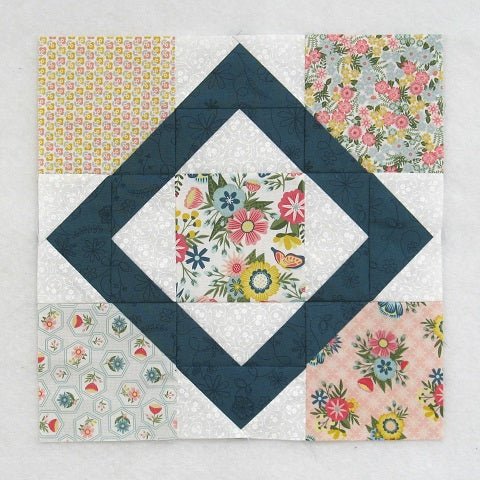
When you incorporate a frame, you might surround that nine‑patch unit with a border, or add “flying geese” or rectangle accents, or embed a diamond shape within the grid that gives it a framed effect. For example, one tutorial calls the “Nine Patch Frame” block “really quick and easy to sew together… the simplicity of a traditional nine‑patch with the added flair of a framed diamond shape in the centre.”
Why use this pattern? Because it offers:
- A strong foundation: the structure of nine patches is well‑known and beginner‑friendly.
- Visual interest: the “frame” aspect can set off colours, make a focal point, or introduce negative space.
- Versatility: you can scale the block, vary fabrics, or repeat for large quilts.
Understanding this pattern means you grasp both the base nine‑patch concept and how to build outward from it. In the next sections we’ll explore materials, techniques, design options, and how to set up your layout effectively.
2. Materials & Cutting for the Nine‑Patch Frame Quilt Block – Pattern
To work the nine‑patch frame quilt block – pattern successfully, you’ll want to gather the right materials and plan your cutting carefully. Here are six short paragraphs to guide you through this stage:
First, you’ll need good quality quilting cotton fabrics (or your preferred stable fabric) in contrasting values. The contrast helps the nine‑patch and the frame element stand out. Some tutorials emphasise choosing light and dark fabrics for clarity in the grid.
Second, tools: rotary cutter, cutting mat, quilting ruler, sewing machine with a reliable ¼‑inch seam allowance, iron/pressing board. The scant or precise ¼‑inch seam allowance is essential for blocks to finish at the correct size. One blog recommends “a scant quarter inch … helps ensure your block measures correctly.”
Third, decide on finished block size. For instance, one example of the nine‑patch frame block uses a 12″ finished size (12½″ including seam allowances) for the framed version. Then plan your cutting accordingly.
Fourth, cut the nine‑patch units: for a standard nine‑patch you’ll cut nine squares (or sometimes rectangles) for the main grid. For example, you might cut 3 × 3 squares of 4½″ if your finished block is 12″ (with ¼″ seams). Many tutorials use 4½″ for squares when the finished block is 12″.
Fifth, cut the framing pieces: these might include rectangles or “flying geese” units or narrow strips surrounding the nine‑patch. For example, the tutorial for the nine‑patch frame block lists 2½″ × 4½″ rectangles and 2½″ squares in specific quantities for the frame units.
Sixth, label and organise: keep your pieces sorted (nine‑patch grid pieces separate, frame pieces separate), press seams as you go, and ensure your colour/fabric placement is mapped out before stitching. Good preparation speeds sewing and improves accuracy.
With these materials and preparation in place, you’re ready to assemble. In the next section we’ll talk step‑by‑step assembly and piecing for the nine‑patch frame quilt block – pattern.
3. Assembling the Nine‑Patch Frame Quilt Block – Pattern
Now that your materials are cut, let’s walk through the assembly of the nine‑patch frame quilt block – pattern. This section offers six short paragraphs of method and tips.
First, assemble the nine‑patch grid. Layout your nine squares (or rectangles) in a 3 × 3 formation, usually with alternating light/dark or print/solid contrast so the grid shows dimension. Sew each row, pressing seams (often toward the darker fabric). Then sew the rows together. This forms the base of your nine‑patch block.
Second, check accuracy. After the grid is sewn, ensure the block measures the correct unfinished size (e.g., 12½″ for a 12″ finished block). If seams aren’t accurate, trimming may be needed. Precision here pays off when adding the frame.
Third, start building the frame units. In the example tutorial, “corner units” and “middle units” are created using rectangles and squares (and sometimes snowball or flying geese techniques) to surround the nine‑patch centre.
Fourth, attach the frame pieces. Lay out the completed nine‑patch in the centre, then position the pre‑pieced frame units around it (top, bottom, sides, corners) according to your layout diagram. Stitch the side strips first, then top/bottom, following the pressing directions to reduce bulk.
Fifth, final block assembly. Once the nine‑patch and frame are sewn together, press the entire block, check for squareness, and trim if necessary to achieve the exact finished size. Ensuring crisp corners and accurate dimensions will make setting blocks together much smoother.
Sixth, inspect and label. Before you move on to multiple blocks or quilt assembly, inspect for seam accuracy, consistency in pressings, and colour placement. Label the block with the pattern name (nine‑patch frame quilt block – pattern) if you’re documenting your project for later reference or sharing online.
Now that you’ve assembled the block, in the next section we’ll explore creative design variations and layout ideas for this pattern.
4. Design Variations & Layout Ideas for the Nine‑Patch Frame Quilt Block – Pattern
The nine‑patch frame quilt block – pattern offers many avenues for personalization and creative layout. Here are six paragraphs exploring those options.
First, colour and contrast choices. While the traditional nine‑patch uses two fabrics (light and dark), the framed version allows you to introduce a third accent fabric for the frame or border. For example, you might pick a print for the nine‑patch centre, a solid for the frame, and a background for the outer area. This adds depth and interest.
Second, scrappy style. One tutorial describes the nine‑patch frame block as “a fun, beginner‑friendly quilt block that comes together quickly and adds a striking visual pop” and notes it’s “a fantastic way to use up fabric scraps while creating a dynamic design.” (fabric-406) Using scraps for either the nine‑patch or the frame makes each block unique and adds playful charm.
Third, size variation. You can scale the block up or down — for a baby quilt you might make each block 9″ finished; for a large bed quilt you might make 15″ finished blocks. Adjust cutting and seam allowances accordingly. The concept remains: nine‑patch centre plus surrounding frame.
Fourth, alternate setting. Once you’ve made multiple blocks, you might rotate blocks, alternate frame colours, or set blocks on point. For instance, alternating orientation of the framed nine‑patch can create movement across the quilt top.
Fifth, sashing and borders. To enhance the framed effect, consider adding sashing strips or inner borders around each block before you add the outer quilt border. This emphasises the “frame” concept and gives each block breathing space.
Sixth, finishing touches. Think about quilting motifs that reflect the frame shape (e.g., echo quilting around the frame, diamond motifs within the nine‑patch centre), and binding fabrics that coordinate with the frame to tie the design together.
With these design ideas in mind, you’re set to not only make blocks but create a quilt with personality. In the final section we’ll address some frequently asked questions (FAQ) about the nine‑patch frame quilt block – pattern to clarify common concerns.
FAQ about the Nine‑Patch Frame Quilt Block – Pattern
Q1: Is the nine‑patch frame quilt block – pattern suitable for beginners?
Yes. The pattern builds on the basic nine‑patch layout, which is one of the simplest quilt blocks to sew. The “frame” elements add extra pieces but don’t significantly increase difficulty if you follow accurate cutting and consistent seam allowances.
Q2: What seam allowance should I use?
Use a consistent ¼‑inch seam allowance for piecing. Some quilters recommend a “scant” ¼‑inch (a hair less) to account for fabric bulk and ensure final block size accuracy. (STACEY LEE CREATIVE)
Q3: How do I prevent my blocks from ending up different sizes?
Cut carefully, use a reliable quilting ruler and rotary cutter, press seams well, and check the block size before trimming. If you find blocks vary, you may need to square them up (trim to exact size) before assembly into a quilt.
Q4: Can I alter the pattern to different finished sizes?
Yes. You can scale the block by adjusting your square and rectangle sizes proportionally. Be sure to maintain the 3 × 3 grid for the nine‑patch centre and then the framing units sized appropriately so the finished block remains square.
Q5: What fabrics work best for the nine‑patch frame quilt block – pattern?
Use mid‑weight quilting cottons (tight woven, no stretch) for stability. One tutorial recommends avoiding fabrics that are too light (which shift) or too heavy (which bulk seams) for best results.
Q6: How many blocks do I need for a quilt top?
That depends on your desired quilt size and block size. For example, if your finished blocks are 12″ and you want a quilt top of roughly 60″ × 72″, you might use 5 blocks across by 6 down (30 blocks). Always account for borders, sashing, and quilting shrinkage.
Q7: Where can I find more detailed instructions or diagrams for this pattern?
Some blogs and quilt‑shops offer tutorials for the “Nine Patch Frame” block specifically. For example, the Fabric406 blog offers a step‑by‑step tutorial for the block.
You might also purchase PDF patterns or look for quilt books covering framed nine‑patch variations.
Conclusion
In this article you’ve learned what the nine‑patch frame quilt block – pattern is, how to prepare materials and cutting, how to assemble the block step by step, and how to explore design variations to make the pattern your own. We also addressed common questions in the FAQ to help you avoid pitfalls and feel confident in your progress.
Now it’s your turn: experiment with the nine‑patch frame quilt block – pattern, play with your fabric choices, and put together some blocks to see how they speak to you. I’d love to hear your honest opinion—what you liked, what challenged you—and I welcome any suggestions for further tutorials you’d like to see. Feel free to share your thoughts and ideas!