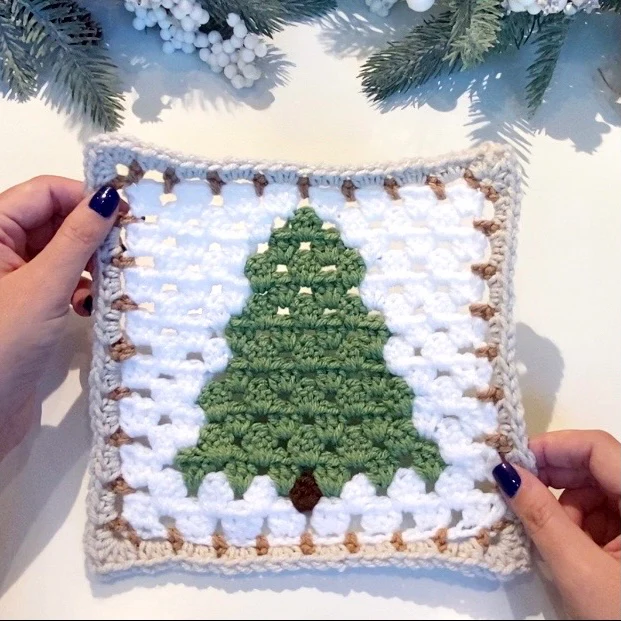
When it comes to festive crochet projects, few are as fun and versatile as the Christmas Tree Crochet Block – Pattern. This creative design allows you to make charming squares featuring Christmas trees that can be joined together to create blankets, pillows, table runners, or wall hangings. Whether you’re an experienced crocheter or just beginning your journey with yarn and hook, this pattern is simple, relaxing, and perfect for spreading holiday cheer through handmade decorations.
The Christmas Tree Crochet Block – Pattern is ideal for anyone who loves adding a personal touch to Christmas décor. It’s a small, manageable project that can be completed in short sessions, making it a wonderful choice for busy crafters during the festive season. Plus, since each block is made individually, you can mix colors, textures, and embellishments to create a completely unique set of crochet squares.
In this guide, we’ll explore everything you need to know about making your own Christmas Tree Crochet Block – Pattern, from the best materials to step-by-step instructions, creative customization ideas, and maintenance tips. By the end, you’ll be ready to design a handmade masterpiece that captures the spirit of Christmas with every stitch.
1. Materials and Tools for Your Crochet Block
Before you begin your Christmas Tree Crochet Block – Pattern, it’s important to gather the right materials. Using quality tools and yarn ensures that your finished piece looks neat, durable, and festive.
Start by choosing your yarn. Cotton or acrylic yarns are great choices for this project because they hold their shape well and come in a wide range of colors. For a cozy and traditional look, use green for the tree, brown for the trunk, and white or cream for the background. You can also experiment with metallic or sparkly yarns to add a festive shimmer to your blocks.
Selecting the right hook size is crucial for achieving a balanced texture. A 4.0 mm (G) or 4.5 mm (7) crochet hook works well for medium-weight yarn. If your stitches seem too tight, switch to a larger hook to give your fabric more flexibility.
You’ll also need a tapestry needle for weaving in ends and scissors for trimming your yarn. If you plan to join multiple blocks together, having stitch markers can help keep your squares aligned neatly.
Consider using a blocking board once your squares are finished. Blocking helps shape and flatten your crochet pieces, giving them a more polished appearance. It’s especially useful if you plan to join several blocks to make a blanket or wall hanging.
Finally, keep your yarn palette organized. The Christmas Tree Crochet Block – Pattern often involves color changes, so using small yarn bobbins or clips can help prevent tangling and make the process smoother.
2. Step-by-Step Instructions to Crochet the Christmas Tree Block
Once your materials are ready, it’s time to start crocheting your Christmas Tree Crochet Block – Pattern. This project is built square by square, and each block features a simple Christmas tree motif that’s easy to follow, even for beginners.
Begin by creating a foundation chain that matches the size of your desired square—most patterns use 20 to 30 stitches across. Work a few rows of single crochet or half-double crochet in your background color to form the base of your square. This will serve as the “sky” around your tree.
Next, you’ll introduce the green yarn to form the Christmas tree shape. Most patterns use a triangle or tiered shape, worked by gradually increasing the number of stitches in each row as you move up the design. You can either follow a charted pattern (graphgan style) or count stitches manually to shape the tree.
Once the tree shape is complete, switch to brown yarn to make a small trunk at the bottom center. Continue with your background color to fill in any remaining spaces on the square, keeping your tension consistent throughout.
As you work, make sure to carry your unused yarn strands neatly across the back of your work or fasten them off and rejoin as needed. This helps maintain a clean, professional look without bulky areas.
When you’ve completed your block, fasten off and weave in all loose ends with a tapestry needle. To give your square a crisp finish, block it by pinning it flat and lightly steaming or spraying it with water. Your first Christmas Tree Crochet Block is now complete—repeat the process to make as many squares as you need!
3. Creative Ideas to Customize Your Crochet Blocks
One of the best things about the Christmas Tree Crochet Block – Pattern is how customizable it is. Every crocheter can add their personal touch to make each block truly special and festive.
You can experiment with different background colors to create a patchwork effect. For example, alternating between snowy white, deep blue, and soft gray backgrounds can make your finished piece look like a beautiful winter scene.
Add embellishments for extra holiday charm. Small beads or buttons make perfect “ornaments” for your crocheted Christmas trees. You can even sew on miniature stars at the top of each tree for a fun, decorative touch.
If you want to add more texture, try using different stitch types. Bobble stitches or puff stitches can create a raised, dimensional look for the tree or snow, making your block more tactile and interesting.
Another creative option is to make your Christmas trees multicolored. Use variegated yarn for a unique gradient effect, or alternate rows of green shades to create depth and dimension.
You can also turn your finished squares into various projects. Join several blocks together to create a cozy holiday blanket, a festive table runner, or a decorative pillow cover. Even a single Christmas Tree Crochet Block can make a lovely coaster or ornament when framed with a border and a hanging loop.
Finally, consider gifting your handmade crochet blocks. A set of decorative squares tied with ribbon makes a heartfelt, personal present that anyone who loves handmade art will cherish.
4. Tips for Joining, Caring, and Displaying Your Crochet Blocks
Once you’ve completed several blocks of your Christmas Tree Crochet Block – Pattern, it’s time to think about joining, caring for, and displaying your beautiful creations. Proper finishing makes your project look professional and helps it last for many Christmases to come.
For joining, there are multiple methods to choose from. You can use a simple whip stitch for an invisible seam, or a decorative join like the slip stitch or single crochet seam for a textured border. Choose a joining color that complements your blocks or use contrasting shades for a playful, patchwork effect.
If you’re making a large project like a blanket, consider adding a border around the entire piece. A single row of half-double crochet or scalloped edging gives a polished and festive look.
To keep your crochet blocks clean, always hand wash them gently in cool water with mild detergent. Avoid wringing or twisting to prevent stretching. Lay them flat to dry, reshaping each block as needed to maintain its square shape.
When storing your crochet items, place them in a dry area away from direct sunlight to prevent fading. Folding them neatly with tissue paper between layers helps preserve the stitches.
If your blocks ever lose shape, a quick re-blocking will bring them back to life. Simply dampen the fabric, pin it flat, and let it dry naturally. This ensures that your Christmas Tree Crochet Block always looks crisp and vibrant.
For displaying, get creative! Hang individual blocks as festive wall art, string several together into a garland, or frame one for a minimalist yet charming Christmas decoration.
FAQ – Christmas Tree Crochet Block – Pattern
Q: Is the Christmas Tree Crochet Block – Pattern beginner-friendly?
Yes, absolutely! It uses basic stitches like single crochet and color changes, making it perfect for beginners and experienced crocheters alike.
Q: How long does it take to make one block?
On average, it takes about one to two hours, depending on your crochet speed and the size of your block.
Q: What yarn works best for this pattern?
Cotton and acrylic yarns work well. Cotton gives a structured finish, while acrylic adds softness and warmth.
Q: Can I use these blocks for larger projects?
Yes! You can join multiple blocks to create blankets, pillow covers, table runners, or even wall hangings.
Q: How do I make my tree design stand out?
Try using textured stitches, metallic yarn, or add small embellishments like beads or sequins for sparkle.
Q: Can I wash my crochet blocks?
Yes, but hand washing is best to maintain the shape and texture. Use cold water and mild detergent.
Conclusion
The Christmas Tree Crochet Block – Pattern is a delightful way to combine creativity, relaxation, and festive spirit. With simple stitches and endless customization options, you can create a beautiful piece of holiday décor or a heartfelt handmade gift. Whether you make one block or an entire collection, each piece reflects the warmth and love of the holiday season.
We hope this guide inspired you to try your own version of the Christmas Tree Crochet Block – Pattern. Share your honest opinion and suggestions below—we’d love to hear how you personalize your crochet creations and what projects you’re planning next. Happy crocheting and Merry Christmas!