If you love sewing small and stylish accessories, then the Pyramid Bag Easy Tutorial- Pattern is the perfect project to try. This adorable, three-dimensional pouch combines functionality with creativity, making it a favorite among sewing enthusiasts of all skill levels. Whether you want a compact bag for storing makeup, coins, or craft supplies, this pattern is both practical and fun to make.
The Pyramid Bag Easy Tutorial- Pattern offers a simple and enjoyable way to create something unique with minimal materials. You can complete it in just a few hours, and it’s an ideal project for using up fabric scraps. The pyramid shape not only looks modern and elegant but also provides a surprisingly roomy interior for its size.
In this article, you’ll learn everything about making your own Pyramid Bag Easy Tutorial- Pattern—from gathering the right materials to sewing and finishing your project beautifully. Whether you’re a beginner or an experienced crafter, this step-by-step guide will help you achieve professional-looking results that you’ll be proud to show off or give as a handmade gift.
1. Understanding the Pyramid Bag Easy Tutorial- Pattern
Before diving into the sewing process, it’s important to understand what makes the Pyramid Bag Easy Tutorial- Pattern so popular. This bag’s distinctive pyramid shape sets it apart from traditional pouches, offering a mix of creativity and practicality. The geometric design is not only visually appealing but also highly functional, allowing the bag to stand upright while keeping its contents secure.
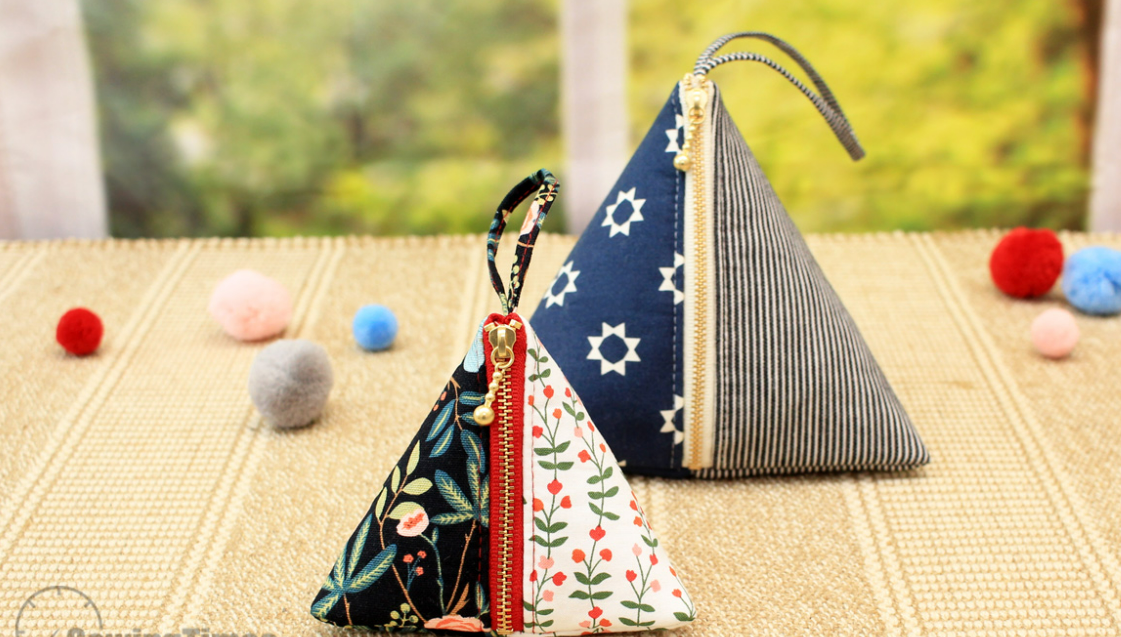
The basic concept of this pattern involves sewing together fabric panels to create a three-sided structure. Once assembled, it forms a perfect pyramid with a zipper opening at the top. The result is a compact and durable bag that can be used for countless purposes—from a travel organizer to a stylish accessory.
One of the main advantages of the Pyramid Bag Easy Tutorial- Pattern is its simplicity. You don’t need to be a professional sewer to achieve great results. Even if you’re a beginner, you can easily follow the steps and create a stunning bag with clean lines and a neat finish.
Another great feature of this design is its versatility. You can adjust the dimensions of your pyramid bag to suit your needs. A small version works wonderfully as a coin purse, while a larger version can serve as a toiletry bag, pencil case, or even a small gift bag.
Beyond its functionality, the pyramid bag also makes an excellent canvas for creativity. You can play with different fabrics, patterns, and embellishments—such as embroidery, patches, or fabric paint—to personalize your design.
Lastly, the Pyramid Bag Easy Tutorial- Pattern is an eco-friendly project because it allows you to use fabric remnants or upcycle old materials. This makes it a sustainable and enjoyable craft that contributes to a waste-free lifestyle.
2. Materials and Tools Needed
To successfully complete your Pyramid Bag Easy Tutorial- Pattern, having the right materials and tools is essential. Luckily, you don’t need much to get started, and most of these items can be found in your sewing kit or local craft store.
Start with your fabric. Choose two different fabrics—one for the outer layer and one for the lining. Cotton, denim, or canvas are all great options since they’re easy to work with and hold their shape well. You can also use lightweight quilting fabric for a softer, more flexible finish.
Next, you’ll need a zipper, usually between 6 and 10 inches long, depending on the size of your pyramid bag. Choose a color that complements your fabric or go bold with a contrasting zipper for a pop of style.
For added structure, use fusible interfacing or a thin layer of batting between the outer fabric and lining. This gives your pyramid bag more stability and a professional look.
You’ll also need basic sewing tools such as a sewing machine, scissors, pins or clips, a ruler or measuring tape, and a fabric marker for tracing your pattern. Don’t forget your iron—pressing your fabric throughout the process will make a big difference in the final appearance.
Lastly, prepare your Pyramid Bag Easy Tutorial- Pattern template. You can draw it yourself or find printable templates online. Typically, the pattern is based on a square or triangle shape that forms the foundation of the pyramid structure once assembled.
By preparing these materials and tools ahead of time, you’ll make the sewing process smooth, organized, and enjoyable from start to finish.
3. Step-by-Step Guide to Sewing the Pyramid Bag
Now that you have your materials ready, it’s time to bring your Pyramid Bag Easy Tutorial- Pattern to life. Follow these steps carefully for the best results.
Start by cutting your fabric pieces according to the template. You’ll need one piece of outer fabric, one piece of lining fabric, and matching interfacing. Make sure your cuts are precise, as accuracy will ensure the bag’s sides align perfectly.
Next, fuse the interfacing to the wrong side of your outer fabric using an iron. This step adds stability and helps the bag maintain its pyramid shape.
Then, attach the zipper. Place the zipper face down along one edge of your outer fabric, then place the lining fabric on top (right sides facing). Pin or clip the layers together, and sew along the edge using a zipper foot. Open it up, press the seam flat, and topstitch for a clean, professional look. Repeat the process for the other side of the zipper with the remaining fabric edges.
Once both sides of the zipper are attached, you’ll have a tube-like structure. Now, align the edges so the zipper runs down the center of the top. Sew across the bottom edge to close the bag, making sure the zipper is partially open so you can turn it right-side out later.
After sewing the bottom seam, create the pyramid shape by pinching the corners and sewing diagonally across each one. This step forms the triangular sides that give the bag its signature shape. Trim any excess fabric at the corners for a neat finish.
Finally, turn the bag right-side out through the zipper opening. Push out the corners gently to form sharp edges, and give the entire bag a final press with your iron. Congratulations—you’ve just completed your Pyramid Bag Easy Tutorial- Pattern!
4. Customization, Uses, and Maintenance
Now that your pyramid bag is finished, you can get creative with customization and learn how to care for it properly to ensure it lasts a long time.
For customization, consider adding embellishments like tassels, charms, or fabric patches to make your pyramid bag unique. You can also mix and match fabrics—using bold prints, metallic tones, or textured materials—to create one-of-a-kind designs.
Another great idea is to embroider initials or small designs on the fabric before assembling the bag. This adds a personal touch, especially if you plan to gift your pyramid bag to friends or family.
When it comes to practical use, the Pyramid Bag Easy Tutorial- Pattern creates a pouch that’s perfect for everyday organization. Use it to store makeup, headphones, jewelry, coins, or even travel-sized toiletries. The bag’s triangular shape makes it easy to find in a larger tote or suitcase.
To maintain your pyramid bag, clean it gently using a damp cloth or hand wash it in cold water if the fabric allows. Avoid harsh detergents or machine washing if you’ve used delicate materials or added embellishments. Let it air dry to maintain its structure.
If you want to make more bags, consider experimenting with different sizes. Small pyramid bags make great stocking stuffers or party favors, while larger ones are ideal for holding craft supplies or travel essentials.
Ultimately, this project’s charm lies in its versatility. The Pyramid Bag Easy Tutorial- Pattern gives you endless opportunities to express creativity while crafting something useful and durable.
FAQ – Pyramid Bag Easy Tutorial- Pattern
1. Is the Pyramid Bag Easy Tutorial- Pattern suitable for beginners?
Yes! This project is perfect for beginners. The steps are simple, and you’ll learn valuable sewing techniques like installing a zipper and working with lining.
2. What type of fabric should I use?
Cotton, canvas, and quilting fabrics are the best choices. They’re easy to sew and hold the pyramid shape well.
3. Can I make the bag without a sewing machine?
Yes, you can sew it by hand using small, tight stitches, although it may take longer to complete.
4. How do I resize the pattern?
Simply adjust the dimensions of the base square or triangle. The larger the base, the bigger your pyramid bag will be.
5. Can I add a wrist strap or keychain?
Absolutely! You can sew a fabric loop or attach a metal ring to one corner before sewing the final seams.
6. What is the best zipper length for this project?
A 6- to 10-inch zipper works well for most sizes. Choose the length based on how large you want your pyramid bag to open.
Conclusion
Creating the Pyramid Bag Easy Tutorial- Pattern is an enjoyable and rewarding sewing project that combines practicality with creativity. You’ve learned how to choose the right materials, follow step-by-step sewing instructions, and personalize your finished design.
This simple yet elegant project is perfect for anyone looking to improve their sewing skills or craft handmade gifts. The pyramid shape adds a modern touch to a classic accessory, making it both functional and fashionable.
We hope this tutorial inspired you to try making your own pyramid bag at home. If you enjoyed this guide, please share your honest opinion and suggestions in the comments below. Your feedback helps us create even better tutorials for sewing enthusiasts like you. Happy crafting! 🧵✨