Halloween is one of the most anticipated holidays of the year, filled with spooky fun, costumes, and treats. A great way to make this occasion even more special is by crafting your very own easy Halloween goody bags – pattern. Whether you’re preparing treats for trick-or-treaters, planning a Halloween party, or creating personalized gifts for friends and family, homemade goody bags add a unique touch that store-bought bags just can’t match.
The best part about making easy Halloween goody bags is that they are simple to create, allowing you to focus on the fun of Halloween while still being crafty. With a few materials and some creative ideas, you can create custom bags that perfectly suit your style and theme for the holiday. From spooky ghosts to playful pumpkins, the possibilities are endless.
In this article, we will guide you through creating your own easy Halloween goody bags – pattern that will impress your guests or delight trick-or-treaters. We’ll walk you through the materials you need, step-by-step instructions, and offer customization tips to make these bags truly your own.
1. Materials Needed for Easy Halloween Goody Bags
To get started on your easy Halloween goody bags – pattern, you’ll need to gather a few essential materials. Fortunately, the list is quite short, and most of these supplies can be easily found at craft stores or online.
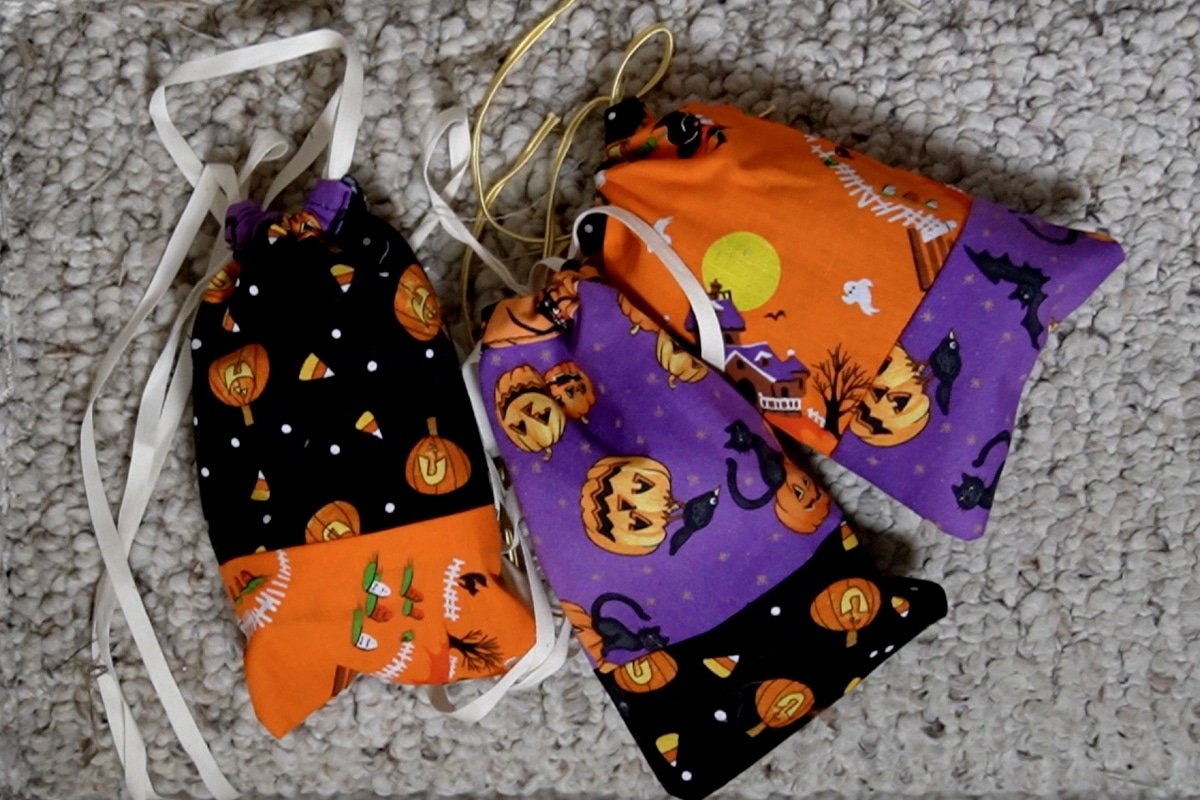
Fabric is the main material you’ll need. For a festive look, choose orange, black, or purple fabric for the main body of the bags. You can also opt for printed fabrics with Halloween motifs, such as pumpkins, skulls, or witches. Felt is a great choice because it’s easy to work with and can hold its shape well. If you want to add a touch of glamour, consider using glittery or shiny fabrics to make your bags stand out.
Next, you’ll need a sewing machine or needle and thread. While a sewing machine will speed up the process, hand-sewing is also an option if you prefer a more personal touch. You will also need scissors, pins, and measuring tape to ensure everything is cut to the right size.
For the handles, you can use ribbon, twine, or fabric strips. Depending on the look you want, these can be tied into bows, braided, or left simple for a minimalist effect.
Additionally, you may want to add some decorative embellishments like buttons, sequins, glitter, or stickers. These will allow you to personalize each goody bag and make it truly unique. Don’t forget about a hot glue gun for adding any extra details or embellishments that can’t be sewn.
2. Step-by-Step Instructions for Making Easy Halloween Goody Bags
Now that you have all your materials ready, it’s time to get started on your easy Halloween goody bags – pattern. Follow these simple steps to create your own spooky and fun treat bags!
Step 1: Measure and Cut the Fabric
Start by measuring and cutting your fabric to the desired size. A typical goody bag measures about 10-12 inches tall and 8-10 inches wide, but you can adjust the size depending on the number of treats you want to pack inside. Use scissors to cut two identical pieces of fabric for the front and back of the bag.
Step 2: Sew the Side Seams
Place the two fabric pieces with the right sides facing each other. Pin the edges in place to keep them from shifting as you sew. Using your sewing machine or needle and thread, sew down both side edges of the fabric, leaving the top open. Make sure to backstitch at the beginning and end to secure the seams.
Step 3: Create the Bag’s Bottom
Now, it’s time to sew the bottom of the bag. With the side seams in place, fold the bottom of the bag so that the two side seams meet in the center. Pin them in place and sew across the bottom. This will form the flat bottom of the bag, allowing it to stand upright when filled with goodies.
Step 4: Add the Handles
To make your goody bags easy to carry, you’ll need to add handles. Cut two pieces of ribbon or fabric strips about 10-12 inches long. Fold the ends of the fabric over and sew them in place to prevent fraying. Pin the handles to the top edges of the bag and sew them securely, ensuring they are evenly spaced on both sides.
Step 5: Add Decorations
Now comes the fun part—decorating your Halloween goody bags! You can create spooky faces using felt for eyes, noses, and mouths, or add other Halloween-themed decorations like bat appliqués, pumpkin patches, or even glitter spider webs. Feel free to let your creativity run wild and make each bag unique.
Step 6: Final Touches
Once your goody bags are decorated, you can give them a final touch by adding some candy or small Halloween-themed toys. If you’re giving them as gifts, you can also fill them with small crafts, treats, or personalized items. Tie the handles with a cute bow for an added decorative flair.
3. Customization Ideas for Your Halloween Goody Bags
The beauty of making your own easy Halloween goody bags – pattern is that you can personalize them to fit any theme or style. Here are a few customization ideas to make your bags even more special:
1. Fun Fabrics and Patterns
Choose fabrics that match your Halloween theme. You could use orange and black stripes for a classic Halloween look, or go for something playful with purple polka dots or green bats. If you’re feeling extra creative, you could even mix and match fabrics to create a patchwork effect.
2. Add Glitter for Extra Sparkle
To make your bags stand out even more, add some glitter! You can apply glitter to the fabric or use glittery felt for shapes like stars, moons, or pumpkins. Glitter is perfect for creating a magical, sparkling effect that will shine in the Halloween night.
3. Personalize with Names
For a personal touch, consider adding names or initials to each bag. You can use fabric paint to write names on the bags, or sew on embroidered patches for a more intricate look. This is especially fun if you’re making goody bags for friends or family.
4. Go for a Vintage Look
If you prefer a more vintage feel, use aged-looking fabrics such as tea-dyed linen or old-school black lace. You can also incorporate vintage-style buttons or old ribbon to add to the charm.
5. Create Themed Goody Bags
Take your goody bags to the next level by creating bags that follow a specific theme. For example, you could make witch-themed bags with green felt and purple ribbons or vampire-themed bags with red satin and bat appliqués.
6. Add Spooky Messages
Use fabric markers to write spooky messages like “Trick or Treat!” or “Happy Haunting” on the front of each bag. This extra detail adds a personal touch and makes each bag more festive.
4. Troubleshooting and Tips for Your Halloween Goody Bags
While making easy Halloween goody bags – pattern is a straightforward project, you may encounter a few challenges along the way. Here are some troubleshooting tips to help ensure your goody bags turn out perfectly:
1. Fabric Fraying
To prevent the fabric from fraying, use pinked-edge scissors or apply a fabric sealant to the raw edges. You can also fold the edges over and sew them to give the bag a more polished look.
2. Handles Coming Loose
If the handles start to come loose, make sure to reinforce the stitching where the handles attach to the bag. You can also sew them with a box stitch for extra durability.
3. Irregular Seams
If your seams are uneven, try using a seam ripper to carefully remove any mistakes and resew them. Make sure to use a steady hand and sew slowly to avoid any misalignments.
4. Decorating Issues
If your decorations aren’t sticking, try using a stronger adhesive like fabric glue or hot glue. For felt shapes, fabric fusible tape can help them stay in place.
FAQ – Easy Halloween Goody Bags
1. How much fabric do I need to make Halloween goody bags?
You’ll need about 1/4 to 1/2 yard of fabric for each bag, depending on the size. This should be enough for the front and back of the bag.
2. Can I use paper instead of fabric?
While fabric is ideal for durability, you can use sturdy cardstock or kraft paper for a more eco-friendly option. Just make sure the material is strong enough to hold treats.
3. How can I make the bags more durable?
Use a thicker fabric, such as canvas or denim, for added durability. You can also reinforce the seams with a double stitch or use fusible interfacing to add strength.
4. Can I use a sewing machine for this project?
Yes, using a sewing machine will
save you time, and it’s perfect for sewing through multiple layers of fabric.
Conclusion
Creating easy Halloween goody bags – pattern is a fantastic and rewarding project that allows you to showcase your creativity. Whether you’re crafting them for a Halloween party, for trick-or-treaters, or as personalized gifts, these bags are sure to impress. With the right materials and techniques, you can craft a bag that’s as unique as your Halloween spirit.
you enjoyed this tutorial, we’d love to hear from you! Share your thoughts, feedback, and any suggestions for future projects in the comments section below. Let us know how your Halloween goody bags turned out!