Halloween is one of the most exciting holidays of the year, and nothing completes a child’s costume better than a handmade Pumpkin trick-or-treat bag. In this Pumpkin trick-or-treat bags, a tutorial – pattern, you’ll learn how to create your very own adorable and sturdy pumpkin-shaped bag for gathering candy on Halloween night. This fun sewing project is easy enough for beginners yet creative enough to delight even experienced crafters.
The charm of the Pumpkin trick-or-treat bags, a tutorial – pattern lies in its combination of practicality and festive flair. With bright orange fabric, playful pumpkin faces, and soft padded handles, these bags are not only functional but also a wonderful seasonal keepsake. Whether you’re sewing for your children, grandchildren, or even for a Halloween craft fair, this tutorial will guide you step by step through the process.
By the end of this article, you’ll know how to design, cut, and sew your own reusable Pumpkin trick-or-treat bag using simple materials and techniques. You can even customize it with fabric paint, applique, or embroidery to make each bag unique. Let’s get started on this Halloween sewing adventure!
1. Materials and Preparation for the Pumpkin Trick-or-Treat Bags, a Tutorial – Pattern
Before beginning your Pumpkin trick-or-treat bags, a tutorial – pattern, it’s important to gather all your materials. Choosing the right fabrics and supplies ensures your finished bag is both durable and visually appealing.
For the main pumpkin body, select a sturdy orange cotton or felt fabric. Both materials hold their shape well and are easy to sew. You will also need a contrasting green fabric for the stem and leaves, along with a black fabric or felt for the jack-o’-lantern face. A medium-weight interfacing or quilt batting can be used to give your bag structure and durability.
Other materials include matching thread, fabric scissors, pins or clips, an iron, and a sewing machine. You’ll also need a ruler or fabric measuring tape and a washable fabric marker for drawing your pattern pieces. If you plan to make several bags, it’s a good idea to create cardboard templates for easy tracing and consistent results.
For the handles, you can use fabric strips, cotton webbing, or ribbon. The handles should be sturdy enough to carry a full bag of Halloween treats comfortably. You’ll also want to choose fabrics that coordinate well to make your Pumpkin trick-or-treat bags look polished and festive.
Before sewing, wash and press your fabrics to prevent shrinking later. Ironing also makes cutting and stitching easier, giving your final project a smooth, professional appearance. Once everything is ready, you can begin cutting and assembling the parts of your pumpkin bag.
2. Cutting and Assembling the Pumpkin Trick-or-Treat Bags, a Tutorial – Pattern
This stage is where your Pumpkin trick-or-treat bags, a tutorial – pattern begins to come to life. Start by cutting two large circles from your orange fabric, each about 12 inches in diameter. These will form the front and back of your pumpkin. If you prefer a larger or smaller bag, simply adjust the size of your circles accordingly.
Next, cut one long strip of fabric, about 4 inches wide and 36 inches long, to form the sides and bottom of your bag. This strip connects the two circular panels together, creating the depth and shape of your trick-or-treat bag. Cut a matching strip of interfacing or batting and fuse or sew it to the wrong side of this piece for extra stability.
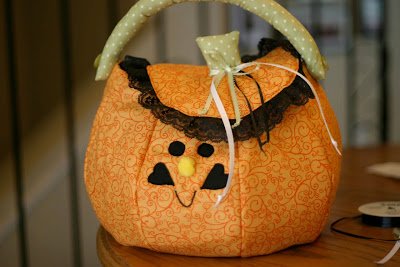
To create the pumpkin face, cut out eyes, a nose, and a mouth from black felt. Arrange them on one of the orange circles before sewing. Play around with different facial expressions—grinning, spooky, or even silly—to make your Pumpkin trick-or-treat bags unique and fun. Once you’re happy with the design, stitch the face pieces in place using a zigzag or applique stitch.
Now attach the side strip to one of the circular pieces, right sides together. Pin or clip carefully around the curve to ensure a smooth fit. Sew slowly, easing the fabric as you go. Repeat with the second circle to form the other side of the bag. When finished, turn the bag right side out and check that all seams are neat.
To add the stem, cut a small rectangle of green fabric, fold it in half lengthwise, and sew along one edge. Turn it right side out and stuff lightly to give it shape. Attach it to the top of the pumpkin with a few stitches. For extra detail, you can cut out and sew small green leaf shapes around the stem.
At this stage, your pumpkin bag is starting to look complete. All that’s left is adding handles and finishing touches to your Pumpkin trick-or-treat bags, a tutorial – pattern.
3. Adding Handles and Final Details to the Pumpkin Trick-or-Treat Bags, a Tutorial – Pattern
The handles are an important feature of your Pumpkin trick-or-treat bags, a tutorial – pattern, providing comfort and functionality while carrying candy. You can make handles from the same orange fabric or choose a contrasting color like black or green for added style.
Cut two strips of fabric measuring about 20 inches long and 2 inches wide. Fold each strip in half lengthwise with right sides together and sew along the long edge. Turn them right side out and press flat. For a sturdier handle, you can insert a strip of interfacing before sewing or topstitch along both edges for reinforcement.
Attach the handles evenly to the inside of the bag’s top edge. Make sure they are securely sewn, as the bag will need to hold quite a bit of candy. Double or triple stitch the handles in place for extra strength. If you prefer, you can use ready-made cotton webbing or rope handles for a more rustic look.
To finish the top edge of the bag neatly, fold the raw edge inward and sew a topstitch all the way around. This not only gives your Pumpkin trick-or-treat bag a professional look but also reinforces the seams for long-lasting use.
Now, give your pumpkin bag a final press with the iron to smooth out any wrinkles. You can also decorate it further by adding fabric paint, glitter, or name tags. Kids will love customizing their bags with their own designs!
Once you’ve made one, you might want to make several more — each with a different face or fabric combination. They also make adorable Halloween gifts or party favors that guests will cherish for years to come.
4. Creative Variations for the Pumpkin Trick-or-Treat Bags, a Tutorial – Pattern
One of the best things about the Pumpkin trick-or-treat bags, a tutorial – pattern is how customizable it is. You can adapt the design to fit your personal style, skill level, and available materials.
For a playful twist, try using patterned orange fabrics with polka dots, stripes, or Halloween prints instead of plain fabric. Mixing textures like felt, cotton, and velvet can also give your pumpkin bag a more unique, tactile look.
If you want to make the bag glow in the dark, consider using reflective or glow-in-the-dark fabric paint for the pumpkin’s face. This adds both safety and fun to your Pumpkin trick-or-treat bag, especially for nighttime trick-or-treating.
You can also modify the shape. Instead of a round pumpkin, try an oval or slightly squashed shape for a more whimsical appearance. Add extra stitching lines across the front to mimic the natural ridges of a pumpkin.
For added creativity, make matching mini bags as treat holders or decorations. You can hang them around the house or use them as table centerpieces filled with candy or small toys.
Finally, personalize each bag with a child’s name or initials using embroidery or iron-on letters. This makes every Pumpkin trick-or-treat bag truly one-of-a-kind and prevents mix-ups on Halloween night.
FAQ – Pumpkin Trick-or-Treat Bags, a Tutorial – Pattern
1. What is the best fabric for making a pumpkin trick-or-treat bag?
Sturdy cotton, canvas, or felt are the best choices since they hold their shape and are easy to sew.
2. Can I make this project without a sewing machine?
Yes! You can hand-sew it using a strong backstitch or even use fabric glue for a no-sew version, though it may not last as long.
3. How big should the pumpkin bag be?
A diameter of about 12 inches works well for children, but you can adjust the size to make larger or smaller versions.
4. How do I make the bag washable?
Use washable fabrics and prewash them before sewing. Avoid decorations that might come off in the wash, such as glued-on embellishments.
5. Can I use this pattern for other holidays?
Absolutely! Change the fabric colors and face designs to make themed bags for Christmas, Easter, or birthdays.
Conclusion
The Pumpkin trick-or-treat bags, a tutorial – pattern is a delightful and creative sewing project perfect for celebrating Halloween. With just a few materials and easy-to-follow steps, you can craft unique, reusable pumpkin bags that add fun and personality to the season. Not only are they functional for collecting candy, but they also make wonderful decorations and keepsakes.
Whether you’re an experienced sewist or just starting out, this project offers a perfect balance of simplicity and creativity. Each bag can be customized to reflect your own style or your child’s favorite Halloween character.
If you enjoyed this Pumpkin trick-or-treat bags, a tutorial – pattern, please share your experience in the comments below! We’d love to hear your thoughts, suggestions, and see how your pumpkin creations turned out. Happy sewing and have a spooky, candy-filled Halloween!