Rolling Stone patchwork block – Pattern is one of those timeless quilting designs that beautifully combines symmetry, geometry, and creativity. This classic quilt block dates back over a century and continues to inspire quilters today with its balance of structure and movement. The pattern’s distinctive look—made up of squares, rectangles, and triangles arranged to create a spinning or “rolling” effect—makes it a favorite among traditional and modern quilters alike. By learning how to create a Rolling Stone patchwork block – Pattern, you’ll not only develop important quilting skills but also gain the ability to produce stunning designs full of visual energy.
This pattern gets its name from the illusion of motion it creates. The central square appears to “roll” within the surrounding pieces, giving the block a dynamic feel even though it’s made from simple shapes. Whether you use bright modern fabrics or classic prints, the Rolling Stone patchwork block – Pattern can be customized to fit your personal aesthetic and project goals. It’s a perfect choice for quilts, table runners, wall hangings, or even individual framed blocks.
In this article, we’ll explore the origins of the Rolling Stone design, how to choose the right fabrics, step-by-step sewing instructions, and ideas for finishing and styling your quilt block. Every section will give you the tools and confidence to create a beautiful piece that celebrates both craftsmanship and creativity. Let’s begin by understanding the pattern in more depth before moving on to practical techniques.
1. Understanding the Rolling Stone Patchwork Block – Pattern
The Rolling Stone patchwork block – Pattern is a traditional design that combines simple geometry to create complex visual effects. At its core, the block consists of a central square surrounded by pieced frames that give the illusion of motion—like a stone rolling across a surface. Despite its intricate appearance, the structure is easy to follow once you understand how each section fits together.
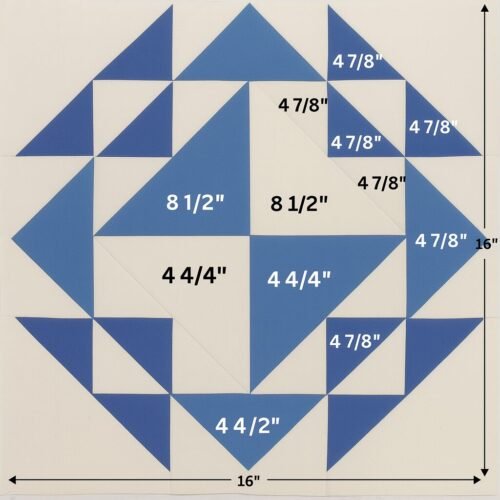
The block is typically built from nine units arranged in a three-by-three grid. The center square forms the focal point, while the corner and side units create the illusion of rotation. This balance of order and movement is what makes the Rolling Stone patchwork block – Pattern so captivating. It’s both structured and lively, making it perfect for quilts that draw the eye without overwhelming the overall design.
One of the key features of this pattern is contrast. High contrast between the center square, surrounding triangles, and corner pieces enhances the rolling effect. Choosing fabrics that complement and contrast each other is essential to bring the pattern to life. For example, pairing a light background with bold colored fabrics can make the design appear more three-dimensional.
Many quilters love the historical background of the Rolling Stone design. It first appeared in the late 19th century and has been featured in countless quilting magazines and exhibitions since. The enduring popularity of the Rolling Stone patchwork block – Pattern proves how timeless geometric art can be when translated into fabric.
This pattern can be resized easily. You can make smaller blocks for intricate quilts or larger ones for bold, modern designs. Adjusting the block size while maintaining proportion ensures that the visual effect remains intact no matter the project scale.
Lastly, before starting, it’s a good idea to study the pattern diagram thoroughly. Understanding the layout before you begin cutting or sewing will save time and help you maintain accuracy. A clear grasp of the pattern structure ensures smooth assembly and professional-looking results every time.
2. Choosing Fabrics and Cutting Your Pieces
Selecting fabrics for your Rolling Stone patchwork block – Pattern is one of the most creative parts of the process. Your color and fabric choices determine how much contrast and movement the finished block will have. Traditional designs often use solid colors or small prints, while modern interpretations might include bold prints or unexpected color combinations.
Begin by deciding on your color scheme. A two- or three-color combination is common for this pattern, allowing the geometric structure to stand out clearly. For example, using navy, white, and red creates a classic look, while pastel tones give it a soft, vintage appeal. High-contrast combinations enhance the rolling illusion that defines the Rolling Stone patchwork block – Pattern.
Once your fabrics are chosen, iron them flat to remove any wrinkles before cutting. Accurate cutting is essential for perfect seams and alignment. Use a rotary cutter, quilting ruler, and self-healing mat for precise results. Follow the cutting guide provided in your pattern, double-checking each measurement before making cuts.
Label each fabric piece according to its placement in the block. Keeping your pieces organized prevents confusion during assembly. You can use sticky notes, clips, or even small zip bags to separate sections such as corners, sides, and the central square.
If you’re new to quilting, consider making a test block first using scrap fabric. This helps you practice assembling the Rolling Stone patchwork block – Pattern before cutting into your final fabrics. It’s also a great way to experiment with color placement and see how different combinations look together.
Finally, handle your fabric pieces carefully after cutting. Avoid stretching or distorting the edges, especially if you’re working with diagonal cuts or bias edges. Maintaining accurate shapes will make sewing your block much easier and ensure the finished piece lies flat and even.
3. Sewing and Assembling the Block
Now that your fabrics are cut and organized, it’s time to assemble your Rolling Stone patchwork block – Pattern. Start by sewing the central square unit. This square will be the focal point of the block, so take your time to ensure perfect alignment and clean seams. Press the seams flat before moving on to the next step.
Next, piece together the side and corner units. These usually consist of smaller triangles and rectangles arranged to form a frame around the center square. The goal is to create the illusion of a rotating shape, so precision is key. Use a ¼-inch seam allowance and press your seams after every seam to keep everything crisp and neat.
When joining the smaller units to form rows, double-check that your points and seams align properly. The Rolling Stone patchwork block – Pattern depends heavily on symmetry, so even a small misalignment can throw off the overall design. Pin the pieces carefully before sewing to maintain perfect alignment.
After completing each row, sew the rows together to form the full block. Take care when matching seams where corners and edges meet. Press all seams toward one direction or open them based on your preference, ensuring the block remains flat and smooth.
If you’re making multiple blocks, repeat the same process for each one. Keeping your seam allowance consistent will ensure that all your Rolling Stone patchwork block – Pattern pieces fit together seamlessly when you join them into a quilt or larger project.
Once your block is finished, measure it to make sure it matches the desired size in your pattern. If necessary, trim any uneven edges to square up the block. A clean, well-aligned block will make assembling your final quilt much easier and more enjoyable.
4. Finishing, Styling, and Creative Ideas
Completing your Rolling Stone patchwork block – Pattern is an exciting moment, but there’s still more you can do to make it truly stand out. Finishing and styling give your block a professional and personalized touch that makes your project shine.
One of the best ways to enhance your block is through quilting. You can outline the seams with simple straight-line stitching or add free-motion quilting for extra texture. Quilting along the diagonal lines emphasizes the “rolling” illusion and adds depth to the finished piece.
Consider how you’ll use your finished block. Multiple Rolling Stone patchwork block – Pattern pieces can be joined together to form a large quilt, or a single block can be turned into a pillow cover, tote bag, or framed wall art. The versatility of this pattern means it can adapt to almost any creative project.
If you love experimenting, try modern variations by using asymmetrical color placement or bold contemporary fabrics. You can even enlarge the block to make a statement piece for your home décor. The geometric elegance of this design looks beautiful in both traditional and modern settings.
Adding a border or sashing between your blocks gives your quilt more structure and allows each block to stand out individually. Choose a neutral or complementary color that enhances your main design without overpowering it.
Finally, label your finished work with your name, the date, and the project title. This personal touch not only preserves your creative legacy but also adds sentimental value to your Rolling Stone patchwork block – Pattern creation. Handmade quilts and patchwork pieces often become family heirlooms, cherished for generations.
FAQ
Q: What is a Rolling Stone patchwork block – Pattern?
A: It’s a traditional quilting design made of squares, rectangles, and triangles arranged to create a spinning, “rolling” effect. It’s known for its geometric beauty and balance.
Q: Is this pattern suitable for beginners?
A: Yes, with some basic sewing experience, anyone can make a Rolling Stone patchwork block – Pattern. It teaches important quilting skills like piecing accuracy and color coordination.
Q: What fabrics work best for this pattern?
A: 100% cotton quilting fabrics are ideal. They’re stable, easy to sew, and available in a wide range of colors and prints.
Q: Can I resize the block?
A: Absolutely. The pattern scales easily—just adjust your cutting measurements while keeping the proportions consistent.
Q: How can I make my block look more dynamic?
A: Use contrasting colors or patterned fabrics. High contrast between the center and surrounding pieces enhances the illusion of movement.
Q: What projects can I make using this pattern?
A: You can use the Rolling Stone patchwork block – Pattern for quilts, pillows, tote bags, or even wall art. It’s versatile and adaptable to many creative applications.
Conclusion
The Rolling Stone patchwork block – Pattern is a classic design that bridges the gap between tradition and modern creativity. By understanding its structure, choosing the right fabrics, and following precise sewing steps, you can create stunning patchwork pieces full of movement and charm.
From quilts to home décor, this pattern offers endless possibilities for personalization. Whether you’re an experienced quilter or just starting out, the Rolling Stone design is a satisfying and rewarding project that will showcase your skill and artistic flair. I’d love to hear your honest opinions and suggestions—how did your block turn out, and what unique touches did you add to make it your own?