Patchwork Japanese Knot Bag – Pattern is a timeless and creative sewing project that combines elegance, functionality, and the art of traditional Japanese design. This stylish bag, known for its unique looping handle design, is easy to carry and surprisingly practical for daily use. The Patchwork Japanese Knot Bag – Pattern merges modern aesthetics with the centuries-old Japanese philosophy of simplicity and craftsmanship. Whether you are a beginner looking to improve your sewing skills or an experienced maker seeking a new, fun challenge, this project offers the perfect opportunity to create something beautiful and useful.
What makes the Patchwork Japanese Knot Bag – Pattern so appealing is its combination of form and function. The knot-style handles not only give the bag its iconic look but also serve as a natural closure—one handle loops through the other, securing your belongings without the need for zippers or buttons. This smart design emphasizes the Japanese concept of minimalism, where beauty lies in practicality and thoughtful craftsmanship.
Incorporating patchwork into this design adds a personal and artistic touch. Using small fabric pieces in various colors and patterns, you can create a bag that reflects your personality and creativity. The result is a handmade accessory that stands out for its uniqueness and quality. In the following sections, we’ll explore everything you need to know about the Patchwork Japanese Knot Bag – Pattern, from materials and cutting techniques to sewing and finishing tips that will make your project a success.
1. Understanding the Patchwork Japanese Knot Bag – Pattern
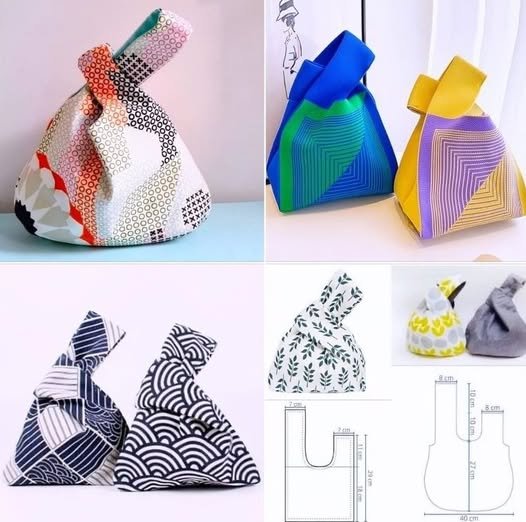
The Patchwork Japanese Knot Bag – Pattern is based on a simple structure with two asymmetrical handles—one longer than the other. The longer handle is designed to pass through the shorter one, forming a secure “knot” that holds the bag closed. This makes the bag perfect for carrying small essentials like a phone, wallet, keys, or cosmetics.
Traditionally, the Japanese knot bag was made from a single piece of fabric, but the patchwork version introduces multiple fabric pieces sewn together to form the outer layer. This approach not only makes the design visually interesting but also provides an excellent way to use leftover fabric scraps creatively. It’s a sustainable project that promotes eco-friendly sewing habits while producing a beautiful result.
The Patchwork Japanese Knot Bag – Pattern can vary in size depending on your needs. Smaller versions work well as coin purses or makeup pouches, while larger ones make elegant handbags or shopping totes. The pattern typically consists of four main parts: the front and back body panels, and the two handles (one short and one long). These parts are lined to provide structure and durability.
Choosing fabrics for your patchwork design is part of the fun. Many crafters use a mix of cotton prints, linen, or even denim. Combining contrasting textures and colors gives your Patchwork Japanese Knot Bag – Pattern a vibrant and modern feel while maintaining its traditional charm.
Another reason this pattern is beloved among sewing enthusiasts is its simplicity. You don’t need advanced sewing skills to create it—just a basic understanding of cutting, sewing straight lines, and turning seams. The pattern is easy to customize, allowing for experimentation with different shapes, sizes, and patchwork layouts.
Because of its lightweight and foldable nature, the Patchwork Japanese Knot Bag – Pattern is perfect for travel or gifting. Handmade versions make thoughtful presents for friends and family, especially when tailored to their favorite colors or styles.
2. Gathering Materials and Preparing Your Design
Before you begin sewing, gather all the materials needed for your Patchwork Japanese Knot Bag – Pattern. The essentials include fabric for the outer patchwork layer, lining fabric, interfacing (for structure), thread, scissors or rotary cutter, a sewing machine, and an iron. You’ll also need basic sewing tools like pins, clips, and a fabric marker.
When selecting fabrics, choose complementary colors and patterns for your patchwork pieces. Cotton and linen are great options because they are easy to work with and hold their shape well. You can use between six to twelve fabric pieces for the patchwork, depending on your desired design complexity.
Next, cut your fabric pieces according to the pattern template. The pieces should be arranged and sewn together to create a rectangular or square panel large enough to form the front and back of the bag. Once the patchwork panels are complete, press the seams flat with an iron to give the bag a neat appearance.
The lining fabric can be a solid color that complements your outer patchwork design. Adding interfacing between the outer fabric and the lining helps the bag retain its structure while keeping it lightweight. For a softer, slouchier style, you can skip the interfacing.
Lay out all your pieces and double-check their symmetry before sewing. Ensuring that both sides of the Patchwork Japanese Knot Bag – Pattern match in size and shape is crucial for a balanced final product. Use pins or clips to hold the layers in place as you prepare to sew.
If you want to personalize your design, now is the time to add small decorative touches such as embroidery, fabric labels, or hand-stitched accents. These details enhance the handmade charm of your Patchwork Japanese Knot Bag – Pattern and make it truly one-of-a-kind.
3. Sewing and Assembling the Patchwork Japanese Knot Bag – Pattern
Once your fabric panels are ready, it’s time to assemble your Patchwork Japanese Knot Bag – Pattern. Start by sewing the outer patchwork panels together along the sides and bottom, right sides facing each other. Then, repeat the process for the lining fabric.
Turn the outer bag right side out while keeping the lining inside out. Slide the lining into the outer bag so that the right sides are facing each other. Align the top edges and pin them together carefully, making sure the seams line up. This step ensures that your bag will look clean and professional once finished.
Sew along the top edge of the bag, leaving an opening to turn it right side out. Trim the seam allowances slightly to reduce bulk, especially around curved areas near the handles. Turn the bag through the opening and use an iron to press the seams flat.
Next, topstitch along the upper edge of the bag. This not only closes the opening but also adds a polished finish. You can use a decorative stitch or contrasting thread for a more artistic look. The Patchwork Japanese Knot Bag – Pattern lends itself well to creativity, so don’t hesitate to experiment with stitch styles.
Once the main body is assembled, fold the handles so that the longer handle can pass through the shorter one. Check the alignment to ensure they interlock smoothly. If you wish to reinforce the handles, add an extra line of stitching or a small piece of interfacing for durability.
Finally, give your bag a final press and inspect all seams to ensure everything is secure. Your completed Patchwork Japanese Knot Bag – Pattern is now ready to use—a blend of beauty, tradition, and practicality that will turn heads wherever you go.
4. Customizing and Styling Your Handmade Bag
The beauty of the Patchwork Japanese Knot Bag – Pattern lies in its adaptability. Once you master the basic structure, you can modify it in countless ways to reflect your personal taste or to match specific occasions.
For instance, you can adjust the size of the bag. Make a mini version for coins or cosmetics, or scale it up for a spacious tote. The same basic pattern works for all sizes—it just depends on your measurements and fabric layout.
You can also experiment with fabric combinations. Try mixing floral prints with solids, or pair traditional Japanese fabrics with modern designs. The contrast between classic and contemporary patterns makes the Patchwork Japanese Knot Bag – Pattern even more visually appealing.
Adding embellishments such as tassels, beads, or buttons can give your bag a more sophisticated or playful look. You could even attach a small charm or handmade keychain for a touch of personality.
For eco-conscious makers, consider using recycled fabrics or repurposing old garments. This sustainable approach not only reduces waste but also gives new life to fabrics with sentimental value. The Patchwork Japanese Knot Bag – Pattern is an ideal project for upcycling because it requires small fabric pieces that might otherwise go unused.
Lastly, styling your bag is effortless. Pair it with casual outfits for everyday errands, or use it as a chic accessory for special occasions. Its lightweight and comfortable design make it both practical and fashionable—proof that simple craftsmanship never goes out of style.
FAQ
Q: What is a Patchwork Japanese Knot Bag – Pattern?
A: It’s a sewing pattern used to create a stylish Japanese knot-style bag, combining multiple fabric pieces in a patchwork design.
Q: Is this pattern suitable for beginners?
A: Yes! The Patchwork Japanese Knot Bag – Pattern is perfect for beginners. It involves simple cutting and sewing techniques with minimal materials.
Q: What fabrics work best for this project?
A: Cotton, linen, and canvas fabrics are ideal because they are easy to sew and maintain the bag’s shape.
Q: Can I make the bag without a sewing machine?
A: Yes, it’s possible to hand-sew this bag using small, tight stitches. It will take more time but still produce beautiful results.
Q: How do I clean and care for my handmade bag?
A: Spot-clean with a damp cloth or gently hand wash in cold water. Avoid machine drying to preserve the fabric and shape.
Q: Can I add a lining or extra pockets?
A: Absolutely. Adding a lining and interior pockets is a great way to increase durability and functionality while maintaining the elegant style.
Conclusion
Creating your own Patchwork Japanese Knot Bag – Pattern is a rewarding experience that celebrates creativity, sustainability, and traditional craftsmanship. You’ve learned how to choose fabrics, assemble the bag, and personalize your design to make it truly your own.
This project is a beautiful example of how simple materials can be transformed into something meaningful and stylish. Whether you make it for yourself or as a thoughtful handmade gift, your bag will stand as a reflection of your creativity and attention to detail. I’d love to hear your opinions and suggestions—what colors or fabrics did you choose for your knot bag, and how did you personalize your design?