When it comes to creating adorable and lifelike crochet dolls, one of the most important finishing touches is the Crochet Amigurumi Doll Hair – Pattern. The hair is what gives each doll its unique personality, expression, and charm. Whether you’re making a playful child-like doll, a whimsical fantasy figure, or a realistic character, the hairstyle you choose can completely transform its look. Understanding how to properly crochet and attach doll hair will make your amigurumi creations look polished and professional.
The beauty of working with Crochet Amigurumi Doll Hair – Pattern lies in its versatility. There are countless ways to style doll hair—from long flowing curls to neat braids, buns, or even fun rainbow colors. With a little creativity, you can make every doll truly one-of-a-kind. What makes it even better is that the process is customizable to any yarn type, doll size, or aesthetic you desire.
In this article, we’ll explore everything you need to know about creating and styling Crochet Amigurumi Doll Hair – Pattern. You’ll learn which materials work best, different methods for attaching hair, and how to shape and care for it so that your handmade dolls always look their best. Whether you’re a beginner or an experienced amigurumi artist, this guide will help you take your crochet dolls to the next level.
1. Understanding Crochet Amigurumi Doll Hair – Pattern
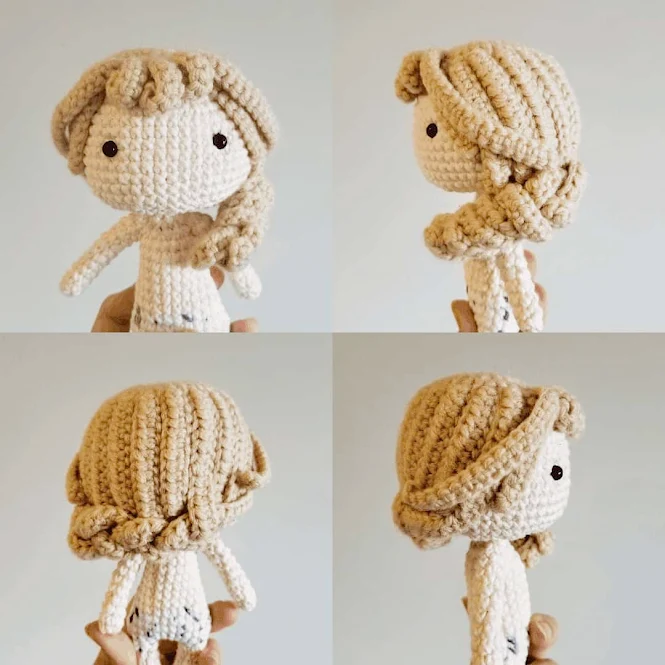
The Crochet Amigurumi Doll Hair – Pattern refers to the techniques used to design, crochet, and attach yarn hair to amigurumi dolls. Unlike store-bought dolls with synthetic hair, crochet dolls use yarn, embroidery thread, or even wool fibers to create soft, realistic textures. This gives the doll a handmade charm that’s impossible to replicate with machine-made toys.
There are several ways to add hair to your amigurumi dolls. Some crafters prefer crocheting the hair directly onto the head, while others create separate wigs or attach strands individually. The method you choose depends on your doll’s design, desired style, and skill level.
One of the simplest and most popular methods is using individual strands of yarn that are looped and secured into the doll’s head with a crochet hook. This creates natural-looking locks that can be brushed, braided, or styled in various ways. For a neater or more structured appearance, you can crochet a wig cap and sew it onto the head before adding the strands.
The Crochet Amigurumi Doll Hair – Pattern also allows you to experiment with different textures. You can use smooth cotton for sleek, straight hair, or textured acrylic for curly and wavy effects. Some artists even combine yarn types to add depth and realism.
Another benefit of crocheting doll hair is that it gives you full creative freedom. You can make hairstyles that match your doll’s personality — pigtails for playful looks, buns for elegance, or loose curls for a soft, natural finish. The possibilities are endless when you understand the basics of this pattern.
Finally, it’s important to remember that good doll hair starts with patience and planning. Taking the time to position the hair evenly and securely will make a big difference in your final result, ensuring your amigurumi doll looks beautiful and lasts for years.
2. Materials and Tools for Crochet Amigurumi Doll Hair – Pattern
Before you start working on your Crochet Amigurumi Doll Hair – Pattern, you’ll need to gather the right materials and tools. Having the proper supplies ensures that your doll’s hair is not only attractive but also durable and easy to manage.
The most essential material is yarn. The type of yarn you choose will determine the look and feel of your doll’s hair. For soft and manageable strands, use lightweight yarns such as cotton or bamboo blends. Acrylic yarns are also great because they come in a wide range of colors and hold their shape well.
If you want to create textured or curly hair, consider using boucle or mohair yarn. These yarns have natural waves and add extra volume to your doll’s hairstyle. For very small dolls or intricate designs, embroidery thread or fine crochet thread can be used to achieve a realistic miniature scale.
In addition to yarn, you’ll need a crochet hook that fits the doll’s head size. A small steel or aluminum hook works best for detailed hair placement. You’ll also need a tapestry needle for sewing the yarn strands securely and a pair of sharp scissors for cutting the hair evenly.
A comb or brush is optional but helpful for styling and separating the strands once attached. If you want to prevent frizz or fuzz, a small amount of fabric softener or anti-frizz spray can help keep the yarn smooth.
Lastly, have your amigurumi doll ready with a fully crocheted head. Make sure the stitches are tight and the head is firmly stuffed. This provides a stable base for adding the hair. Once your materials are prepared, you’re ready to begin your Crochet Amigurumi Doll Hair – Pattern and bring your doll to life.
3. Step-by-Step Guide to Crochet Amigurumi Doll Hair – Pattern
Now that your tools and materials are ready, it’s time to start crafting your Crochet Amigurumi Doll Hair – Pattern. Follow these steps carefully for a neat, even, and professional-looking hairstyle.
Begin by cutting multiple strands of yarn. The length of each strand will determine how long your doll’s hair will be. Remember, each strand will be folded in half, so cut them twice as long as the final desired length. For example, if you want the hair to be 6 inches long, cut strands that are 12 inches each.
Next, decide on the hairline placement. Use pins or a washable marker to outline where the hair will start on the head. This helps keep your rows even and symmetrical.
To attach the strands, fold one yarn piece in half and insert your crochet hook under a stitch on the doll’s head. Pull the looped end of the yarn through the stitch, then draw the loose ends through the loop and pull tight to secure it. Repeat this process across the head, row by row.
Continue adding strands until the head is covered. For a fuller look, place the strands closer together. For thinner hairstyles or pigtails, leave small gaps between rows. Once all the strands are in place, trim the ends evenly or shape them into layers for a natural finish.
If you prefer a removable hairstyle, you can crochet a separate wig cap. To make one, start with a magic ring and crochet in rounds until the cap fits snugly on the doll’s head. Attach the strands to the wig cap instead of the doll, then sew or glue it on later. This method allows you to create interchangeable hairstyles.
Finally, style the hair as desired. You can braid it, curl it using light heat or water techniques, or tie it into buns or ponytails. Once you’re satisfied with the look, your Crochet Amigurumi Doll Hair – Pattern is complete, and your doll will have a beautifully unique hairstyle.
4. Tips and Creative Ideas for Crochet Amigurumi Doll Hair – Pattern
The Crochet Amigurumi Doll Hair – Pattern gives you plenty of room for creativity. Beyond just attaching yarn strands, there are countless ways to make your doll’s hair stand out and reflect its character.
For a fun, whimsical style, try using multiple colors of yarn. Rainbow hair, pastel ombré, or seasonal color combinations can make your dolls look playful and eye-catching. You can even mix metallic or glitter yarn for a magical touch.
If you want realistic curls, wrap strands of yarn around a knitting needle or chopstick, spray lightly with water, and let them dry completely before attaching. When removed, the yarn will hold beautiful spiral curls that mimic real hair.
Another creative approach is to give your doll short haircuts or textured hairstyles. You can cut the strands to different lengths, add bangs, or even crochet a bob-style cap for a modern twist.
For a vintage or classic look, braid the hair or tie it into two pigtails with small ribbons. You can also add accessories like crochet flowers, tiny bows, or beaded clips to match the doll’s outfit.
Lastly, remember that less is often more. Avoid overcrowding the scalp with too many strands, as this can make the hair bulky or uneven. With careful placement, the Crochet Amigurumi Doll Hair – Pattern will look balanced, natural, and elegant.
FAQ About Crochet Amigurumi Doll Hair – Pattern
1. What is the best yarn for making amigurumi doll hair?
Cotton and acrylic yarns are ideal because they hold their shape well and come in a wide range of colors.
2. Can I brush my amigurumi doll’s yarn hair?
Yes, but gently. Use a wide-tooth comb or your fingers to prevent frizz and tangling.
3. How do I make curly or wavy hair for my doll?
Wrap yarn strands around a rod or pencil, spray with water, let them dry, and then remove for lasting curls.
4. Is it better to attach hair directly or make a wig cap?
It depends on your preference. A wig cap offers flexibility, while direct attachment gives a more natural look.
5. How can I keep the yarn from fraying or fuzzing?
Apply a light coat of fabric softener or anti-frizz spray to the yarn to maintain smoothness.
6. Can I use other materials instead of yarn for doll hair?
Yes! Embroidery thread, wool, or even felt strips can be used for different textures and styles.
Conclusion
The Crochet Amigurumi Doll Hair – Pattern is one of the most rewarding parts of creating a handmade doll. It transforms a simple crocheted figure into a character full of personality and charm. With the right materials, patience, and creativity, you can achieve professional-looking hairstyles that make your dolls truly special.
From straight and sleek to curly and colorful, each hairstyle tells a story and gives your amigurumi its unique flair. Remember, practice makes perfect — and experimenting with new techniques will help you find your own artistic style.
Now that you’ve learned everything about the Crochet Amigurumi Doll Hair – Pattern, it’s time to pick up your yarn and crochet hook and start creating! Don’t forget to leave your honest opinion and share your creative ideas or tips — your feedback helps inspire others in the crochet community to bring their own handmade dolls to life.