Creating a Crocheted Christmas Ornament – Pattern is one of the most enjoyable and heartwarming projects you can take on during the holiday season. Crochet ornaments add a unique handmade charm to your Christmas tree, making it stand out with warmth, tradition, and creativity. Unlike store-bought decorations, these ornaments carry the love and effort of your own hands, turning every stitch into a treasured memory that lasts for years.
The beauty of a Crocheted Christmas Ornament – Pattern lies in its versatility. You can craft simple designs that take minutes to make or more intricate patterns that challenge your creativity. Each ornament can reflect your personal style—whether classic, rustic, or modern—and can be made in various shapes like snowflakes, stars, angels, or mini Christmas balls. These ornaments are not only beautiful additions to your holiday décor but also make thoughtful handmade gifts for family and friends.
In this article, we’ll explore everything you need to know about crafting your own Crocheted Christmas Ornament – Pattern—from materials and techniques to creative customization ideas. Whether you’re a beginner or an experienced crocheter, this step-by-step guide will inspire you to create festive decorations filled with joy and holiday spirit.
1. The Charm and Significance of a Crocheted Christmas Ornament – Pattern
There’s something timeless and special about a Crocheted Christmas Ornament – Pattern. Handmade ornaments hold sentimental value because they are created with care and attention. Each stitch represents love, patience, and creativity, making these decorations more than just items on a tree—they become part of family traditions and cherished memories.
Crocheted ornaments are also incredibly versatile. You can use them to decorate Christmas trees, gift packages, wreaths, garlands, or even tables. Their lightweight texture makes them easy to hang, and since they are made of yarn, they won’t break like traditional glass ornaments. This makes them perfect for families with children or pets.
Another beautiful aspect of crocheted ornaments is that they can be reused year after year. You can even wash and refresh them for each new holiday season. Over time, they become part of your family’s Christmas story, passed down from one generation to the next.
Beyond personal use, these ornaments make excellent gifts. A Crocheted Christmas Ornament – Pattern allows you to create personalized presents that show thoughtfulness and creativity. Add someone’s initials, favorite colors, or small embellishments like beads or sequins to make it extra special.
Additionally, crocheting ornaments is an excellent way to use leftover yarn from other projects. Small quantities of yarn can turn into charming decorations, helping reduce waste while allowing you to experiment with different textures and colors. It’s a sustainable, budget-friendly, and rewarding craft that keeps on giving.
Finally, the process itself brings joy. The rhythmic motion of crocheting combined with the festive atmosphere of the holidays creates a calming and fulfilling experience. It’s the perfect activity for cozy winter evenings, where you can relax with a cup of tea while crafting something meaningful for your home.
2. Materials and Tools Needed for a Crocheted Christmas Ornament – Pattern
Before starting your Crocheted Christmas Ornament – Pattern, it’s essential to gather the right materials and tools. While this project is flexible, choosing quality supplies ensures your ornaments look polished and last for many Christmas seasons.
The most important material is yarn. Cotton or acrylic yarns are ideal choices for crocheted ornaments. Cotton provides structure and durability, while acrylic offers vibrant color options and a soft texture. Metallic or sparkly yarns can also add a festive touch to your decorations. Choose colors that match your holiday theme—classic reds, greens, and whites, or modern golds, silvers, and blues.
Next, select a crochet hook that matches your yarn’s weight. Most Crocheted Christmas Ornament – Pattern projects work best with smaller hooks (2mm to 3.5mm), as tighter stitches help your ornament hold its shape. Always check your yarn label for recommended hook sizes, but feel free to adjust based on your personal tension preference.
You’ll also need a few additional items: scissors for cutting yarn, a tapestry needle for weaving in ends, and a bit of fiberfill stuffing if you’re making 3D ornaments. For hanging loops, you can use yarn, ribbon, or metallic thread. Optional decorative materials include beads, buttons, sequins, or small bells to add sparkle and charm.
If you’re planning to make flat ornaments like snowflakes or stars, consider using a fabric stiffener or starch spray to help them maintain their shape. Blocking your finished pieces also ensures a neat, professional look. Simply pin your ornament to a foam board, spray lightly with water or stiffener, and let it dry overnight.
Lastly, prepare a comfortable workspace. Good lighting, soft background music, and an organized crafting area make crocheting even more enjoyable. Keep all your tools within reach so you can focus on bringing your Crocheted Christmas Ornament – Pattern to life.
3. Step-by-Step Guide to Making a Crocheted Christmas Ornament – Pattern
Now that you have your materials ready, it’s time to create your Crocheted Christmas Ornament – Pattern. While designs can vary, most ornaments follow a simple structure—begin with a central motif and build outward with increasing rounds or rows.
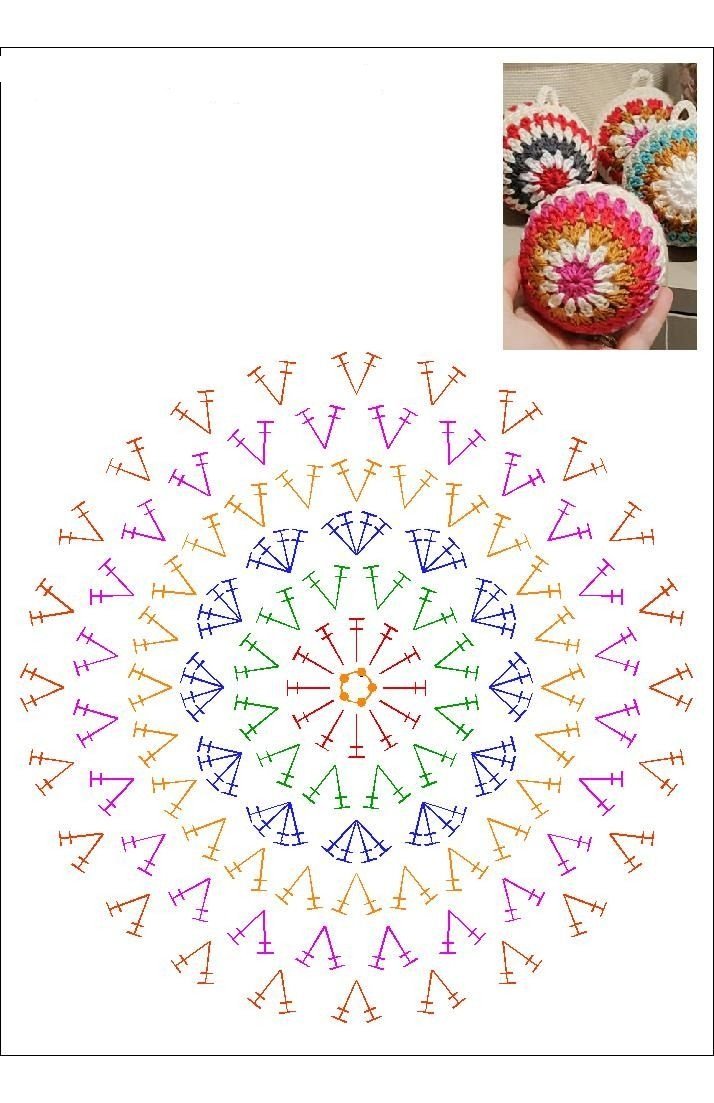
Start by choosing your ornament shape. Popular designs include circles, stars, snowflakes, and mini Christmas trees. For beginners, a round bauble-style ornament is a great starting point. Begin with a magic ring and work single or double crochet stitches in increasing rounds until you reach the desired diameter. Then, decrease the stitches symmetrically to close the shape, adding stuffing before sealing it completely.
If you prefer flat ornaments, you can create motifs like hearts, snowflakes, or stars using chain stitches and picots. Once finished, block them flat to enhance their details. Adding a touch of glitter glue or metallic thread can make them sparkle beautifully under holiday lights.
After finishing the main body, create a hanging loop by attaching a small chain of stitches or tying a ribbon through the top. Ensure it’s secure enough to hold the ornament’s weight. You can also decorate your ornament with beads, sequins, or small appliques for added visual interest.
For more advanced crocheters, incorporating multiple colors using color-changing techniques or tapestry crochet adds complexity and beauty. You can even make themed sets—like Santa, snowmen, or gingerbread men—to tell a festive story through your crochet work.
Finally, don’t rush the finishing touches. Weaving in ends neatly and shaping your ornament properly ensures it looks professional. The effort you put into each detail will be visible in the final product, making your Crocheted Christmas Ornament – Pattern truly stand out.
4. Creative Ways to Use and Display a Crocheted Christmas Ornament – Pattern
Once your Crocheted Christmas Ornament – Pattern is complete, there are countless ways to showcase it during the holidays. Of course, the most traditional use is to hang it on your Christmas tree, where its handmade charm will immediately catch the eye. But that’s just the beginning.
You can use crocheted ornaments to embellish gift wrapping. Instead of using store-bought bows, attach a small crochet star or heart to the ribbon for a beautiful, reusable touch that shows extra care. It’s an easy way to make your gifts stand out while promoting sustainability.
These ornaments also work wonderfully as garlands. Simply string several together with twine or yarn to create a festive decoration for mantels, windows, or doorways. A Crocheted Christmas Ornament – Pattern garland adds texture and warmth to any holiday space.
If you enjoy hosting Christmas dinners, you can use crocheted ornaments as table decorations or napkin holders. Smaller designs make great name card holders or keepsakes for guests to take home. This adds a personal and cozy atmosphere to your festive gatherings.
Another creative idea is to turn your ornaments into keychains or car charms for the holiday season. They make adorable and functional accessories that spread Christmas cheer wherever you go. You can even sell them at holiday markets or gift them to coworkers and friends.
Finally, use your crocheted ornaments to decorate spaces beyond your tree. Hang them on doorknobs, wreaths, or even walls. The versatility of a Crocheted Christmas Ornament – Pattern allows you to incorporate handmade beauty into every corner of your home.
FAQ About Crocheted Christmas Ornament – Pattern
1. Are Crocheted Christmas ornaments beginner-friendly?
Yes, most designs are easy and quick to make, making them perfect for beginners.
2. What type of yarn should I use for crocheted ornaments?
Cotton or acrylic yarns are best. They hold their shape well and come in many festive colors.
3. Can I sell the ornaments I make?
Yes! Handmade crocheted ornaments are popular at craft fairs and online marketplaces, especially during the holidays.
4. How do I stiffen flat crochet ornaments?
You can use fabric stiffener, starch spray, or diluted glue to help them keep their shape.
5. How long does it take to make one ornament?
Depending on the pattern, most can be completed in 30 minutes to 2 hours.
6. Can I wash crocheted ornaments?
Yes, gently hand wash with mild soap and lay flat to dry to preserve their shape.
Conclusion
The Crocheted Christmas Ornament – Pattern is a perfect project to celebrate the holiday season with creativity and warmth. It combines the joy of crafting with the magic of Christmas, resulting in beautiful, lasting decorations that carry personal meaning. Whether you’re making them for your own tree or as gifts for loved ones, each ornament tells a story of care, effort, and festive spirit.
By following this guide, you now have the knowledge to create stunning crochet ornaments that will brighten your home year after year. Enjoy the process, embrace the imperfections, and let your creativity shine. We’d love to hear your thoughts and see your creations—share your experiences, honest opinions, and suggestions in the comments below!