The Crochet Turkey Hat – Pattern is a fun and festive project that perfectly captures the joy and creativity of fall and Thanksgiving celebrations. This adorable hat combines warm autumn colors and playful design elements, making it a favorite for crafters of all ages. Whether you’re creating it for a baby’s first Thanksgiving, a family photo, or as a cheerful handmade gift, the crochet turkey hat adds personality and charm to the holiday season.
Crochet lovers enjoy this pattern because it’s a mix of creativity and practicality. The Crochet Turkey Hat – Pattern can be customized for any age, from newborns to adults, and it’s an excellent way to practice color changes, shaping, and fun embellishments. Plus, it’s a great conversation starter and adds a touch of humor and warmth to family gatherings. Making this hat allows you to blend skill with festive cheer while keeping your loved ones cozy during cooler months.
In this article, you’ll learn how to create your own crochet turkey hat, explore the best materials to use, discover creative design ideas, and get expert tips for perfecting your project. You’ll also find a helpful FAQ section to answer common questions about crocheting turkey hats. The Crochet Turkey Hat – Pattern is simple enough for beginners but detailed enough to keep experienced crafters engaged.
1. Understanding the Crochet Turkey Hat Pattern
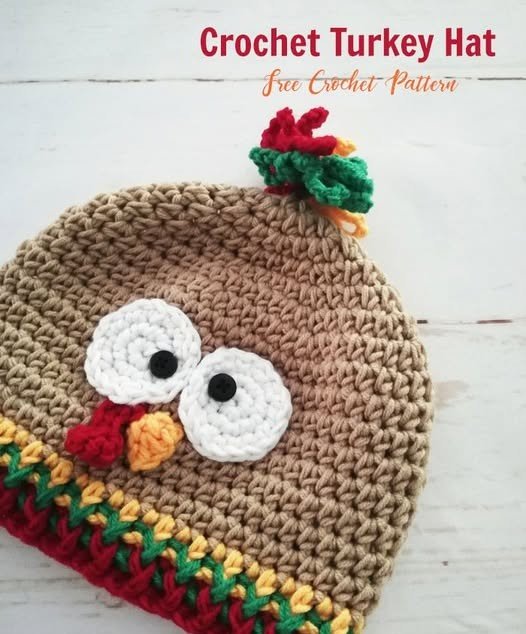
Before starting your project, it’s important to understand what makes the Crochet Turkey Hat – Pattern so delightful and distinctive. This hat design typically features a cozy base in brown tones, representing the turkey’s body, and colorful feathers attached to the back or crown. It’s often finished with googly eyes, a beak, and a small red wattle for that unmistakable turkey look.
The foundation of this pattern is a basic crochet beanie. You’ll work in rounds using simple stitches like single crochet and half-double crochet. This makes it accessible even for beginners while providing a sturdy and comfortable fit. The key is maintaining even tension throughout to achieve a smooth, professional look.
Choosing the right yarn is essential for success. Medium-weight acrylic yarn is highly recommended for this project—it’s soft, durable, and easy to wash, making it ideal for hats that might see plenty of wear during the holiday season. For a traditional color scheme, choose brown for the base, and add yellow, orange, and red for the feathers.
When following a Crochet Turkey Hat – Pattern, size adjustments are easy. Most patterns include measurements for various age groups, allowing you to scale your hat for babies, children, or adults. Always check your gauge before starting to ensure the perfect fit.
Adding the decorative features is where creativity shines. The eyes can be crocheted circles or safety eyes, while the beak and wattle are made separately and sewn onto the hat. These playful details give your project its unique turkey personality.
Finally, remember that crochet is an art form. While the pattern provides a guide, your own choices in color, yarn, and embellishments make the finished product truly one of a kind. The Crochet Turkey Hat – Pattern encourages creativity while celebrating tradition and fun.
2. Step-by-Step Instructions for Crafting the Turkey Hat
Creating your Crochet Turkey Hat – Pattern begins with the hat base. Start by making a magic ring and working single or half-double crochets in continuous rounds. Increase gradually until the crown reaches the desired size, then continue working evenly until the hat measures the correct height for the intended head size.
Once the base is complete, move on to the decorative elements. For the feathers, crochet several teardrop or leaf-shaped pieces in bright fall colors. You can use a combination of orange, red, and yellow yarns to represent the turkey’s feathers. Attach them securely to the back or crown of the hat, spacing them evenly for balance and symmetry.
Next, create the turkey’s facial features. For the eyes, crochet small white circles and stitch a smaller black circle in the center for the pupils. Alternatively, you can use plastic safety eyes for a more realistic effect. The beak is typically a small triangle made with yellow or orange yarn, and the wattle is a short, wavy red strand that hangs from the beak area.
Once all the parts are made, it’s time to assemble them. Using a tapestry needle and matching yarn, sew the features securely onto the hat. Make sure the placement is centered and symmetrical for the best visual effect. Double-check that all parts are firmly attached, especially if the hat is for a child.
If you’re making the hat for colder weather, consider lining it with fleece or adding earflaps for extra warmth. You can also crochet ties on each side so that the hat stays securely on the wearer’s head, especially for younger children.
Finally, finish off your project by weaving in all loose ends and lightly blocking the hat to shape it perfectly. Once complete, your Crochet Turkey Hat – Pattern will be ready to wear or gift—an adorable, handmade reminder of the season’s joy.
3. Creative Variations and Styling Ideas
One of the most enjoyable parts of working with the Crochet Turkey Hat – Pattern is experimenting with different styles and variations. You can adapt this pattern in countless ways to suit various preferences, making each version unique.
For a classic Thanksgiving theme, stick to the traditional color palette—brown, orange, red, and yellow. However, you can modernize the design by introducing neutral tones like cream or beige, or even create a fun twist with pastel shades for a whimsical look.
You can also play with the hat’s structure. Instead of a standard beanie, try making a slouchy hat or one with earflaps. Adding braids or tassels to the ends of the earflaps not only provides a cute finishing touch but also helps secure the hat in place.
If you want to make your Crochet Turkey Hat – Pattern stand out, consider adding textured stitches such as bobbles or puff stitches to the hat’s body. These small details can give your turkey hat extra dimension and personality.
For baby versions, keep the design soft and minimal. Use lightweight yarn and avoid small detachable parts that could pose a choking hazard. For adults, you can make a playful oversized version that doubles as a novelty accessory for Thanksgiving dinner or a themed party.
Another fun idea is to turn your crochet turkey hat into a family project. Create matching hats for each family member, varying the colors slightly for individuality. This not only makes for adorable family photos but also celebrates creativity and togetherness during the holidays.
4. Tips for Perfecting and Maintaining Your Crochet Hat
Once you’ve completed your Crochet Turkey Hat – Pattern, taking care of it properly will ensure it lasts for many Thanksgiving seasons. Handmade crochet items require gentle handling to preserve their shape and color.
Always wash your crochet hat by hand in cool water using mild detergent. Avoid wringing or twisting it, as this can stretch the fibers. Instead, press out the water gently with a towel and lay the hat flat to dry.
If your hat includes safety eyes or decorative attachments, handle these areas carefully when washing. Spot cleaning is often the best method for maintaining the hat’s details without loosening the stitches.
Storing your crochet hat properly is also important. Keep it in a dry, cool place away from direct sunlight to prevent fading. Folding it loosely helps maintain the shape of the feathers and facial features.
If you notice any loose threads or stitches, repair them immediately. Small fixes are easy to handle and will prevent bigger issues later on. Keep a small amount of leftover yarn from your project for quick repairs if needed.
Lastly, take pride in your work. Every stitch in your Crochet Turkey Hat – Pattern reflects your effort and creativity. Wearing or gifting something handmade brings joy not only to the recipient but also to the crafter who poured love into every loop.
Frequently Asked Questions (FAQ)
1. What materials do I need for a Crochet Turkey Hat – Pattern?
You’ll need medium-weight yarn in brown, red, orange, yellow, and white, a crochet hook (usually 4mm or 5mm), scissors, and a tapestry needle. Optional: safety eyes and stuffing for 3D details.
2. Can beginners make this hat?
Yes! This pattern is beginner-friendly and uses basic stitches like single crochet and double crochet. The details are easy to add with a bit of patience.
3. How long does it take to make a crochet turkey hat?
Depending on your skill level, it usually takes 3 to 6 hours to complete one hat, including the decorative elements.
4. Can I adjust the size for babies or adults?
Absolutely! Most Crochet Turkey Hat – Patterns include size charts, but you can also adjust stitch counts to customize the fit.
5. How can I make my hat extra warm?
You can line the inside with fleece or use thicker yarn to provide more insulation, especially for colder weather.
6. Is the pattern safe for babies?
Yes, but avoid using small detachable parts like plastic eyes. Instead, embroider the eyes for a safe and soft baby version.
Conclusion
The Crochet Turkey Hat – Pattern is a joyful and creative project that combines warmth, humor, and festive spirit. Perfect for Thanksgiving celebrations or cozy fall days, this hat is easy to make, fun to customize, and a guaranteed hit with family and friends. From choosing the perfect colors to adding the finishing details, each step lets you express your creativity and love for crochet.
We hope this guide has inspired you to try making your own turkey hat and add a handmade touch to your holiday celebrations. Please share your honest opinion in the comments and leave your suggestions for future crochet projects. Your feedback helps keep the crafting community creative and connected!