The Two Ways to Make a French Braid Quilt – Pattern is a timeless quilting technique that combines elegance, simplicity, and versatility. Known for its striking braided design, the French braid quilt has captivated quilters around the world for decades. Its flowing, woven appearance mimics the intricate look of a hair braid, yet it’s surprisingly easy to create with the right guidance and fabric selection. Whether you’re new to quilting or an experienced crafter, learning this pattern opens up a world of creative possibilities.
The beauty of the Two Ways to Make a French Braid Quilt – Pattern lies in its adaptability. You can craft it in a traditional style using warm, muted tones or give it a modern twist with bold, contrasting colors. Each strip of fabric interlocks harmoniously with the next, creating movement and depth that adds sophistication to any space. This design works well as a bed quilt, wall hanging, or table runner, offering both aesthetic appeal and functional warmth.
What makes this quilt especially appealing is that there are two main approaches to creating it: the traditional strip-piecing method and the modern foundation-pieced technique. Both methods have their unique advantages, and in this article, we’ll explore them step by step so you can choose which works best for your skill level and style. Let’s dive into the world of braiding fabric and discover how to master the Two Ways to Make a French Braid Quilt – Pattern.
1. The History and Inspiration Behind the French Braid Quilt Pattern
The origins of the French Braid Quilt can be traced back to traditional European weaving and braiding techniques, which inspired quilters to recreate similar interlaced designs using fabric. The pattern gained popularity in the late 20th century as quilters sought designs that balanced visual complexity with approachable construction. Its braided look symbolizes unity and continuity, making it a meaningful pattern to gift or display.
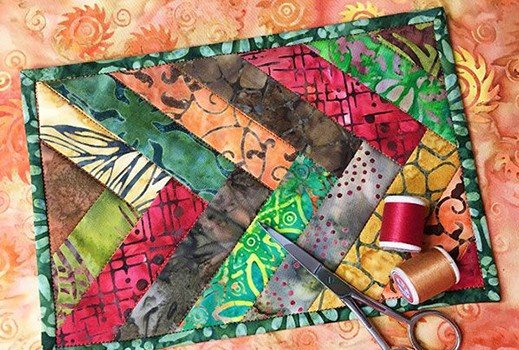
Unlike many patchwork designs that rely on squares or triangles, the French braid uses long strips of fabric to form a continuous zigzag effect. This gives it a dynamic and elegant look that works beautifully in both traditional and contemporary homes. The arrangement of color and contrast is what makes each quilt unique, as the fabric choices determine how bold or subtle the final braid appears.
This quilt design also carries a sentimental touch. Many quilters use leftover fabrics or scraps from previous projects, allowing each piece to tell a story. It’s not just a quilt — it’s a tapestry of memories woven together, reflecting creativity and emotional connection.
Over time, the French Braid Quilt – Pattern evolved into several variations, from narrow, compact braids to wide, flowing designs. Some quilters combine multiple braids within a single quilt, while others use a single braid as the centerpiece for a more minimalist style.
The French braid is a favorite among beginners because it offers visual complexity without requiring advanced piecing skills. Yet, even experienced quilters appreciate its versatility and potential for experimentation.
Ultimately, this pattern is more than just a visual statement — it’s a celebration of quilting artistry, where structure and spontaneity intertwine beautifully.
2. Materials and Preparation for the Two Ways to Make a French Braid Quilt – Pattern
Before starting your Two Ways to Make a French Braid Quilt – Pattern, it’s essential to prepare the right materials. The process begins with selecting high-quality quilting fabric. Choose a combination of light, medium, and dark tones to create contrast and movement within the braid. Cotton fabric works best because it’s durable, easy to cut, and presses cleanly.
You’ll need a rotary cutter, cutting mat, quilting ruler, sewing machine, matching thread, and iron. For beginners, pre-cut fabric strips known as “jelly rolls” can be a great option since they come in coordinating colors and save time on cutting.
When selecting colors, think about the mood you want to create. Warm tones like burgundy, gold, and cream evoke a classic, cozy look, while cool shades like blue, silver, and white offer a modern feel. The choice of color order will determine the overall visual flow of your braid.
Before cutting your strips, press all fabrics to remove wrinkles. Then, cut them into equal-width pieces—usually 2½ inches wide for standard braids. Make sure all edges are straight and uniform, as precise cuts are key to achieving clean lines in your finished quilt.
For the background or sashing fabric, choose a color that complements your braid without overpowering it. This background helps define each braid and gives the quilt structure and balance.
Lastly, organize your strips in the order you plan to sew them. Laying them out visually before stitching helps you adjust color placement and avoid unwanted repetition. Careful preparation sets the foundation for a flawless French Braid Quilt – Pattern.
3. Method One: Traditional Strip-Piecing Technique
The first method for creating the French Braid Quilt – Pattern is the traditional strip-piecing approach. This classic technique is perfect for quilters who enjoy simple, repetitive sewing that leads to beautiful results.
Begin by selecting two contrasting strips — one for the left side and one for the right side of the braid. Start with a center rectangle or triangle at the base. Sew the first strip to one side, aligning the edges precisely. Press the seam flat, then add a strip to the opposite side, alternating left and right as you build upward.
Each strip should extend slightly beyond the base shape, forming a staggered, braided effect. Trim the edges periodically to maintain symmetry and alignment. Continue adding strips until the braid reaches your desired length.
Once your braid is complete, square off the top and bottom edges. Add background strips or sashing on each side to frame the braid and enhance its visual definition. These framing fabrics create separation and make the braid stand out beautifully.
The charm of this traditional method lies in its simplicity. You can easily adjust the width and length of your braid to suit different projects, from table runners to large quilts. It’s also an excellent way to use fabric scraps efficiently.
This approach allows for intuitive creativity — you can mix colors freely or follow a pre-planned gradient for a polished look. With practice, your French Braid Quilt – Pattern will display a perfect balance between precision and artistry.
4. Method Two: Foundation-Pieced Technique
The second method for making the French Braid Quilt – Pattern involves foundation piecing, a more structured technique that provides enhanced accuracy. This method is especially useful for intricate color arrangements or when working with delicate fabrics.
Start by printing or drawing your braid pattern onto a foundation base, such as lightweight paper or stabilizer. The printed lines act as guides, helping you maintain perfect alignment throughout the process.
Place your first strip face-up on the foundation, then position the second strip right side down, aligning edges along the marked line. Sew through both layers and the foundation, using a short stitch length for stability. Press the strip open and repeat the process, alternating sides as you move upward.
Continue sewing and pressing until the entire foundation is covered. Once finished, trim the excess fabric and remove the foundation carefully. The result is a precise, clean braid that maintains its shape beautifully.
This method allows for greater control, especially for beginners who struggle with straight seams or consistent spacing. It’s also ideal for creating symmetrical designs when making multiple braids for one quilt.
Foundation piecing adds a level of confidence to your sewing, ensuring that your French Braid Quilt – Pattern looks professional and polished, no matter your experience level.
FAQ
Q1: What is the main difference between the two methods?
A: The traditional strip-piecing method is faster and more freeform, while the foundation-pieced method offers more precision and structure.
Q2: Can I make a French Braid Quilt using fabric scraps?
A: Absolutely! The design works beautifully with leftover fabrics, giving your quilt a charming, scrappy look.
Q3: What size should my fabric strips be?
A: Standard strips are 2½ inches wide, but you can adjust the width for larger or smaller braids depending on your project.
Q4: Do I need special tools to make this quilt?
A: No special tools are required — a rotary cutter, ruler, sewing machine, and iron are sufficient for both methods.
Q5: How do I choose the right color palette?
A: Choose light, medium, and dark tones to create contrast and movement. Arranging them in gradient order enhances the braid’s flowing effect.
Q6: Can I combine both methods in one project?
A: Yes! Some quilters use the traditional method for larger sections and foundation piecing for smaller, detailed parts.
Conclusion
The Two Ways to Make a French Braid Quilt – Pattern offers quilters an exciting opportunity to combine beauty and craftsmanship. Whether you choose the traditional strip-piecing method for its simplicity or the foundation-pieced approach for its precision, both yield stunning results that showcase your creativity.
By mastering these techniques, you can create quilts that exude elegance, warmth, and personality. From color selection to final stitching, every step is a chance to express yourself through fabric and design.
Now that you’ve explored both methods, it’s time to bring your own French Braid Quilt – Pattern to life. Experiment with colors, textures, and layouts to make your creation truly one-of-a-kind. Don’t forget to share your thoughts and suggestions below — your feedback inspires other quilting enthusiasts to discover the joy of braiding fabric into timeless art.