CROCHET BAG – Pattern projects are among the most popular and rewarding creations in the crochet world, offering endless opportunities for customization, style, and functionality. Whether you’re looking to make a casual tote, a chic handbag, or a sturdy market bag, the bold and versatile CROCHET BAG – Pattern provides a solid foundation for crafting an accessory that reflects your personal taste. Handmade bags carry a unique charm that store-bought items simply cannot match, making them perfect for gifting or everyday use.
Starting a CROCHET BAG – Pattern is an exciting opportunity to experiment with stitches, textures, shapes, and colors. From simple single crochet bags to intricate lace or motif-based designs, there is a style for every skill level. What makes crochet bags so enjoyable to create is the balance between creativity and practicality. Your finished piece will not only showcase your skill but will also serve a functional purpose in your daily life.
Additionally, working on a CROCHET BAG – Pattern helps build important crochet techniques, such as consistent tension, working in the round, shaping, and adding structural elements. It’s a great project for beginners who want to learn more, and for advanced crocheters who want to challenge themselves with detailed patterns. This guide will walk you through everything you need to know to create your own beautiful crochet bag.
1. Understanding the CROCHET BAG – Pattern
Before starting your CROCHET BAG – Pattern, it’s helpful to understand the variety of shapes and structures that crochet bags can take. Some bags are worked bottom-up, beginning with a flat circular, rectangular, or square base, while others start as motifs that are later assembled. Knowing the construction style helps you select the method that best fits your vision.
One of the most common techniques used in crochet bags is working in continuous rounds. This creates a seamless, sturdy structure ideal for tote bags and market bags. Bags made with squares or motifs allow for more artistic expression, enabling you to mix textures and colors creatively.
Choosing the right stitch is crucial for achieving a durable and visually appealing bag. Single crochet offers density and strength, making it ideal for everyday bags, while more open stitches like mesh or shell stitch are perfect for lightweight, decorative bags. Texture-rich stitches, such as puff or bobble stitches, add depth and personality to your design.
Understanding the purpose of your bag also influences your pattern choices. For example, a market bag benefits from flexibility and stretchiness, while a handbag requires more stability and structure. Your yarn type, stitch selection, and handle style will depend largely on how you plan to use the bag.
Even the smallest design decisions—such as adding pockets, closures, buttons, or lining—play a key role in the final functionality of your bag. Taking time to plan your design helps ensure that your finished CROCHET BAG – Pattern will meet your expectations.
In short, understanding the basic components and structure of a crochet bag gives you confidence as you begin crafting and allows you to personalize every detail.
2. Materials and Tools Needed for the CROCHET BAG – Pattern
To achieve the best results with your CROCHET BAG – Pattern, selecting the right materials is essential. Yarn choice affects the bag’s durability, texture, weight, and appearance. Cotton yarn is highly recommended because it offers strength, holds shape well, and resists stretching. Blended or acrylic yarns can also be used for softer or more flexible bags.
The crochet hook size you choose should complement your yarn. Using a slightly smaller hook than the yarn label suggests creates tighter stitches, which gives your bag more structure. Most medium-weight yarns pair well with a 4.0 mm to 5.5 mm hook, but sturdier yarns may require larger hooks.
Basic tools such as stitch markers, scissors, and a yarn needle will help you complete your project more efficiently. Stitch markers are especially helpful when working in rounds or maintaining symmetry in motif-based bags.
Handles are an important feature of your CROCHET BAG – Pattern. You can make crocheted handles for a matching look, or choose leather, metal, or wooden handles to elevate the bag’s appearance. The handle style you choose affects both the bag’s function and aesthetic.
For added professionalism, you may want to line your bag. A fabric lining prevents stretching, keeps small items from slipping through open stitches, and enhances durability. Cotton fabric is easy to sew and pairs well with crocheted items.
Optional accessories such as zippers, buttons, magnetic snaps, tassels, or decorative appliques can add charm and convenience. These elements make your bag more personalized and functional, transforming it into a stylish, everyday accessory.
3. Step-by-Step Guide to Making a CROCHET BAG – Pattern
Start your CROCHET BAG – Pattern by creating the base. Whether you’re working in the round or creating a flat panel, the base establishes the bag’s shape and size. A tight stitch pattern is recommended to ensure a sturdy foundation.
Once the base is complete, work the body of the bag in rows or rounds, depending on the design. Maintain consistent tension and pay attention to stitch counts to avoid unwanted shaping. You can work in one stitch pattern or mix different textures for a more dynamic look.
As you continue building up the sides, consider adding color changes or stripes to give the bag a unique look. Changing colors is an easy way to personalize your bag without altering the stitch pattern.
When the body reaches the desired height, you may choose to add edging or a decorative border. This not only reinforces the top edge but also gives your CROCHET BAG – Pattern a polished finish. Popular border stitches include crab stitch, shell stitch, and picot edging.
Next, create and attach your handles. If crocheting handles, ensure they are reinforced with dense stitches to prevent stretching. For added durability, double-layered or rope-style handles work well. If using pre-made handles, securely sew them in place using strong thread or yarn.
Finally, weave in all loose ends and add optional features such as pockets, closures, or lining. Proper finishing enhances the quality and longevity of your bag, making it ready for daily use or gifting.
4. Creative Customization Ideas for the CROCHET BAG – Pattern
Customizing your CROCHET BAG – Pattern allows you to create a one-of-a-kind accessory that reflects your personality. One simple way to personalize your bag is by experimenting with colors. You can choose earthy tones for a boho vibe, vibrant hues for a youthful look, or monochrome shades for modern elegance.
Texture is another powerful tool for customization. Incorporating bobble stitches, cable stitches, or tapestry crochet patterns can give your bag an artistic flair. These textures not only enhance visual appeal but also make your bag more tactile and unique.
Adding embellishments such as tassels, pom-poms, buttons, or beads can instantly elevate your design. These decorations complement different styles, from minimalist to eclectic, depending on how you use them.
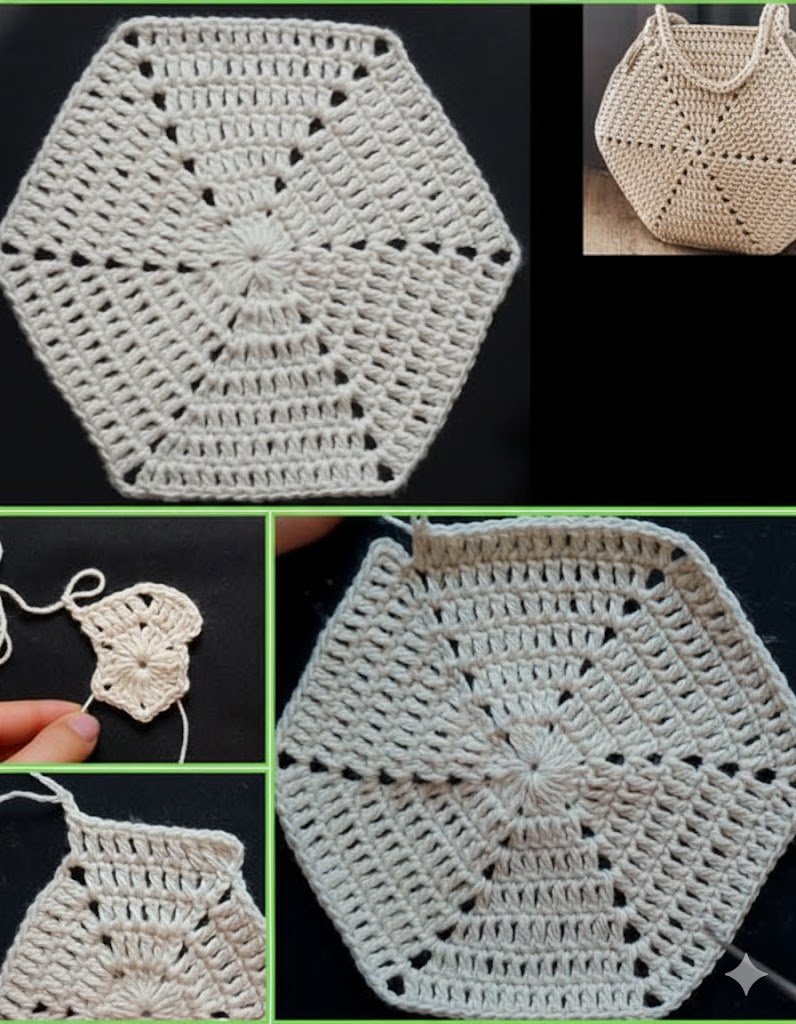
If you enjoy motif work, consider using granny squares, hexagons, or floral motifs to construct the entire bag. Motif-based bags are eye-catching and highly customizable. You can mix motif styles or stick to one cohesive design.
Practical customization options include adding interior or exterior pockets, adjustable straps, or keychain loops. These functional additions make your bag more convenient and suitable for everyday activities.
You can also experiment with different shapes. While rectangular and circular bags are common, you can create backpacks, bucket bags, or tote-style designs using the same CROCHET BAG – Pattern principles.
FAQ – CROCHET BAG – Pattern
1. Is the CROCHET BAG – Pattern suitable for beginners?
Yes, many crochet bag patterns are beginner-friendly, especially designs using basic stitches.
2. What yarn works best for crochet bags?
Cotton is ideal due to its strength and durability, but blends and acrylic also work well depending on the bag style.
3. How can I make my crochet bag sturdy?
Use tight stitches, smaller hooks, cotton yarn, and consider adding a lining.
4. Can I wash my crochet bag?
Most cotton bags can be hand-washed. Always follow yarn care instructions.
5. How do I attach handles securely?
Use strong thread or yarn and reinforce the connection area with multiple stitches.
6. Do I need a lining?
Lining is optional but useful for adding structure and preventing stretching.
7. Can I add a zipper to my crochet bag?
Yes, zippers can be sewn in by hand or with a sewing machine for added security.
8. How long does it take to make a crochet bag?
Depending on the pattern and size, it can take anywhere from a few hours to several days.
Conclusion
Creating a CROCHET BAG – Pattern is a rewarding experience that blends creativity, practicality, and craftsmanship. Throughout this guide, you learned how to choose materials, understand construction methods, follow step-by-step instructions, and explore imaginative customization ideas.
Whether you’re making your first bag or adding a new design to your collection, this project offers endless possibilities. I’d love to hear your honest opinion and suggestions—your feedback inspires future tutorials and helps our crochet community grow!