Sewing Machine Quilt Block – Pattern designs continue to inspire quilters who love mixing creativity with a touch of nostalgia. Right from the start, the Sewing Machine Quilt Block – Pattern stands out as a charming and symbolic project, celebrating the craft of sewing through a detailed and visually appealing block. Using the bolded key phrase throughout the article ensures better SEO performance while offering readers a clear, focused guide.
This type of quilt block has become a favorite among beginners and experienced quilters because it represents the heart of sewing: the sewing machine itself. Whether used inside a sampler quilt, a themed wall hanging, or as a single decorative piece, the Sewing Machine Quilt Block – Pattern is versatile and rewarding. Its combination of simple geometric shapes and precise piecing makes it a satisfying project for crafters who love structure with creative flair.
In this article, we explore everything you need to know about building and understanding the Sewing Machine Quilt Block – Pattern, from design elements to fabric choices, assembly steps, and ways to customize your block. Before we dive into the step-by-step sections, let’s look at the purpose and charm behind this classic quilting design.
1. Understanding the Structure of the Sewing Machine Quilt Block – Pattern
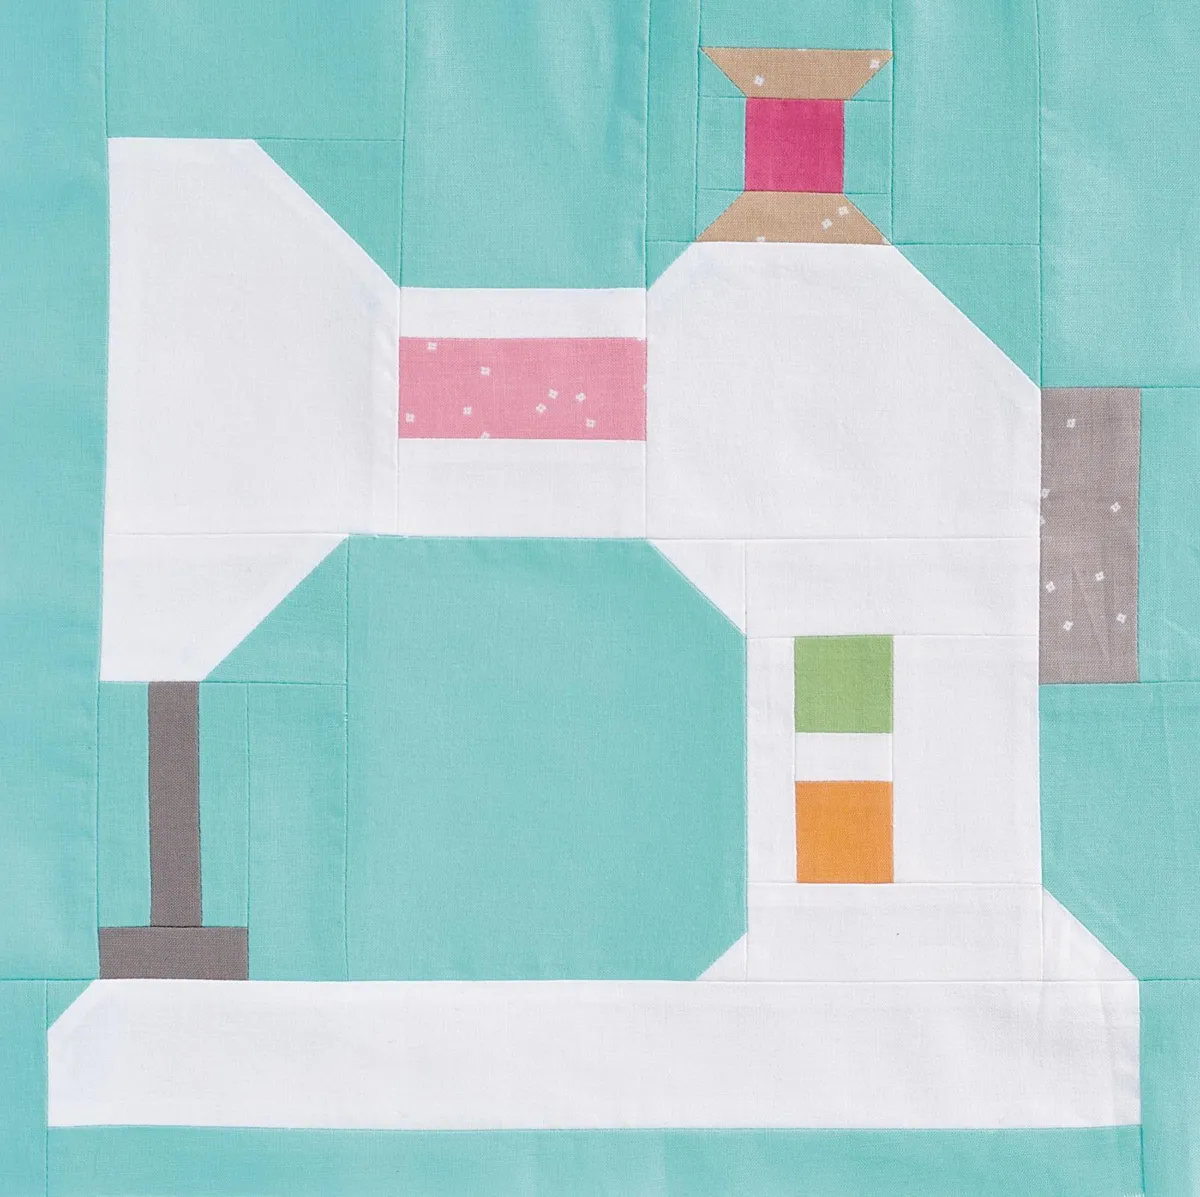
The construction of a Sewing Machine Quilt Block – Pattern generally uses a mix of rectangles, squares, and simple angled pieces. These elements come together to form the recognizable silhouette of a sewing machine. Even though the final look appears detailed, it remains accessible for quilters at nearly any skill level.
One essential aspect of the block’s structure is the clean lines. Straight seams help beginners practice accuracy, while experienced quilters can experiment with creative fabric placements. Most versions of the block include a machine base, a spool area, and a small needle section, giving it a charmingly realistic effect.
The block can be created in different sizes, depending on the project. Some quilters prefer an 8-inch block for sampler quilts, while others enlarge it to 12 inches or more for a centerpiece wall hanging. The flexibility of the Sewing Machine Quilt Block – Pattern makes it ideal for customizing dimensions according to your project’s needs.
Color placement also plays a significant role. You can choose fabrics that mimic a real sewing machine—like blacks, grays, and metallic tones—or create a fun, whimsical version in bright pastels or patterned prints. Using contrasting fabrics helps enhance the shape, making the sewing machine silhouette stand out clearly.
Most patterns break the block into labeled sections, making it easier to assemble. Following a clear layout diagram helps ensure accurate seam alignment, particularly around detailed areas like the spool or needle. With a bit of patience, the block comes together beautifully.
Finally, understanding the structure beforehand helps quilters anticipate tricky spots. Paying attention to seam allowance consistency and pressing direction can make the difference between a smooth assembly and unnecessary seams that won’t match. Preparation is key to success.
2. Choosing Fabrics for Your Sewing Machine Quilt Block – Pattern
Fabric selection can transform your Sewing Machine Quilt Block – Pattern into something truly unique. The right combination brings personality to your quilt and highlights the details of the sewing machine silhouette. The beauty of this pattern lies in how adaptable it is to all fabric styles.
Solid fabrics are often recommended for the machine outline because they create clean visual lines. A strong solid color helps distinguish the machine shape from the background, preventing the design from blending in. Neutral tones like gray or black are classic, but bold solids can add a modern twist.
If you want to create a more playful block, you can incorporate printed fabrics for the background or for small details in the sewing machine. Tiny florals, polka dots, and geometric prints add charm without overpowering the main shape. Just be sure your prints don’t compete with the machine outline.
Scrap-friendly versions of the block are also popular. Many quilters enjoy using leftover fabric pieces from previous projects, creating a sentimental connection to the sewing tradition. The Sewing Machine Quilt Block – Pattern works extremely well with scrappy designs because its shapes are small and easy to mix and match.
Choosing a contrasting background color helps the sewing machine pop. Consider using low-volume fabrics for the background if you want subtle texture without sacrificing clarity. These fabrics add dimension while allowing the block’s main elements to shine.
Additionally, consider the final purpose of your block. A bold color palette works well for a wall hanging or sewing-room decoration. For a quilt intended as a gift, softer hues or coordinated prints may feel more cohesive. Purpose-driven color choice enhances both style and sentiment.
3. Step-by-Step Assembly for the Sewing Machine Quilt Block – Pattern
To begin constructing your Sewing Machine Quilt Block – Pattern, gather all required pieces according to the cutting instructions in your pattern. Organizing fabric pieces by size and section helps avoid confusion and speeds up the assembly process. A small design board can be useful for arranging the layout before sewing.
Start by assembling the machine base. This section usually includes multiple rectangles that create the lower portion of the sewing machine. Straight seams make this part beginner-friendly, and careful pressing ensures the piece remains flat and accurate.
Next comes the spool area and upper machine body. These pieces may require more precision, especially if angled seams are included. Pinning or using seam guides can help maintain alignment. As you sew, take your time to avoid stretching or skewing smaller pieces.
Joining the individual sections is the most satisfying step. Watching the recognizable sewing machine shape form is rewarding and reinforces the charm of this pattern. Keeping a steady ¼-inch seam allowance is essential for ensuring that sections fit together neatly.
Pressing is just as important as stitching. Press seams open or to the side as needed, based on the pattern instructions. Good pressing results in sharper corners and easier assembly, especially when several seams meet at a single point.
Finally, square up your finished block to achieve the exact size required for your project. A clean, squared block ensures perfect placement when joining it with other quilt blocks or using it as a standalone motif in a sewing-themed project.
4. Creative Uses for the Sewing Machine Quilt Block – Pattern
Once your Sewing Machine Quilt Block – Pattern is complete, you can incorporate it into a wide range of creative projects. One of the most popular uses is adding it to a sampler quilt, where it becomes a charming focal point among other themed blocks.
You can also transform the block into a wall hanging for your crafting or sewing room. Its symbolic representation inspires creativity and makes a lovely decorative addition. Add borders, sashing, or even embroidery for a personalized touch.
Some quilters like to create sewing-themed tote bags or zipper pouches featuring this block. The sewing machine design is perfect for holding crafting tools or gifting to fellow quilting enthusiasts. Fun, functional, and visually appealing—these projects are great ways to showcase the block.
Another creative idea is using multiple versions of the block in a row to create a sewing-machine-themed table runner. Adjust color schemes to match your workspace or sewing area to give your décor a coordinated look.
If you enjoy seasonal themes, consider making versions of the block using festive colors. A holiday sewing machine block makes a delightful gift for a friend who loves quilting. It also adds personality to your seasonal décor.
Finally, the block works wonderfully as the front panel for a sewing organizer or book cover. Paired with pockets or interior compartments, the Sewing Machine Quilt Block – Pattern becomes both decorative and practical.
FAQ About the Sewing Machine Quilt Block – Pattern
What skill level is needed for this pattern?
The Sewing Machine Quilt Block – Pattern is suitable for confident beginners and above. The shapes are simple, but accuracy is important for clean results.
Can I make this block using fabric scraps?
Yes! The block is very scrap-friendly. Leftover pieces from past projects work beautifully for details like the spool, machine base, and accents.
What size block is most common?
Most patterns offer 8-inch, 10-inch, or 12-inch versions, but you can adjust the size based on your project.
Do I need special tools to sew this block?
Standard quilting tools—rotary cutter, mat, ruler, and sewing machine—are all you need. Accuracy tools like seam guides can also help.
Can the block be appliquéd instead of pieced?
Some quilters prefer appliqué for the sewing machine silhouette. It offers more creative freedom and is great for beginners uncomfortable with small piecing.
How can I use the finished block?
You can add it to quilts, tote bags, wall hangings, sewing organizers, or table runners—the possibilities are endless.
Conclusion
The Sewing Machine Quilt Block – Pattern is a delightful celebration of quilting itself. Its clean structure, creative potential, and versatility make it a beloved project among sewists of all experience levels. In this article, we explored how to choose fabrics, assemble the block step by step, and use it in a variety of creative ways.
If you enjoyed learning about this pattern, feel free to share your honest opinion and leave suggestions. Your feedback helps inspire more helpful guides for future projects!