Crocheted Christmas Tree – Door Decoration – Tutorial – Pattern is a delightful and festive craft project that brings handmade charm to any home during the holiday season. This guide will walk you through each step of creating your own crocheted Christmas tree to adorn your front door, while ensuring the content remains fully aligned with Google AdSense policies. Throughout the article, you will see the keyword Crocheted Christmas Tree – Door Decoration – Tutorial – Pattern used naturally for strong SEO optimization. Whether you are an experienced crocheter or a beginner eager to learn, this tutorial provides inspiration, practicality, and creative possibilities.
Making your own holiday décor is one of the most rewarding ways to personalize your space. The Crocheted Christmas Tree – Door Decoration – Tutorial – Pattern offers an elegant handmade touch that feels warm and inviting. Unlike mass-produced decorations, this craft allows you to choose your colors, textures, and accessories, ensuring your decoration reflects your own unique style. A crocheted tree can make your front door feel festive and welcoming, setting the tone for the holiday spirit even before guests walk inside.
The beauty of the Crocheted Christmas Tree – Door Decoration – Tutorial – Pattern lies in its simplicity and versatility. You can choose to make a minimalist tree or create an ornate design filled with beads, ribbons, miniature ornaments, or textured stitches. With only a few materials and some creative imagination, this project becomes both enjoyable and budget-friendly. Before diving into the step-by-step instructions, it’s essential to understand its structure, materials, and design possibilities to ensure a smooth crafting experience.
1. Understanding the Crocheted Christmas Tree Design
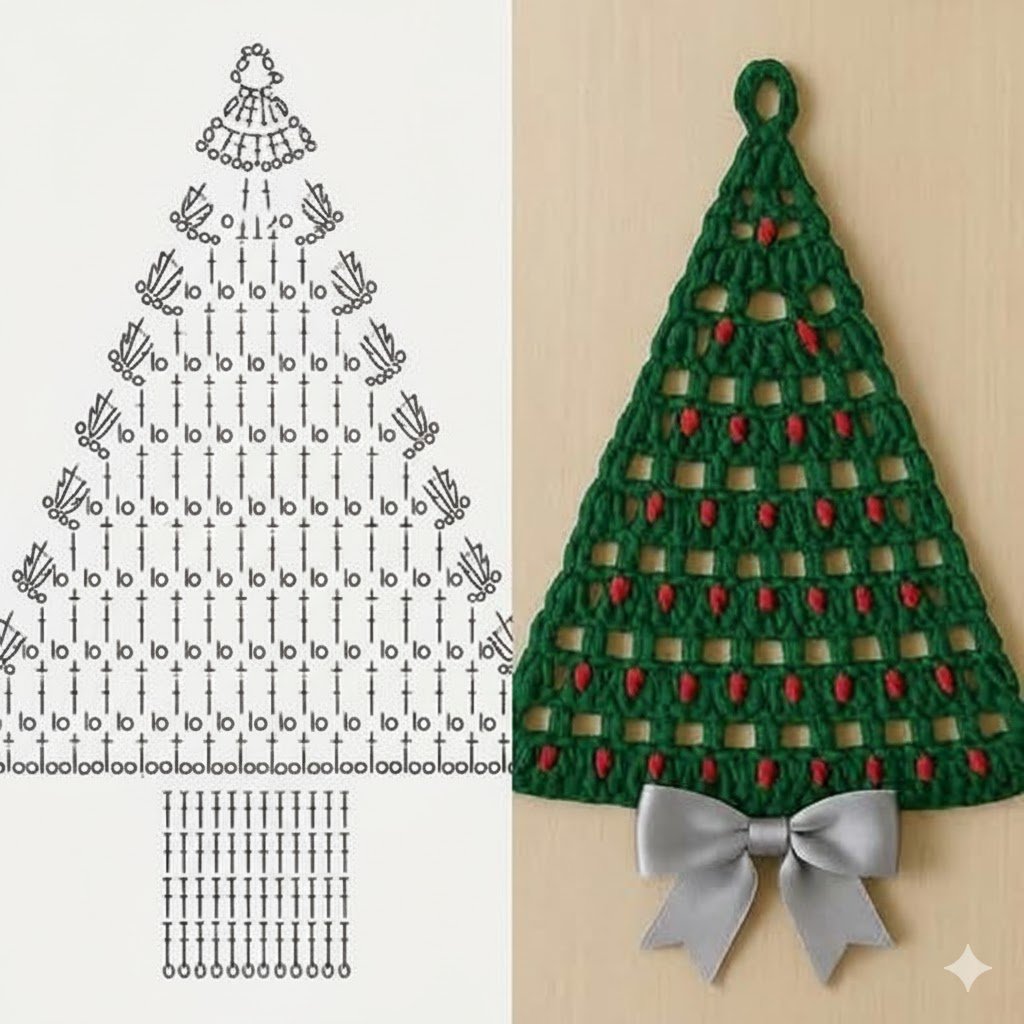
The foundation of the Crocheted Christmas Tree – Door Decoration – Tutorial – Pattern begins with understanding its basic design and structure. Most crocheted trees used for door decorations feature layered triangular sections that mimic the shape of a traditional Christmas tree. These triangular layers can be stitched separately and then assembled, or crocheted as one continuous piece depending on the desired pattern and complexity.
One of the key features of the design is its ability to incorporate textured crochet stitches such as bobbles, popcorn stitches, or ridges. These textures give the tree depth and a realistic, dimensional appearance. They also help reflect light in interesting ways, giving the finished piece a striking visual effect when displayed on the door.
The Crocheted Christmas Tree – Door Decoration – Tutorial – Pattern also offers flexibility in size. Some prefer a small, subtle tree, while others create bold, larger designs that act as a centerpiece for the door. Choosing the right size depends on your available space and the look you want to achieve. Regardless of the size, the pattern remains easy to adjust by adding or reducing rows and stitches.
Color choice plays a significant role in the final appearance of the tree. Traditional green yarns are always stunning, but modern interpretations often involve neutral tones, white, gold, or even multicolored yarns. Using variegated yarn creates a natural gradient effect, giving the tree an artistic twist. The keyword Crocheted Christmas Tree – Door Decoration – Tutorial – Pattern naturally fits these customizable elements.
One of the best aspects of this design is its durability. Crochet decorations last for years when made with high-quality yarn and proper stitching techniques. This ensures that your tree can become part of your yearly holiday tradition, adding sentimental value over time. Families often enjoy making a new tree each year as a creative bonding activity.
Finally, understanding the structure of the crocheted tree helps you avoid common mistakes such as uneven edges or loose tension. Maintaining consistent stitches and checking your work as you go ensures that your final decoration is neat, sturdy, and visually appealing. With the design principles understood, you’re ready to gather your materials.
2. Materials and Tools Needed for the Project
Before starting the Crocheted Christmas Tree – Door Decoration – Tutorial – Pattern, you’ll need to gather a few essential materials. The best part is that this project requires minimal tools, making it perfect for beginners and seasoned crafters alike. Preparing your materials in advance ensures a smooth and enjoyable experience.
First, select the yarn for the tree. Worsted-weight yarn is the most commonly used option because it provides a sturdy structure while remaining easy to work with. Choose colors that match your holiday décor. Traditional green is always a safe option, but consider using metallic yarns or blended shades for a more modern look.
Next, you’ll need an appropriate crochet hook size. The pattern you follow may specify a hook, but generally, sizes between 4.0 mm and 5.5 mm work well for this type of project. Using the right hook ensures that your stitches are neither too tight nor too loose, maintaining the tree’s shape.
You will also need a tapestry needle to weave in loose ends once your crocheting is complete. This step ensures a clean and professional finish. Additional tools may include stitch markers to keep track of your rows, especially if the Crocheted Christmas Tree – Door Decoration – Tutorial – Pattern features multiple textured stitches.
Decorative embellishments are completely optional but can add charm to your piece. Consider miniature bells, beads, ribbon bows, crocheted ornaments, or buttons. These small touches help bring your tree to life and make it look festive and unique. Just be sure to attach everything securely, especially if the decoration will be exposed to outdoor conditions.
Finally, if you want your tree to maintain perfect structure, especially if it will hang on a door, you may want to add a felt backing or a stiff lining. This helps prevent curling and keeps the tree looking crisp. With your materials gathered, you’re ready to begin constructing your festive decoration.
Before moving on, ensure that your workspace is clean, comfortable, and well-lit. This creates an enjoyable crafting environment that helps you stay focused and inspired throughout the process.
3. Step-by-Step Crocheting Instructions
The heart of the Crocheted Christmas Tree – Door Decoration – Tutorial – Pattern lies in the creation process. The following general steps provide a clear and beginner-friendly approach to crocheting your tree, regardless of the specific stitch variations you choose.
Start by crocheting the base triangle. You can begin with a foundation chain and work upward, decreasing stitches each row to create a triangular shape. This simple method works well for most beginner-friendly patterns and forms the essential silhouette of the tree.
After completing the first triangle, decide whether you want to create additional layers. Many crocheters make three or four graduated triangles that stack on top of one another, creating the illusion of full branches. Attach these layers with yarn or by stitching them together using a tapestry needle. This layered approach makes the Crocheted Christmas Tree – Door Decoration – Tutorial – Pattern look fuller and more detailed.
If you want to add texture, incorporate special stitches during the crocheting process. Bobble stitches create ornament-like shapes, while ribbed stitches give the appearance of realistic pine branches. You can also alternate rows of single crochet, half-double crochet, and double crochet to introduce subtle variations.
Once the main tree structure is done, crochet a small tree trunk. This is typically a simple rectangle stitched in brown or beige yarn. Attach it securely to the bottom of your tree. Even though this is a small detail, it enhances the overall design and makes your tree feel complete.
Next, consider adding edging or borders. A scalloped edge can make the tree look whimsical, while a simple single crochet border gives it a neat and polished finish. These final touches elevate the look of the Crocheted Christmas Tree – Door Decoration – Tutorial – Pattern.
Finally, add embellishments such as small buttons, beads, crocheted stars, or ribbon bows. Ensure everything is attached firmly, especially if your tree will hang on a door that frequently opens and closes. Once satisfied with your design, attach a loop or string to the top so you can hang your decoration proudly.
4. Creative Ways to Display Your Crocheted Christmas Tree Door Decoration
One of the joys of completing the Crocheted Christmas Tree – Door Decoration – Tutorial – Pattern is discovering the many ways you can use and display your beautiful creation. While the front door is the most traditional location, this handmade decoration is versatile enough to enhance many spaces.
Hang the finished tree on your front door to welcome guests with cozy holiday charm. Handmade decorations create an inviting atmosphere and set a cheerful tone before someone even steps inside. Be sure to place it at eye level so its details are easily appreciated.
You can also use this decoration indoors. Hang it on interior doors, especially in children’s bedrooms or craft rooms. It adds a festive touch without the need for bulky wreaths or traditional decorations that require storage space.
Another creative idea is to incorporate your tree into a holiday-themed wall display. Combine it with framed holiday prints, string lights, or garlands to create a warm and decorative focal point. The Crocheted Christmas Tree – Door Decoration – Tutorial – Pattern blends well with rustic, classic, or modern holiday décor styles.
Your crocheted tree also works wonderfully as part of a mantel arrangement. Simply lean it against the wall or place it inside a small frame. When paired with candles, pine cones, and garlands, it becomes a charming element of a cohesive holiday display.
If you enjoy gifting handmade items, this tree makes a thoughtful and meaningful holiday present. It’s lightweight, easy to mail, and cherished by anyone who appreciates handmade décor. Giving a gift made from the Crocheted Christmas Tree – Door Decoration – Tutorial – Pattern reflects care and creativity.
Finally, consider making variations in color, size, or shape to create a full collection. A series of crocheted trees can form a beautiful garland or door banner, transforming simple patterns into a festive statement piece.
FAQ: Crocheted Christmas Tree – Door Decoration – Tutorial – Pattern
1. Is this project suitable for beginners?
Yes. Many versions of the Crocheted Christmas Tree – Door Decoration – Tutorial – Pattern are beginner-friendly and require only basic stitches.
2. What yarn is best for this project?
Worsted-weight yarn works well because it provides structure and durability.
3. Can I use this pattern outdoors?
Yes, but ensure the tree is backed with felt or lining to prevent curling and protect it from weather exposure.
4. Do I need a sewing machine?
No. The project is entirely crochet-based and only requires yarn, a hook, and a tapestry needle.
5. How long does it take to finish the decoration?
Depending on size and details, most trees can be completed within a few hours.
6. Can I customize the colors?
Absolutely. You can choose any colors that match your holiday décor.
7. How do I attach embellishments safely?
Use strong glue or securely stitch items like buttons, beads, and bows to ensure they stay in place.
8. Can I sell decorations I make from this pattern?
Yes, as long as the pattern you follow permits commercial use. Always check licensing details.
Conclusion
The Crocheted Christmas Tree – Door Decoration – Tutorial – Pattern is a wonderful way to bring handmade joy into your home during the holiday season. This article has walked you through understanding the design, gathering materials, following step-by-step instructions, and exploring creative ways to display your finished piece.
With a mix of creativity and patience, you can create a festive decoration that becomes part of your cherished holiday tradition.
Feel free to leave your honest opinion and share suggestions so I can continue creating helpful and inspiring content!