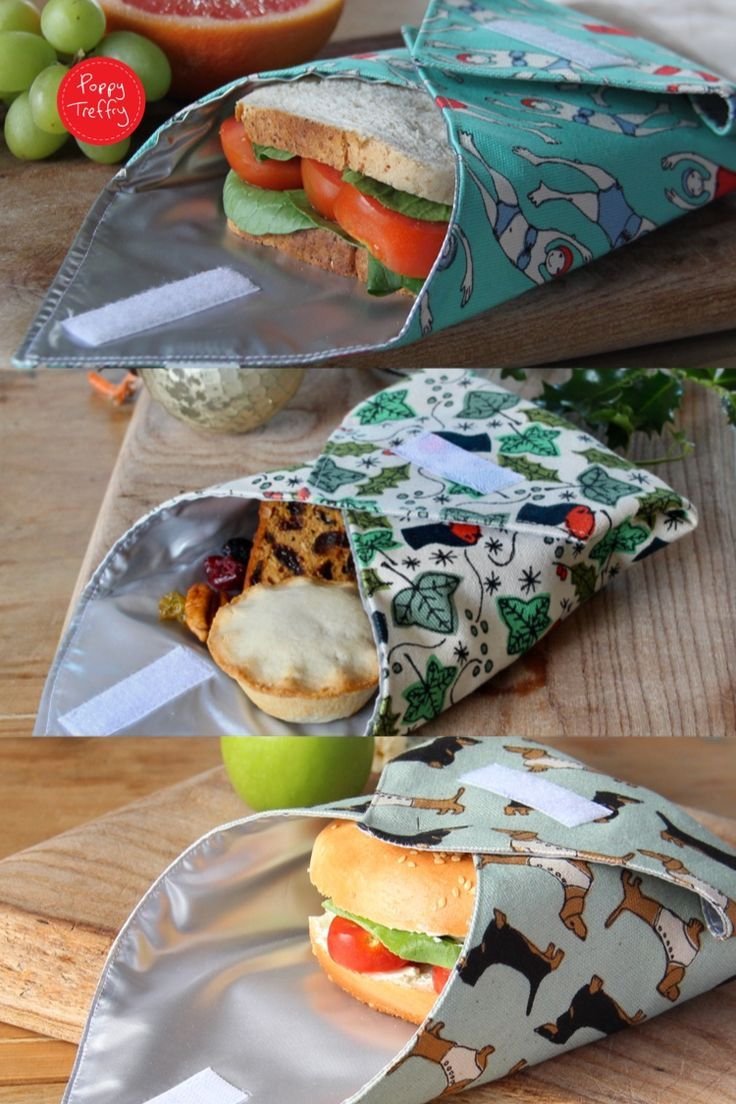
The DIY Reusable Sandwich Wrap – Pattern is a practical and eco-friendly sewing project that helps reduce single-use plastic while adding a personal, handmade touch to your lunch routine. By following this pattern, crafters can create a functional, stylish, and sustainable solution for packing sandwiches, snacks, or even small wraps. The DIY Reusable Sandwich Wrap – Pattern offers both beginner-friendly steps and opportunities for creative customization, making it an ideal project for anyone interested in eco-conscious crafting.
One of the biggest benefits of the DIY Reusable Sandwich Wrap – Pattern is its versatility. You can experiment with different fabric combinations, closures, and sizes to suit your individual needs. Cotton fabric, laminated cotton, or oilcloth are popular choices because they are durable, washable, and food-safe. By creating your own wrap, you can avoid wasteful disposable options while producing a unique, personalized accessory that matches your style and preferences.
Additionally, the DIY Reusable Sandwich Wrap – Pattern is a fun and fast project that can be completed in a few hours. It’s perfect for beginners who want to try a small sewing project or for experienced sewers looking to make useful gifts for family and friends. This pattern also introduces simple sewing techniques such as hemming, adding snaps or Velcro, and handling laminated fabrics, all while keeping the focus on practicality and sustainability.
1. Materials Needed for the DIY Reusable Sandwich Wrap – Pattern
To start your DIY Reusable Sandwich Wrap – Pattern, gather high-quality materials. The most important component is the fabric. Laminated cotton or oilcloth works best because it is water-resistant, easy to wipe clean, and keeps food fresh. Cotton fabrics can also be used if combined with a food-safe lining or a thin layer of waxed cotton for added protection.
Thread is another essential material. Choose a strong, durable thread that can withstand repeated washing. Polyester or all-purpose sewing thread is ideal, as it will hold the wrap together without fraying or breaking. Matching or contrasting thread can also be used to add decorative elements to your design.
You will also need closures for the wrap. Snaps, Velcro, or reusable hook-and-loop fasteners work best. These closures allow the wrap to fold neatly around the sandwich and stay securely in place. The choice of closure will determine how easy the wrap is to open and close, so consider what is most convenient for daily use.
Scissors, a rotary cutter, or a cutting mat are needed to ensure precise cuts. Accuracy is important for the DIY Reusable Sandwich Wrap – Pattern because uneven edges can affect folding and closure. Pins or clips can help keep the fabric layers aligned during sewing, especially when working with slippery materials like laminated cotton.
Optional materials include decorative elements such as ribbons, embroidery, or printed fabric patterns. Personalizing your wrap adds charm and allows it to reflect your unique style while maintaining functionality. These small touches elevate the DIY Reusable Sandwich Wrap – Pattern from a basic utility item to a stylish handmade accessory.
Finally, ensure you have an iron and ironing board or a press cloth suitable for laminated fabrics. Some materials require a lower heat setting, but pressing helps create crisp folds and clean edges that make your sandwich wrap look professional and polished.
2. Cutting and Preparing the Fabric
The next step in creating your DIY Reusable Sandwich Wrap – Pattern involves cutting and preparing the fabric. First, measure your desired wrap size. A common dimension is 12×12 inches, which accommodates most standard sandwiches. Adjust the size for larger or smaller meals as needed. Accuracy in measurement ensures the wrap folds neatly around the sandwich.
Cut your fabric carefully, using scissors or a rotary cutter. If you are using laminated cotton or oilcloth, a rotary cutter is especially helpful for clean, straight edges. Lay the fabric flat and ensure there are no wrinkles, as even small folds can affect the final shape and folding ability of the wrap.
If your design involves lining fabric, cut both the outer fabric and lining to the same dimensions. Layer them carefully before sewing, ensuring that any printed sides or decorative elements face the correct direction. This attention to detail is essential for a neat, professional-looking DIY Reusable Sandwich Wrap – Pattern.
Next, prepare the edges for sewing. Fold the edges inward about a quarter-inch and press them with an iron or use clips to hold the fold. This creates a clean edge and prevents fraying. Laminated fabrics may not fray, but folding edges gives the wrap a finished look.
Mark where the closures will go. Measure and mark spots for snaps or Velcro, making sure they align properly when the wrap is folded. Precise placement ensures the wrap holds securely around sandwiches without slipping open. Proper closure placement is a key feature of a functional DIY Reusable Sandwich Wrap – Pattern.
Finally, check all your pieces for alignment, folds, and marks before starting to sew. Preparation at this stage minimizes mistakes and helps the sewing process go smoothly. Taking the time to properly cut and prepare your fabric ensures that the finished wrap is durable, attractive, and fully functional.
3. Sewing the DIY Reusable Sandwich Wrap – Pattern
Begin sewing the DIY Reusable Sandwich Wrap – Pattern by stitching the edges. Use a straight stitch or topstitch along the folded edges to secure them. This step gives the wrap a polished appearance and prevents fraying if cotton fabrics are used. Laminated cotton may require a slightly longer stitch length to prevent puckering.
Next, attach your chosen closure method. For snaps, use a snap-setting tool or pliers to secure them in place at the marked locations. Velcro or hook-and-loop fasteners can be sewn directly onto the fabric with a strong stitch, ensuring they hold after repeated opening and closing. Proper attachment is critical for the wrap’s usability.
If your design includes decorative stitching, now is the time to add it. Topstitching, embroidery, or contrasting thread lines can enhance the look of your wrap while also reinforcing seams. Decorative elements add a personal touch without compromising the function of the DIY Reusable Sandwich Wrap – Pattern.
Once the edges and closures are complete, fold the wrap into the correct shape to test the fit. Place a sandwich in the center and fold the sides over to ensure the wrap closes properly. Make any necessary adjustments to closure placement or stitching to improve the fit and functionality.
Trim any excess threads and inspect the wrap for weak spots. Reinforce areas if necessary to ensure durability. Quality control at this stage guarantees the wrap will last through repeated use and washing, making it a practical and long-lasting addition to your kitchen.
Finally, press the finished wrap gently with a warm iron, following any specific heat instructions for laminated fabrics. This step ensures the wrap lies flat, looks tidy, and folds easily. Your DIY Reusable Sandwich Wrap – Pattern is now ready for use or gifting.
4. Customization and Creative Ideas
The DIY Reusable Sandwich Wrap – Pattern can be personalized in countless ways to reflect your style and make lunchtime more enjoyable. One option is using different fabric prints for the outer layer and lining, such as florals, stripes, or playful patterns, which can make the wrap visually appealing and fun.
Adding embroidered names or small icons like hearts, stars, or initials is another way to personalize the wrap. These details make it unique and ideal for children, school lunches, or gifts. A personalized DIY Reusable Sandwich Wrap – Pattern can also help family members identify their own wrap easily.
You can also experiment with varying the size of the wrap. Smaller versions work well for snacks, granola bars, or fruit slices, while larger wraps accommodate sandwiches, paninis, or wraps. This customization ensures the wrap fits your needs perfectly.
Consider using eco-friendly materials like organic cotton, bamboo fabric, or beeswax wraps as part of your design. These sustainable choices enhance the environmentally conscious purpose of your DIY Reusable Sandwich Wrap – Pattern while providing durability and ease of cleaning.
Decorative elements such as ribbons, contrast stitching, or patchwork squares can also be incorporated for a stylish touch. These additions do not interfere with the wrap’s functionality but make it visually striking. They allow your wrap to double as a thoughtful gift for friends or family.
Finally, creating a set of matching wraps in different sizes, patterns, or color schemes can turn this small sewing project into a larger collection. Coordinated sets are perfect for gift-giving or organizing lunches at home, elevating the DIY Reusable Sandwich Wrap – Pattern from a single item to a practical and stylish system.
FAQ: DIY Reusable Sandwich Wrap – Pattern
1. Is the DIY Reusable Sandwich Wrap – Pattern suitable for beginners?
Yes. The steps are straightforward and easy to follow for all skill levels.
2. What fabrics work best?
Laminated cotton, oilcloth, or waxed cotton are ideal for durability and easy cleaning.
3. Can I wash the wrap?
Yes, most wraps are machine washable on gentle settings or can be hand-washed.
4. What closures are recommended?
Snaps, Velcro, or hook-and-loop fasteners work best for secure closure.
5. Can I make different sizes?
Absolutely. Adjust dimensions for sandwiches, snacks, or larger wraps.
6. Can the wrap be personalized?
Yes, embroidery, decorative stitching, and fabric patterns allow full customization.
7. Is this project eco-friendly?
Yes. Using reusable wraps reduces single-use plastic and promotes sustainability.
8. Can children help with this project?
Yes, older children can assist with cutting, folding, and placing decorations under supervision.
Conclusion
The DIY Reusable Sandwich Wrap – Pattern is a practical, sustainable, and creative sewing project that brings eco-conscious functionality to your everyday routine. By following this guide, you can create personalized, durable wraps that reduce waste and enhance lunchtime enjoyment. This project offers versatility, creative freedom, and an opportunity to practice sewing skills while producing a useful, stylish item.
I hope this tutorial inspires you to make your own reusable wraps. Please share your honest opinion and any suggestions—I’d love to hear how you plan to customize your DIY Reusable Sandwich Wrap – Pattern!