The joy of crafting often lies in transforming small remnants into something beautiful and functional. The Create a Sweet Angel Mug Rug from Scraps – Pattern is a perfect embodiment of this principle, offering a charming way to use up those precious bits of fabric while adding a delightful, angelic touch to your coffee time. More robust than a coaster, a mug rug is a miniature placemat, and one shaped like a sweet angel elevates your daily routine with a personalized, handmade elegance.
Embarking on the Create a Sweet Angel Mug Rug from Scraps – Pattern is an ideal project for quilters and sewers of all levels. It requires only small pieces of fabric, making it a fantastic stash-busting endeavor that is both economical and environmentally conscious. The small scale means it works up quickly, offering immediate gratification and a wonderful opportunity to practice precision piecing and appliqué techniques before tackling a larger project.
This comprehensive guide will illuminate every stage of mastering the Create a Sweet Angel Mug Rug from Scraps – Pattern. We will cover essential material choices for optimal stability, meticulous techniques for shaping the angel’s body and delicate wings, and the final touches that transform simple scraps into a divine piece of table décor. Gather your prettiest fabric scraps, find your sharpest sewing needle, and let’s begin crafting these celestial additions to your home.
1. Selecting and Preparing Fabric Scraps for the Angel Mug Rug Pattern
The unique appeal of the Create a Sweet Angel Mug Rug from Scraps – Pattern is its patchwork charm, which requires careful selection and preparation of small fabric scraps to achieve the best results. The right materials ensure both durability and a visually stunning design.
For the angel’s body, wings, and backing, choose high-quality $100\%$ quilting cotton. This fabric is tightly woven, stable, and easy to press, which is crucial for achieving crisp points and smooth curves in the small details of the mug rug. Avoid using flimsy fabric scraps, which will buckle and distort the shape.
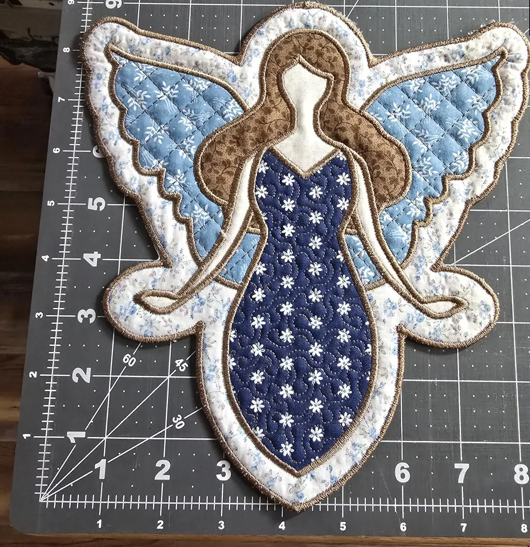
Color selection is key to the “sweet angel” aesthetic. For the angel’s body, a neutral tone like cream, beige, or a light tan is traditional. For the wings, select a lighter, perhaps slightly shimmery fabric scrap, or even a subtle white-on-white print to give them an ethereal quality.
The background fabric of the mug rug should be a contrasting color that makes the angel motif pop. A deep blue, a festive red, or a soft pastel green provides a beautiful frame. Since this pattern uses scraps, this is your chance to use those favorite prints you’ve been saving.
To ensure the mug rug is stable and protective against heat and moisture, you must include a layer of batting and perhaps an inner stabilizer. A thin, heat-resistant batting (like Insul-Bright or a dense cotton batting) is recommended, as it adds the necessary cushioning and insulation.
Precision cutting is vital, especially when working with small scraps. Use a rotary cutter and an accurate ruler to cut all pieces according to the pattern dimensions. Even a small error in a piece of fabric that is only $2 \text{ inches}$ long can significantly distort the final mug rug shape.
Pre-washing your fabric scraps is always a good practice, particularly if they are from different sources, as this prevents unwanted shrinkage or color bleeding when the finished mug rug is eventually washed. Once washed, press all pieces flat before cutting.
2. Techniques for Shaping the Angel and Assembling the Appliqué
The core of the Create a Sweet Angel Mug Rug from Scraps – Pattern lies in the precise cutting and application of the angel motif, which typically uses a combination of basic piecing and appliqué.
Start by cutting the separate components of the angel—head, body, and wings—from your chosen scraps following the templates provided in the pattern. If the angel is pieced, ensure all seams are accurately sewn with a $1/4 \text{ inch}$ seam allowance, using a short stitch length for added security.
For the wings, which are often the most delicate part, consider using a freezer paper method for appliqué. Iron the freezer paper template onto the wrong side of the wing fabric, trim, and then press the seam allowance over the paper edge before stitching the wings onto the background fabric.
To give the angel dimension, the wings can be attached using a gentle raw-edge appliqué technique. Instead of turning under the seam allowance, secure the wings with a decorative machine stitch, such as a zigzag stitch or a close blanket stitch, which prevents fraying while adding a charming outline.
The placement of the angel motif on the main mug rug background is critical for aesthetic balance. Measure carefully to ensure the angel is perfectly centered, or positioned according to the pattern’s design, leaving ample space on all sides for the mug and the final border.
When stitching the angel motif onto the background, use a sewing machine for speed, or hand-stitch with a fine slip stitch for an invisible, heirloom finish. Regardless of the method, use a thread color that either matches the angel fabric exactly or one that contrasts nicely to serve as a fine outline.
Finally, consider adding small details to the angel’s face using embroidery floss. Two simple French knots can serve as eyes, and a small curve can be stitched for a smile. These tiny, personalized details truly bring the “sweet” character to your Angel Mug Rug.
3. Quilting and Finishing Techniques for a Stable Mug Rug
Transforming the appliquéd top into a functional and durable mug rug requires specialized techniques for layering, quilting, and binding, ensuring it stands up to heat and moisture.
The construction of a mug rug follows a basic quilt sandwich structure: the appliquéd top layer, a central layer of batting, and the backing fabric. Use large safety pins or temporary spray adhesive to securely baste these three layers together, ensuring there are absolutely no wrinkles in any layer.
Quilting is essential for stabilizing the layers and adding texture. For the Create a Sweet Angel Mug Rug from Scraps – Pattern, simple, straight-line quilting around the perimeter of the angel motif and diagonal lines across the background is highly effective. Use a walking foot on your sewing machine for even feeding of the thick layers.
To enhance the angel motif, try outline quilting. Stitch a line of quilting just inside or outside the perimeter of the angel’s body and wings. This technique, known as echo quilting, makes the angel appear to “puff up” from the background, adding beautiful dimension.
Once the quilting is complete, trim the entire piece so all three layers are flush and square. Measure from the center outwards and use your rotary cutter to ensure the edges are straight and perpendicular, which is vital for a clean, professional binding finish.
The mug rug is traditionally finished with a binding, much like a miniature quilt. Cut binding strips from a coordinating fabric scrap and attach them using a $1/4 \text{ inch}$ seam allowance. The binding not only encloses the raw edges but also provides a strong frame that defines the shape of the mug rug.
For an extra touch of charm, consider adding a small hanging loop to one corner of the mug rug before attaching the binding. This allows the finished piece to be hung up for decoration when not in use, adding to its versatility as a piece of home décor.
4. Customizing Your Angel Mug Rug and SEO Optimization
After mastering the core Create a Sweet Angel Mug Rug from Scraps – Pattern, customization allows you to create unique pieces, and proper SEO techniques ensure your patterns or finished products gain visibility online.
Customize the angel’s wings by using different fabric types. Try a sheer, metallic organza or a subtle lace scrap for the wings. These lightweight materials will contrast beautifully with the cotton body, giving the angel a truly ethereal and unique appearance.
Vary the size and purpose. By increasing the dimensions of the background fabric and the angel motif, you can easily adapt the pattern to create a sweet angel placemat or even a small table runner, making the design versatile for different dining settings.
For a dimensional effect, instead of flat appliqué, use the tuck and turn method for the angel’s body, slightly stuffing the head and body with a small amount of batting before closing. This gives the angel a soft, 3D look that is adorable for a holiday theme.
For SEO purposes, when sharing your finished Create a Sweet Angel Mug Rug from Scraps – Pattern or a tutorial, use highly specific, appealing keywords in your titles and descriptions. Examples include: “DIY Angel Mug Rug Free Pattern Sewing Tutorial,” “Sweet Angel Scrap Fabric Quilt Pattern,” or “Handmade Christmas Mug Rug from Scraps.”
Ensure your content is well-structured with clear headings and detailed, step-by-step instructions. Naturally integrate related keywords like “quilting scraps project,” “beginner appliqué tutorial,” “quilted table decor,” and “holiday sewing project” throughout the text.
High-quality photography is non-negotiable for visual platforms like Pinterest. Take bright, focused images of the mug rug with a steaming mug on it to demonstrate its functionality. Use a close-up to show the detail of the wings and the quilting. Name your image files with your main keywords (e.g., sweet-angel-mug-rug-pattern-finished.jpg) to improve search ranking.
Finally, offer suggestions for seasonal variations. Suggest making the angel’s dress in red and green scraps for Christmas or in light pastels for spring. This adds longevity to the pattern and increases the scope of your content’s reach.
Frequently Asked Questions (FAQ) about Create a Sweet Angel Mug Rug from Scraps – Pattern
1: Why is my mug rug warping or puckering after quilting?
Warping or puckering is usually caused by the top fabric and the backing fabric being stretched unevenly during the quilting process. Ensure your layers are securely basted, and use a walking foot on your sewing machine to help feed all three layers evenly.
2: Can I use fleece scraps instead of cotton batting for the mug rug?
You can use fleece scraps for padding, but be cautious. If the mug rug will hold very hot beverages, $100\%$ synthetic fleece may melt. It is safer to use a cotton batting or specialized heat-resistant batting to provide adequate insulation and avoid potential damage.
3: What’s the best stitch to use for attaching the angel appliqué edges?
For a professional, durable finish, the satin stitch (a dense, short zigzag stitch) is excellent for machine appliqué, as it completely covers the raw edges. For hand appliqué, the tiny, invisible slip stitch is preferred for a high-end, smooth finish.
4: How do I make the angel’s head perfectly round using fabric scraps?
To make the head perfectly round, use a technique called turn-and-stuff. Cut two circles slightly larger than the required size, stitch them right sides together (leaving an opening), turn, stuff lightly with fiberfill, and then close the opening with a slip stitch before appliquing to the body.
5: Is it necessary to bind the edges, or can I just sew the top and back right sides together?
While you can stitch the top and back right sides together and turn (the “pillowcase” method), it is not recommended for a mug rug. The binding adds crucial durability, protects the edges from fraying with use, and provides a stable frame for the finished piece.
6: How can I personalize the Angel Mug Rug for a gift?
Personalize the Angel Mug Rug by embroidering the recipient’s initial or a small date onto the background fabric before appliquéing the angel. Alternatively, choose a fabric scrap for the angel’s dress that reflects their favorite color or a theme relevant to their style.
Conclusion
The Create a Sweet Angel Mug Rug from Scraps – Pattern is a delightful project that beautifully combines the economy of using scraps with the elegance of precise appliqué and quilting. We have thoroughly covered the essential stages: from selecting the right fabric scraps and stabilizing the piece with batting to the detailed techniques for shaping the angel’s wings and securely finishing the edges with a durable binding.
The emphasis on precision in both cutting and quilting ensures your finished mug rug is not just charming but also a highly functional piece of handmade décor.We sincerely hope this detailed guide has provided you with the inspiration and technical confidence to successfully transform your beautiful fabric scraps into a collection of sweet, angelic additions to your home or as thoughtful, handmade gifts.