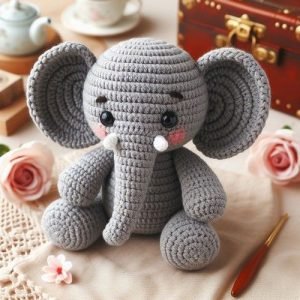
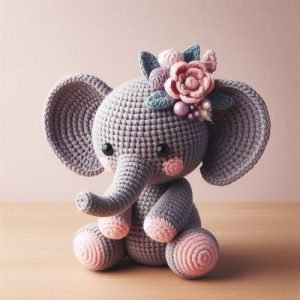
Creating an Elephant Dolls amigurumi is a delightful crochet project that combines whimsy with skill. Amigurumi, the Japanese art of crocheting small stuffed toys, has gained immense popularity worldwide, and the elephant doll is a cherished pattern among crafters.
This project is perfect for anyone looking to create a cute and cuddly toy that can be customized in various ways.In this tutorial, we will take you through each step of making your own elephant amigurumi.
From selecting the right materials to crafting and assembling the parts, you’ll have all the information you need to complete this charming project.

Materials and Tools Needed for Elephant Dolls Amigurumi
Before you begin your project, gather the following materials and tools:
- Yarn: Choose a soft, medium-weight yarn (such as worsted weight) in gray or any color of your choice for the elephant’s body. You’ll also need small amounts of contrasting yarn for the details like the ears and feet.
- Crochet Hook: A 3.5mm crochet hook is ideal for this project, but you can adjust the size based on your yarn weight and tension.
- Stuffing: Polyfill or another stuffing material to give the elephant its shape and cuddliness.
- Safety Eyes: 10mm safety eyes or black yarn for embroidering the eyes.
- Tapestry Needle: For sewing the parts together and weaving in the ends.
- Scissors: To cut your yarn.
- Stitch Marker: To keep track of your rounds as you work in continuous rounds.
Using high-quality materials will ensure that your elephant amigurumi is soft, durable, and huggable. The right tools will make the process smoother, resulting in a polished and professional-looking finished product.
Step-by-Step Elephant Dolls Amigurumi Tutorial
Step 1: Crocheting the Body
The body of the elephant is crocheted in continuous rounds, starting from the bottom and working your way up. Begin with a magic ring and work in single crochet stitches to form a rounded shape.
Body Pattern:
- Round 1: 6 single crochets (SC) into the magic ring.
- Round 2: Increase in each stitch around (12 SC).
- Round 3: 1 SC, increase around (18 SC).
- Round 4: 2 SC, increase around (24 SC).
- Continue increasing in this pattern until you reach the desired width for the body. Then, work even rounds to build the body’s length.
As you approach the top, begin decreasing to close the body. Be sure to stuff the body firmly with polyfill before closing the final rounds to ensure it holds its shape. Finish off by weaving in the ends securely.
Step 2: Crocheting the Head
The head of the elephant is made separately and is slightly larger than the body for a proportionate, cute look. Like the body, it is worked in continuous rounds.

Head Pattern:
- Round 1: 6 SC into the magic ring.
- Round 2: Increase in each stitch around (12 SC).
- Round 3: 1 SC, increase around (18 SC).
- Round 4: 2 SC, increase around (24 SC).
- Continue increasing until the head is the desired size, then work even rounds.
Before finishing the head, insert the safety eyes or embroider them with black yarn. Stuff the head firmly, then close the head by decreasing in the same manner as the body. Secure the end with a tapestry needle.
Step 3: Making the Ears and Trunk
The elephant’s ears are one of its most distinctive features. They are crocheted separately and sewn onto the head after completion.
Ear Pattern:
- Round 1: 6 SC into the magic ring.
- Round 2: Increase in each stitch around (12 SC).
- Round 3: 1 SC, increase around (18 SC).
- Round 4: 2 SC, increase around (24 SC).
- Continue increasing until the ears are the desired size, then work even rounds for a few rows.
The trunk is also made separately and is crocheted in continuous rounds, starting from the tip and working towards the face.
Trunk Pattern:
- Round 1: 6 SC into the magic ring.
- Round 2: Work even rounds to the desired length, then decrease slightly as you approach the base.
Attach the ears to the sides of the head and the trunk to the center front. Make sure the ears are positioned symmetrically for a balanced appearance.

Assembling the Elephant Doll
Step 4: Crocheting the Legs and Arms
The legs and arms of the elephant are crocheted separately and then attached to the body. These pieces are made similarly to the body, but on a smaller scale.
Legs and Arms Pattern:
- Round 1: 6 SC into the magic ring.
- Round 2: Increase in each stitch around (12 SC).
- Round 3: Work even rounds for the desired length.
- For the legs, you may want to increase the rounds to make them slightly larger than the arms.
Once you’ve crocheted and stuffed the legs and arms, sew them onto the body in the appropriate positions. The legs should be attached to the bottom of the body, while the arms are sewn on the sides near the top.
Step 5: Adding the Tail and Details
The final touch to your elephant amigurumi is the tail. This can be made with a simple chain stitch or by crocheting a small tube.
Tail Pattern:
- Chain a length of 8 to 10 stitches, then work single crochets back down the chain to add thickness.
Sew the tail onto the back of the body, and add any additional details, such as embroidered toenails or a small bow around the elephant’s neck.
Customizing Your Elephant Amigurumi
Customization Tip 1: Color Choices
One of the best parts of creating amigurumi is the ability to customize your project with different colors. While gray is a classic choice for an elephant, don’t be afraid to experiment with pastel shades, bright colors, or even a mix of variegated yarns to make your elephant unique.
Customization Tip 2: Adding Accessories
Consider adding accessories to your elephant amigurumi to give it extra character. A tiny hat, scarf, or even a small blanket can make your elephant stand out. These accessories can be crocheted separately and easily attached to the elephant.
Customization Tip 3: Facial Expressions
You can give your elephant a distinct personality by varying the placement of the eyes, trunk, and mouth. Experiment with different facial expressions to make your elephant look happy, sleepy, or even mischievous.
Advanced Elephant Amigurumi Techniques
Technique 1: Crocheting in the Round
Crocheting in the round is an essential skill for making amigurumi. This technique involves working in continuous spirals rather than turning your work at the end of each row. Using a stitch marker to mark the beginning of each round will help you keep track of your progress.
Technique 2: Creating a Seamless Finish
For a polished look, practice creating a seamless finish when sewing the pieces together. Use the tapestry needle to weave in ends and join pieces with invisible stitches. This attention to detail will make your elephant amigurumi look professionally made.
Technique 3: Adding Texture with Stitches
Experiment with different crochet stitches to add texture to your elephant amigurumi. For example, using a popcorn stitch for the ears or feet can add a unique touch and make your elephant stand out.

The Elephant Dolls amigurumi is a charming and versatile crochet project that is sure to delight crafters of all skill levels. Whether you’re making it as a gift, a keepsake, or simply for fun, this tutorial provides all the steps needed to create a beautiful and huggable elephant.
By following these instructions and incorporating your own creative touches, you’ll end up with a unique amigurumi that reflects your personal style.This blog article is optimized for SEO with the keyword “crochê” strategically placed throughout the text to enhance search engine visibility.

