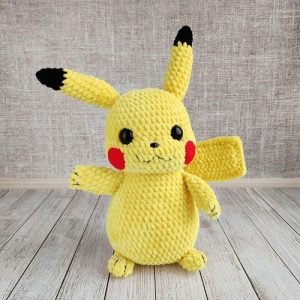
Creating your own Pikachu amigurumi is a fun and rewarding project for crochet enthusiasts, especially for fans of the Pokémon series.
This tutorial will guide you through the steps to make your very own Pikachu, complete with all the details that make this character so beloved.
We’ll cover everything from selecting the right materials to the finishing touches.

Materials and Preparation
Before you begin crocheting your Pikachu amigurumi, it’s important to gather all the necessary materials. The success of your project greatly depends on the quality and appropriateness of your supplies.
Start with the yarn. For Pikachu, you’ll need yellow, black, red, and white yarn. It’s recommended to use a medium-weight acrylic yarn for durability and ease of use. A 3.5mm (E/4) crochet hook is ideal for this project as it will help you achieve tight, even stitches. You’ll also need a pair of 10mm black safety eyes, polyester stuffing, and a tapestry needle for sewing the parts together.
In addition to these, make sure to have a stitch marker and scissors on hand. The stitch marker will help you keep track of your rounds, ensuring consistency in your work, while sharp scissors will give you clean cuts when trimming excess yarn.
Creating Pikachu’s Head
The head is the most defining feature of your Pikachu amigurumi, so take your time with this part. Start by creating a magic ring with your yellow yarn. Crochet six single crochets into the ring and pull it tight to close. This forms the beginning of your head.
Continue crocheting in the round, increasing the number of stitches gradually. For example, on the second round, crochet two single crochets in each stitch around, doubling your stitch count. On the third round, increase by making one single crochet in the first stitch, followed by two in the next, and repeat. This process continues until you reach the desired size for Pikachu’s head, which should be about 6-7 rounds of increases.
Once you reach the desired size, continue crocheting without increasing to create the height of the head. This part should be about 10-12 rounds, depending on how large you want Pikachu’s head to be. Remember to place the safety eyes between rounds 6 and 7, about 6 stitches apart, before you start decreasing to close the head.
Crocheting the Body
Pikachu’s body is slightly smaller than the head, so keep that in mind as you work. Start with the same magic ring technique, using your yellow yarn. Begin with six single crochets in the ring and gradually increase the number of stitches in each round as you did with the head.
After about five or six rounds of increases, continue crocheting in the round without increasing to build the body’s height. This should be around 10 rounds. The body should be a bit cylindrical but still slightly rounded. As you crochet, be sure to stuff the body lightly with polyester filling to give it a soft, plush feel.
Once the body is the desired height, start decreasing the stitches by crocheting two stitches together until you can close the top of the body completely. Be careful to maintain an even shape as you decrease, and add any final bits of stuffing before sealing the body.

Making the Ears, Arms, and Legs
For Pikachu’s ears, use the black and yellow yarn. Start with a magic ring using the black yarn and crochet six single crochets into the ring.
After two rounds, switch to yellow yarn and continue crocheting until the ear reaches the desired length, usually around 8-10 rounds. Repeat this process to make a second ear.
The arms and legs are made similarly. For the arms, start with a magic ring using yellow yarn and crochet six single crochets into the ring. Continue crocheting in the round without increasing until the arms are the desired length, about 8 rounds. The legs are slightly larger, so after the initial magic ring, add one round of increases before continuing to crochet in the round.
Once all the pieces are crocheted, stuff them lightly and sew them onto the body. Attach the ears to the top of Pikachu’s head, the arms to the sides of the body, and the legs at the bottom.

Adding Pikachu’s Tail and Finishing Touches
Pikachu’s tail is one of his most iconic features. To make the tail, use yellow yarn to create a flat, zigzag shape. Start by chaining 15 stitches, then work single crochets back along the chain.
At certain points, make 2-3 single crochets in one stitch to create a slight increase, giving the tail its distinctive zigzag pattern. You may need to make several rows of single crochet to get the tail to the right thickness and length.
Once the tail is complete, sew it securely onto Pikachu’s back. Be sure to position it so that it sticks out slightly, as in the original character design.
Finally, add the facial features. Using black yarn, embroider Pikachu’s nose and mouth onto the face, and use red yarn to add small circles on the cheeks. These finishing touches bring your Pikachu to life and give him that familiar, cheerful expression.

Creating a Pikachu amigurumi is a delightful project for crochet enthusiasts, especially those who are fans of Pokémon. This tutorial has guided you through every step, from selecting materials to finishing the details. By following these instructions, you can create your own Pikachu amigurumi that is sure to bring joy to anyone who sees it.
Remember, the key to a successful amigurumi is patience and attention to detail. Take your time with each part, and don’t be afraid to adjust the pattern to suit your personal style. Happy crocheting!

