Creating handmade ornaments is a fantastic way to add a personal touch to your holiday decor. One of the most charming and timeless designs is the Patchwork Prairie Point Ornament – Pattern. This ornament, with its rich textures and traditional patchwork design, is an excellent project for crafters of all levels. Whether you’re a seasoned quilter or a beginner looking to explore the world of patchwork, this pattern is both easy to follow and highly customizable. In this article, we will guide you through the steps of making this beautiful ornament, as well as explore creative ways to personalize your design.
The Patchwork Prairie Point Ornament – Pattern uses the classic prairie point technique, which involves folding fabric squares into triangles to create a dimensional, layered effect. When these triangles are sewn together, they form an intricate design that can be used in a variety of ways—whether in quilts, wall hangings, or, as in this case, delightful Christmas ornaments. This versatile pattern can be customized to fit any holiday theme or color scheme, making it a perfect craft for creating meaningful gifts or decorations.
Not only does the Patchwork Prairie Point Ornament – Pattern give you the satisfaction of making a beautiful and functional piece of art, but it also allows for creativity with fabric choices and embellishments. The ornament can be created in a variety of colors, sizes, and shapes, offering endless possibilities. Let’s dive into the steps to create your very own patchwork ornament, as well as some helpful tips for getting the best results.
1. Materials You Will Need for the Patchwork Prairie Point Ornament
Before starting your Patchwork Prairie Point Ornament – Pattern, it’s important to gather all the necessary materials. These items will help ensure the process runs smoothly and that your ornament turns out beautifully.
- Fabric Squares: You will need several fabric squares in different colors and patterns. Choose fabrics that complement each other and create a balanced look. For a holiday-themed ornament, consider using festive colors like red, green, gold, or white, but feel free to get creative with your color palette.
- Needle and Thread: Although this is a no-sew project for most parts, you will need a needle and thread for some of the finishing touches, such as securing the layers and adding hanging loops.
- Scissors: To cut your fabric squares, you’ll need sharp scissors that will give you precise, clean cuts.
- Iron: Pressing your fabric pieces is crucial for achieving neat folds and crisp prairie points. An iron will help you set the creases and ensure your ornament holds its shape.
- Fabric Glue or Fusible Web: While sewing is minimal in this project, you may need fabric glue or fusible webbing for attaching the points and fabric layers together.
- Embellishments (Optional): For a personalized touch, you can add small embellishments such as beads, sequins, buttons, or ribbons. These will give your ornament some extra sparkle and a festive flair.
Having all of these materials on hand will make the process more enjoyable and ensure that your Patchwork Prairie Point Ornament – Pattern turns out beautifully.
2. How to Make a Patchwork Prairie Point Ornament
Making the Patchwork Prairie Point Ornament – Pattern is a straightforward process, and with just a few simple steps, you’ll have a stunning ornament to add to your collection. Here’s a step-by-step guide to get you started:
Step 1: Cutting Your Fabric Squares
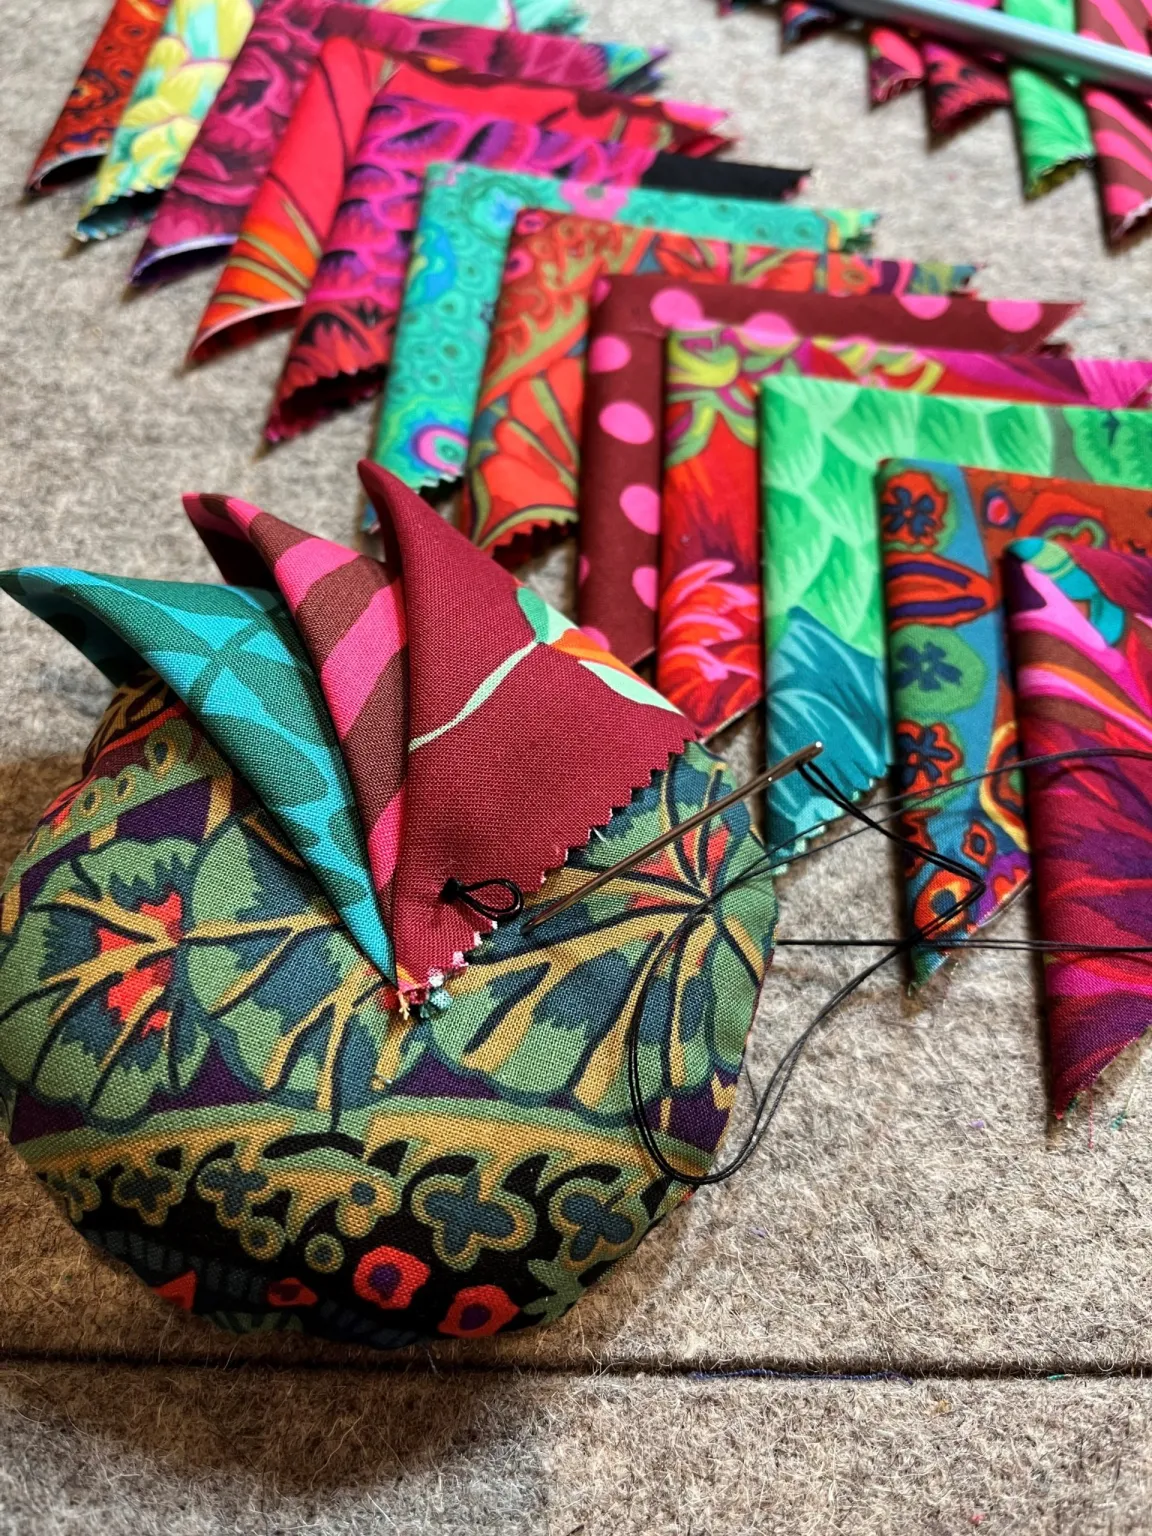
Start by cutting your fabric into squares. The size of the squares can vary depending on how large you want your ornament to be, but a good starting size is 3-4 inches. You will need several squares of fabric in different colors or patterns, depending on the design you wish to create.
Step 2: Folding the Prairie Points
Once your fabric squares are cut, the next step is to fold them into prairie points. To do this, fold each fabric square in half diagonally to form a triangle. Then, fold the two outer edges of the triangle towards the center to form a point at the top. You’ll want to press each fold with an iron to ensure that the points stay in place.
Step 3: Arranging the Prairie Points
Now that you have several prairie points, it’s time to start arranging them into a pattern. Begin with the central point of the ornament, and work your way outwards in a circular or star-shaped pattern. Secure the prairie points in place using fabric glue or by stitching them down lightly with a needle and thread.
Step 4: Attaching the Points
As you arrange the prairie points, make sure to overlap each one slightly to create a layered effect. Once you are happy with the arrangement, you can use a small stitch to attach the points to a central fabric circle. For added stability, you can also use fabric glue to bond the points to the fabric.
Step 5: Adding the Ornament’s Backing
To complete your ornament, cut a circular piece of fabric for the back of the ornament. This will help hold everything together and give your ornament a neat, finished look. Use fabric glue to attach the back of the ornament to the fabric points, making sure the edges are securely glued.
Step 6: Finishing Touches
To add a final touch to your Patchwork Prairie Point Ornament – Pattern, consider adding a small ribbon loop at the top for hanging. You can also embellish your ornament with beads, sequins, or buttons to make it even more festive. Once everything is dry and secure, your ornament is ready to hang on your tree or give as a gift!
3. Creative Ideas for Customizing Your Patchwork Prairie Point Ornament
While the basic Patchwork Prairie Point Ornament – Pattern is beautiful on its own, there are plenty of ways to personalize it. Here are a few creative ideas to help make your ornament truly unique:
Use Seasonal Fabrics
For a holiday-specific ornament, use fabrics with seasonal themes. Think about using prints with snowflakes, holly, or candy canes for a Christmas tree ornament. For other holidays, try using floral fabrics for spring or rich autumn colors for fall.
Add a Personal Touch
To make your ornament extra special, consider adding personal touches like embroidery, family initials, or a small holiday greeting. This makes the ornament even more meaningful as a gift or keepsake.
Experiment with Shapes
While the ornament typically uses a round or star-shaped design, you can experiment with other shapes as well. Try making the ornament in the shape of a heart, snowflake, or even a tree for a fun twist.
Layer Your Fabrics
For added texture, you can layer your fabric squares in different directions or use contrasting fabrics. Mixing patterns like stripes, plaids, and solids can create a striking visual effect.
Add a 3D Element
If you want to give your ornament a more dimensional look, consider using thicker fabrics or stuffing the prairie points lightly with cotton batting. This will add volume and make the ornament pop.
Make a Set of Matching Ornaments
If you love the look of your Patchwork Prairie Point Ornament, why not make a whole set? You can create matching ornaments in different sizes or colors, perfect for decorating a tree or sharing with family and friends.
4. Why the Patchwork Prairie Point Ornament is the Perfect Craft
The Patchwork Prairie Point Ornament – Pattern is a fantastic choice for anyone looking for a quick, enjoyable, and meaningful holiday craft. Here are a few reasons why it’s a perfect project:
Quick and Easy
This ornament is easy to make and doesn’t require complicated techniques. It’s a great project for beginners or anyone who wants to craft something beautiful without spending too much time.
No Sewing Required
While there are some simple stitches involved, the bulk of this ornament is made without a sewing machine. This makes it an excellent no-sew project for those who don’t have access to one or simply prefer handcrafts.
Customizable for Any Occasion
This pattern can be adapted for any holiday or special occasion. You can use different fabric colors, patterns, and embellishments to fit the theme of your tree or decor.
Great for Gifts
Handmade ornaments make fantastic gifts, and the Patchwork Prairie Point Ornament is no exception. It’s a thoughtful and personal present for friends, family, or colleagues that can be cherished for years.
A Fun Family Activity
This project is simple enough for kids to help with and enjoy. Whether you’re making them together as a family or teaching a friend, this ornament is a fun and social craft to enjoy during the holiday season.
Durable and Beautiful
The Patchwork Prairie Point Ornament is not only visually appealing, but it’s also durable. Made from sturdy fabric, it will last for many holiday seasons to come.
FAQ
Q1: Can I use a sewing machine for this project?
A: While this ornament can be made without a sewing machine, you can certainly use one if you prefer. It may help speed up the process and provide more durability to the ornament.
Q2: How do I attach the prairie points securely?
A: You can attach the prairie points using fabric glue or by lightly stitching them in place with a needle and thread. Make sure to overlap the points slightly for a layered effect.
Q3: Can I make this ornament without any embellishments?
A: Yes! The Patchwork Prairie Point Ornament is beautiful on its own, but if you prefer a simpler look, feel free to skip the embellishments and focus on the fabric design.
Q4: What fabrics work best for this project?
A: Cotton, felt, and flannel are all excellent choices for this ornament. Choose fabrics that are easy to work with and that will hold their shape well.
**Q5: How long does it
take to make one ornament?**
A: Depending on your skill level and attention to detail, you can expect to spend 1-2 hours making one ornament.
Conclusion
The Patchwork Prairie Point Ornament – Pattern is a fantastic way to add a personal touch to your holiday decorations. With just a few materials and steps, you can create beautiful, handmade ornaments that will make your home feel extra special during the holiday season. Whether you’re crafting for yourself or making gifts for others, this ornament offers endless possibilities for creativity and customization.
We’d love to hear about how your Patchwork Prairie Point Ornament turned out! Please share your thoughts, suggestions, and any tips you’ve picked up along the way. Happy crafting!