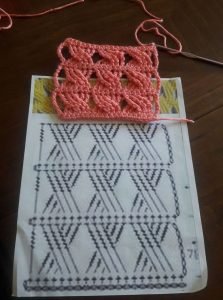
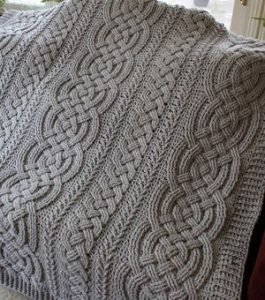
The Cabled Blanket is a stunning crochet project known for its textured, woven appearance that resembles intricate cables. This design is perfect for creating a cozy and elegant blanket that adds sophistication to any room.
The cabled pattern is both visually appealing and functional, providing warmth and style.In this tutorial, we will guide you through the process of creating your own Cabled Blanket.
From gathering materials to completing the final touches, you’ll learn how to master this classic crochet pattern. Whether you’re a seasoned crocheter or a beginner looking for a new challenge, this tutorial will help you achieve a beautiful and professionally finished blanket.

Why Choose a Cabled Blanket?
A Cabled Blanket is a fantastic choice for anyone looking to create a unique and textured crochet piece. The cable stitch pattern adds a dimensional quality to your blanket, making it stand out from traditional flat designs.
This pattern is ideal for showcasing different yarns and colors, allowing you to customize the blanket to match your personal style or home decor.
Additionally, the cabled design provides extra warmth and comfort, making it perfect for use on chilly evenings. Its intricate appearance also makes it a great gift for loved ones, adding a touch of handmade elegance to any occasion.
Materials Needed for the Cabled Blanket
Before you start your Cabled Blanket, gather the following materials:
- Yarn: Select a soft, medium-weight yarn (worsted weight) for your blanket. For a standard throw blanket, you will need approximately 1200-1500 yards of yarn.
- Crochet Hook: A 5mm (H-8) crochet hook is recommended for worsted weight yarn.
- Scissors: To cut the yarn.
- Tapestry Needle: For weaving in ends and finishing touches.
Choosing high-quality yarn will enhance the texture and durability of your blanket. Opt for yarns that are soft and comfortable against the skin. Acrylic and cotton blends are popular choices for their versatility and ease of care.
Step-by-Step Cabled Blanket Tutorial
Step 1: Create the Foundation Chain
Begin by making a slipknot on your crochet hook. For a standard-sized blanket, start with a foundation chain of 120 stitches. This chain will determine the width of your blanket. Make sure your chain is not too tight, as it needs to accommodate the width of the cable stitches.
Once you have your foundation chain, work a row of double crochet stitches into each chain stitch. This establishes a solid base for your cable pattern. Turn your work at the end of the row and prepare to begin the cabled pattern.
Step 2: Start the Cabled Pattern
To create the cable pattern, you will be working in rows with special stitch combinations. Begin by crocheting the first row of cables, which will consist of a series of front post double crochet (FPDC) stitches. Yarn over, insert your hook around the post of the double crochet stitch from the previous row, and pull up a loop. Yarn over again and pull through the three loops on your hook to complete the FPDC stitch.
In the next row, you will be creating the cables by crossing the FPDC stitches over each other. Work a series of cable crossings by skipping a specified number of FPDC stitches and then crocheting around the next FPDC stitches. This creates the interwoven, textured appearance of the cables. Continue this pattern across the row.

Step 3: Continue Building the Cable Pattern
Repeat the cable pattern rows until your blanket reaches the desired length. For a standard throw blanket, you will typically work around 60-70 rows. Ensure that each row of cables aligns properly with the previous rows to maintain a consistent pattern.
As you work, you can experiment with different yarn colors or textures to add visual interest to your blanket. If you wish to change colors, complete the last double crochet stitch of the row with the new color and continue with the cable pattern.
Tips for a Perfect Cabled Blanket
Tip 1: Consistent Tension
Maintaining consistent tension throughout your Cabled Blanket is crucial for achieving an even and professional-looking finish. To avoid uneven stitches, regularly check your tension and adjust your grip on the yarn if necessary. Practicing your cable stitches on a small swatch before starting the blanket can help you get a feel for the tension.
Tip 2: Blocking the Blanket
Blocking your finished Cabled Blanket can help to shape and smooth out any uneven areas. After completing your blanket, gently wash it in cold water and lay it flat on a towel to dry. Use blocking mats or pins to shape the blanket and ensure that the cable stitches lay flat and are well-defined.
Blocking also enhances the overall appearance of the blanket and helps to even out the stitches. Follow the care instructions on your yarn label to ensure that your blanket maintains its color and texture.
Tip 3: Choosing the Right Yarn
Selecting the right yarn for your Cabled Blanket is essential for achieving the best results. Opt for yarn that is soft and durable, with good stitch definition. Avoid yarns that are too thick or too thin, as they may affect the appearance of the cable stitches. Experiment with different yarns to find the perfect match for your project.

Advanced Cabled Blanket Variations
Variation 1: Color Block Cabled Blanket
Create a modern twist on the classic Cabled Blanket by incorporating color blocks. Alternate between different colors of yarn in each section to create a bold and graphic design. This variation adds a contemporary touch to the traditional cable pattern.
Variation 2: Cabled Baby Blanket
Adjust the size of your Cabled Blanket to create a cozy and soft baby blanket. Use softer, baby-friendly yarn and reduce the number of stitches and rows to fit a smaller size. This version is perfect for baby gifts and adds a touch of handmade charm to any nursery.

Variation 3: Textured Cabled Blanket
Enhance the texture of your Cabled Blanket by adding additional stitch patterns between the cable rows. Incorporate stitches such as bobbles or popcorns to create a multi-dimensional effect. This variation adds extra visual interest and complexity to your blanket.
The Cabled Blanket is a beautiful crochet project that combines texture and elegance. By following this tutorial, you will be able to create a stunning and sophisticated blanket that showcases your crochet skills.
With its intricate cable pattern and customizable design, the Cabled Blanket is a versatile and rewarding project that will add a touch of handmade charm to your home.
Happy crocheting!

