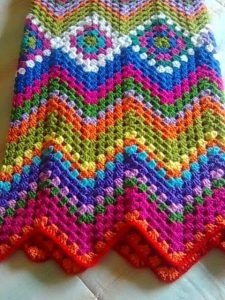
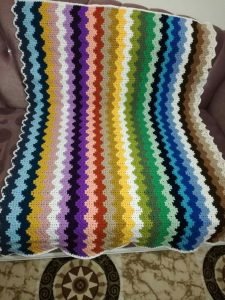
The Zig Zag Blanket is a delightful and visually striking project that combines both simplicity and elegance.
This crochet pattern is characterized by its distinct zig-zag or chevron design, which creates a dynamic and textured appearance. Ideal for both beginners and experienced crocheters, the Zig Zag Blanket is a versatile pattern that can be customized to suit various tastes and preferences.
In this tutorial, we will guide you through the process of creating your own Zig Zag Blanket, covering everything from selecting materials to the final finishing touches.

Why Choose a Zig Zag Blanket?
The Zig Zag Blanket stands out due to its bold geometric pattern that adds a touch of modern flair to any space.
Its design is perfect for showcasing a variety of colors, making it a fantastic project for using up scraps or creating a cohesive color scheme. The repeating zig-zag motif is not only visually appealing but also provides a rhythmic and engaging crochet experience.
Moreover, the Zig Zag Blanket is a practical choice for a variety of uses. Whether you’re looking to make a cozy throw for your living room, a warm baby blanket, or a stylish addition to your bedroom decor, this pattern fits the bill. Its adaptability makes it an excellent project for experimenting with different yarn types and colors.
Materials Needed for the Zig Zag Blanket
Before you start your Zig Zag Blanket, you’ll need to gather your materials. Here’s what you will need:
- Yarn: Choose a medium-weight yarn (worsted weight) in your preferred colors. The amount will depend on the size of your blanket.
- Crochet Hook: A 5mm (H-8) hook works well with worsted weight yarn.
- Scissors: For cutting yarn.
- Tapestry Needle: To weave in ends.
Selecting the right yarn is crucial for the success of your project. Opt for a soft, durable yarn that feels comfortable against the skin and is easy to care for. Acrylic and cotton yarns are popular choices for blankets due to their affordability, softness, and easy maintenance. Be sure to check the yarn label for the recommended hook size and gauge.
Step-by-Step Zig Zag Blanket Tutorial
Step 1: Create the Foundation Chain
To begin your Zig Zag Blanket, you’ll need to create a foundation chain that sets the width of your blanket. Start by making a slipknot on your crochet hook. Then, chain a multiple of 14 stitches plus 2. This number allows for the repeating zig-zag pattern and ensures that the blanket will have a consistent width.
Once you have your foundation chain, work a single crochet into the second chain from the hook. Continue working single crochet stitches across the chain until you reach the end. This creates a sturdy base row for your blanket.
Step 2: Work the Zig Zag Pattern
With your foundation row complete, it’s time to start the zig-zag pattern. Turn your work and chain 3 (this counts as your first double crochet). In the same stitch, work 2 more double crochets. This creates the first peak of the zig-zag pattern.
Skip 2 stitches, then work 3 double crochets into the next stitch. Skip 2 stitches and repeat the pattern across the row. When you reach the end of the row, you should have a series of peaks and valleys. To create the valleys, work 1 double crochet into the top of each double crochet from the previous row, and work 2 double crochets into the chain-2 space of the previous row.
Step 3: Continue the Pattern
Continue working in the zig-zag pattern for the length of your blanket. Each new row should align with the peaks and valleys of the previous row. To maintain the pattern, remember to skip 2 stitches before making your next set of 3 double crochets. If you’re using multiple colors, change yarns at the end of each row or when you reach the desired color block.
To keep your blanket uniform, make sure to count your stitches regularly and check that each row follows the pattern. If you notice any inconsistencies, rip back and correct them before proceeding. This will ensure that your Zig Zag Blanket has a clean and professional appearance.

Tips for a Perfect Zig Zag Blanket
Tip 1: Color Choices
Choosing the right colors for your Zig Zag Blanket can significantly impact its overall look. Consider using a color palette that complements your home decor or one that represents your personal style. You can use a gradient of colors for a subtle, blended effect or go bold with contrasting colors for a vibrant and eye-catching design.
If you’re new to colorwork, start with a limited color palette and experiment with different combinations. You can also use a color wheel to find harmonious or contrasting colors that work well together. Creating a swatch with your chosen colors will help you visualize how they work together before committing to the entire blanket.
Tip 2: Gauge Swatch
Before starting your blanket, it’s important to create a gauge swatch. This will ensure that your blanket will be the correct size and that your stitches are consistent. To make a gauge swatch, crochet a small sample of the zig-zag pattern and measure its dimensions. Compare your measurements to the pattern’s recommended gauge to determine if adjustments are needed.
If your swatch is too small or too large, adjust your hook size or yarn tension accordingly. Accurate gauge helps to prevent issues with the final size of your blanket and ensures a better overall fit.
Tip 3: Adding a Border
To give your Zig Zag Blanket a polished finish, consider adding a border. A simple border, such as a single crochet or half-double crochet border, can help to neaten the edges and add a final touch of elegance. For a more decorative border, consider adding scallops, shells, or picots in a contrasting color.
To add a border, work evenly around the edges of your blanket, placing stitches in the corners and along the sides. If you find that the edges are curling or uneven, you may need to adjust your border stitches or block the blanket to achieve a flat, smooth edge.

Advanced Zig Zag Blanket Variations
Variation 1: Ripple Blanket
A Ripple Blanket is a variation of the Zig Zag Blanket that features more pronounced peaks and valleys. To create a ripple effect, work additional rows of double crochets into the valleys and peaks, increasing the height of the zig-zag pattern. This variation adds extra texture and dimension to your blanket.
Variation 2: Striped Zig Zag
Incorporate stripes into your Zig Zag Blanket by alternating different colors in each row. This creates a striped zig-zag pattern that adds visual interest and allows you to experiment with color combinations. Be sure to change colors cleanly at the end of each row to maintain a neat and uniform appearance.
Variation 3: Chevron Baby Blanket
For a smaller, more delicate version of the Zig Zag Blanket, create a Chevron Baby Blanket. Use a soft, baby-friendly yarn and adjust the pattern to fit a smaller size. This variation is perfect for baby gifts or small lap blankets and features the same zig-zag pattern in a more compact form.

The Zig Zag Blanket is a fun and engaging crochet project that results in a beautiful and practical blanket. By following this step-by-step tutorial and incorporating the tips and variations provided, you’ll be able to create a stunning blanket that showcases your crochet skills. Whether you choose to use a single color or experiment with multiple hues, the Zig Zag Blanket is sure to become a cherished addition to your home.
Happy crocheting!

