If you’re looking for a cheerful holiday project to brighten up your home, the 🎅Crocheted Santa Claus Rug – Pattern is the perfect choice. Combining warmth, color, and festive spirit, this crochet design transforms any room into a cozy Christmas scene. Handmade rugs not only add comfort and style but also carry the personal touch of creativity and care—something that makes the holidays feel truly special.
The 🎅Crocheted Santa Claus Rug – Pattern is ideal for anyone who loves decorating their home for the holidays. Whether you place it by the Christmas tree, near your front door, or in the living room, this rug becomes an eye-catching piece that spreads seasonal joy. The pattern is both decorative and practical, offering the perfect balance of charm and function.
Even if you’re new to crochet, this project can be adapted to your skill level. You’ll learn to work with simple shapes, color changes, and basic stitches to create a delightful Santa face design. In this article, we’ll go step-by-step through materials, techniques, assembly, and finishing details to help you craft your own 🎅Crocheted Santa Claus Rug – Pattern from start to finish.
1. Getting Started with the 🎅Crocheted Santa Claus Rug – Pattern
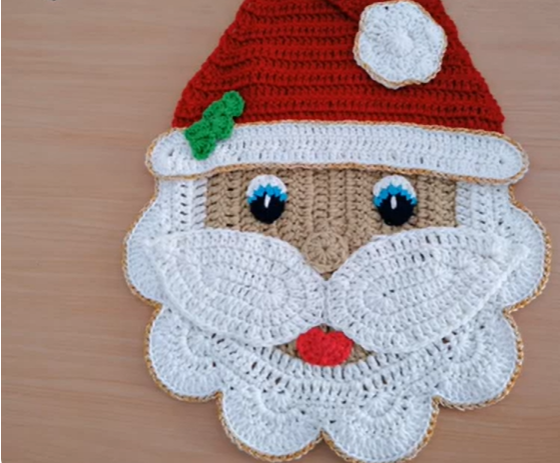
Before diving into the stitches, it’s important to understand what makes the 🎅Crocheted Santa Claus Rug – Pattern unique. This rug features Santa’s iconic face—complete with rosy cheeks, a fluffy beard, and his signature red hat. By combining basic crochet techniques with thoughtful color placement, you can create a piece that looks both professional and handmade.
Start by choosing the right yarn. A medium or bulky-weight acrylic or cotton blend is ideal for rugs since it offers durability and easy cleaning. If you want extra softness, you can use a plush yarn for Santa’s beard to give it a fluffy texture. The main colors you’ll need include red for the hat, white for the beard and trim, beige or light pink for the skin tone, and black for the eyes and outlines.
When selecting your hook, choose one that complements your yarn thickness—typically 5.5 mm to 6.5 mm for worsted or bulky yarns. Using the correct hook size ensures your stitches are firm and even, giving your 🎅Crocheted Santa Claus Rug – Pattern structure and balance.
It’s best to work on a flat surface with good lighting to see color changes clearly. Before you begin, review your pattern or chart to understand the layout. Some crocheters prefer to create the rug in circular rounds, while others work it in separate sections and join them later.
Another tip is to crochet a small sample swatch using your chosen yarn and hook. This helps you check your gauge and test how the colors look together. The last thing you want is to finish half the rug and realize the shades clash or the yarn feels too thin.
Finally, prepare your space with all necessary tools: yarn, scissors, tapestry needle, stitch markers, and a non-slip rug backing for safety. Once everything is ready, you can start bringing your 🎅Crocheted Santa Claus Rug – Pattern to life one stitch at a time.
2. Materials and Techniques for the 🎅Crocheted Santa Claus Rug – Pattern
The right materials are key to creating a durable and beautiful 🎅Crocheted Santa Claus Rug – Pattern. As mentioned, acrylic and cotton yarns work best. Acrylic yarns are sturdy and colorful, while cotton adds weight and softness. You can also mix both types to balance texture and function.
Choose vivid colors that capture Santa’s charm—bright red, snow white, a warm beige for his face, and black for details like eyes or outlines. Some crocheters like to add a touch of blush pink to Santa’s cheeks using a small patch of yarn or embroidery thread. These details give your rug a lively, cheerful expression.
The most common stitches used in this pattern are chain (ch), single crochet (sc), half-double crochet (hdc), and double crochet (dc). If you know these basics, you can easily complete the 🎅Crocheted Santa Claus Rug – Pattern. For beginners, practicing these stitches beforehand ensures smoother progress during the project.
Many crafters prefer to start the rug from the center of Santa’s face and work outward in rounds. This helps maintain symmetry and makes it easier to adjust the size. To form the hat and beard, you’ll need to switch colors carefully. Carry unused yarn along the back of your work or fasten off neatly when changing colors to keep your rug clean and tidy.
For added detail, you can crochet separate pieces—like Santa’s nose, eyes, and hat pom-pom—and sew them on later. This technique gives your 🎅Crocheted Santa Claus Rug – Pattern a 3D effect, making the face more expressive and textured.
Once all sections are crocheted, assemble them with a yarn needle using invisible seams. Weave in all ends securely and ensure that all attachments are tight to prevent unraveling during use. A well-assembled rug not only looks professional but also lasts through many holiday seasons.
3. Step-by-Step Instructions for Crafting the 🎅Crocheted Santa Claus Rug – Pattern
To begin your 🎅Crocheted Santa Claus Rug – Pattern, make a magic ring or chain loop to start the face’s center. Work several rounds of single crochet in your skin-tone yarn, increasing evenly in each round to form a flat circle. Continue until the circle reaches the desired width for Santa’s face.
Next, attach your red yarn to start shaping Santa’s hat. You can either crochet directly onto the top portion of the circle or work the hat as a separate triangle and sew it on. Add a white band across the hat’s base to create the fur trim, using a textured stitch such as the puff or bobble stitch for extra dimension.
For the beard, attach white yarn below the face area. Work rows of half-double or double crochet stitches, expanding outward as you go. The beard should be full and wavy, giving Santa that classic fluffy look. If you want to make it extra soft, use a fuzzy or chenille yarn for this part of the 🎅Crocheted Santa Claus Rug – Pattern.
Once the beard and hat are complete, move on to the details. Crochet small circles in black for the eyes, a small pink or red oval for the nose, and tiny blush patches for the cheeks. You can sew these pieces onto the rug with a tapestry needle or use surface crochet to embroider facial features directly onto the base.
For Santa’s pom-pom, make a fluffy white ball using your hands or a pom-pom maker, then sew it securely to the tip of his hat. This little detail adds charm and a professional finish to your 🎅Crocheted Santa Claus Rug – Pattern.
After assembling all pieces, check for any loose threads or uneven edges. You can also add a non-slip backing using rug glue or fabric spray to ensure safety when placing it on smooth floors. Finally, block your rug by lightly dampening it and laying it flat to dry, shaping it perfectly.
4. Finishing Touches and Creative Ideas for the 🎅Crocheted Santa Claus Rug – Pattern
Once your 🎅Crocheted Santa Claus Rug – Pattern is complete, there are endless ways to personalize it. You can add embroidery details, outline the features with black yarn, or even crochet small holly leaves and berries to decorate Santa’s hat. These simple additions make your rug unique and eye-catching.
For a coordinated look, create matching crochet pieces like coasters, pillows, or wall hangings using the same design theme. This will bring a unified festive touch to your home décor and enhance the holiday atmosphere.
To maintain your rug, hand wash it gently in cool water and lay it flat to dry. Avoid using hot water or dryers, as they can distort the shape. If you used acrylic yarn, you can lightly steam block the rug to restore its flatness and remove any curling edges. Proper care ensures your 🎅Crocheted Santa Claus Rug – Pattern stays bright and beautiful for years.
If you want to gift your rug, wrap it in festive paper or pair it with a handmade crochet Santa ornament. Handmade gifts like this convey thoughtfulness and warmth, especially during the holiday season.
Another creative idea is to scale up the pattern into a larger rug or wall tapestry. By using thicker yarn and a larger hook, you can transform your 🎅Crocheted Santa Claus Rug – Pattern into a statement piece for any room.
Lastly, remember that the joy of crocheting lies in creativity and sharing. Whether you follow the pattern exactly or add your own twist, your handmade Santa rug will bring happiness to your space and everyone who sees it.
FAQ
Q1: Is the 🎅Crocheted Santa Claus Rug – Pattern suitable for beginners?
A1: Yes, it’s beginner-friendly if you’re familiar with basic stitches like chain, single crochet, and double crochet.
Q2: What type of yarn is best for the Santa Claus rug?
A2: Medium or bulky-weight acrylic or cotton yarn works best for durability and easy care.
Q3: Can I wash the rug in a machine?
A3: Hand washing is recommended to maintain the rug’s shape and texture, but gentle machine washing may be possible if secured in a mesh bag.
Q4: How large should the finished rug be?
A4: Typically, around 24–30 inches in diameter is ideal, but you can adjust based on your preference or available space.
Q5: Can I use different colors instead of traditional red and white?
A5: Absolutely! Experimenting with colors like gold, cream, or green can create unique versions of the 🎅Crocheted Santa Claus Rug – Pattern.
Q6: How can I make my rug non-slip?
A6: Add a non-slip rug pad, apply rug backing glue, or use fabric spray for extra grip on smooth floors.
Conclusion
The 🎅Crocheted Santa Claus Rug – Pattern is a joyful and creative way to add handmade warmth to your holiday décor. Throughout this article, we’ve explored materials, techniques, and creative variations to help you craft a durable, beautiful rug that spreads Christmas cheer.
Now that you know how to create your own 🎅Crocheted Santa Claus Rug – Pattern, it’s time to grab your yarn and start stitching. Enjoy the process, have fun experimenting with colors and textures, and share your finished project with friends or online crafting communities. I’d love to hear your honest opinion and suggestions—what did you enjoy most, and how will you personalize your Santa rug? Share your feedback below!