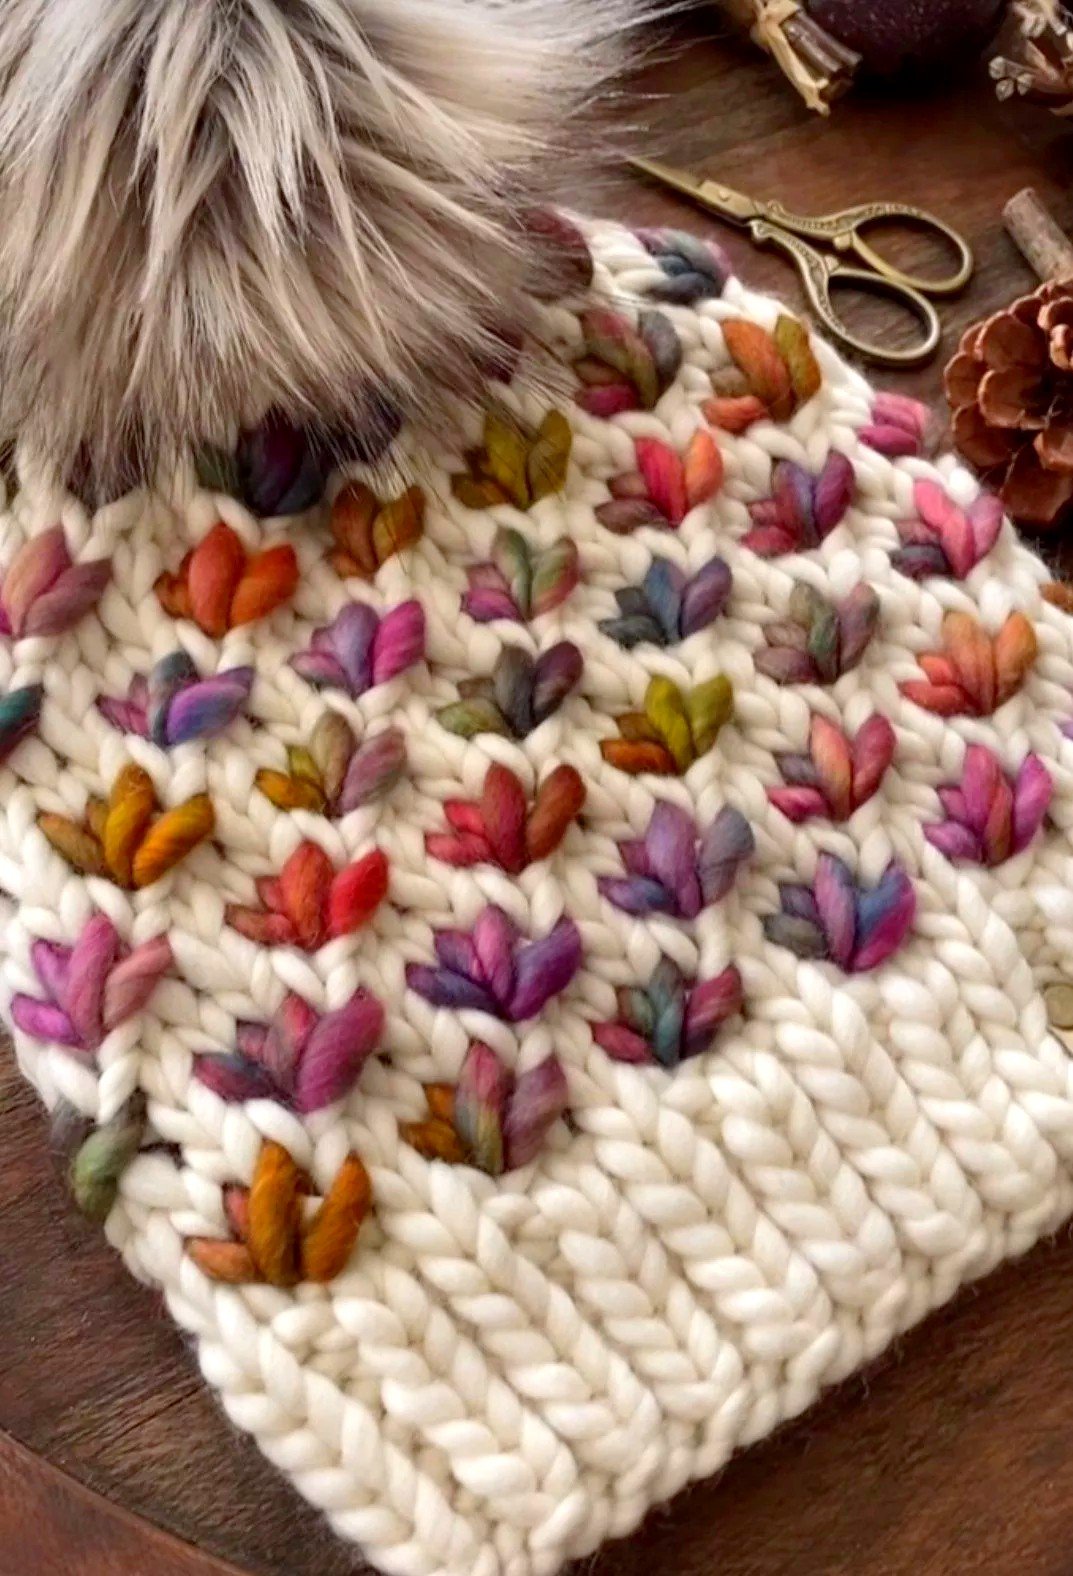
The 3D Leaf Stitch Beanie Crochet – Pattern is an extraordinary project that combines the warmth of traditional headwear with the sophisticated texture of nature-inspired design. If you are looking to elevate your crochet skills beyond basic stitches, this specific technique offers a visually stunning result that mimics the organic flow of leaves climbing up the fabric. By following a 3D Leaf Stitch Beanie Crochet – Pattern, you create a garment that is not only functional for cold weather but also serves as a high-fashion accessory that often draws compliments for its intricate, embossed appearance.
Many crafters find that the beauty of the 3D Leaf Stitch Beanie Crochet – Pattern lies in the way light and shadow play across the raised “leaf” elements. This is achieved through a strategic combination of front post stitches and increases that allow the leaves to “grow” out of the background texture. Unlike flat stitches, the 3D Leaf Stitch Beanie Crochet provides extra insulation due to the overlapping layers of yarn, making it one of the warmest hat designs you can possibly create with a standard crochet hook and some quality wool.
In this comprehensive guide, we will explore the essential elements needed to successfully complete your 3D Leaf Stitch Beanie Crochet – Pattern. We will delve into the specific terminology used in the instructions, such as the 3D Leaf Stitch Beanie Crochet, which refers to the finished physical product characterized by its raised floral motifs, and the Pattern, which is the technical set of instructions and stitch counts required to guide your hands. Whether you are making this for yourself or as a thoughtful handmade gift, understanding the architecture of this design will ensure a professional and beautiful finish every time.
1. Preparing Your Materials for the 3D Leaf Stitch Beanie Crochet – Pattern
Before you dive into the first row of your 3D Leaf Stitch Beanie Crochet – Pattern, selecting the right yarn is the most critical decision you will make. For the “3D” effect to truly pop, you need a yarn with excellent stitch definition, such as a smooth wool blend or a high-quality mercerized cotton. Avoid “fuzzy” or variegated yarns that are too busy, as they can hide the delicate ridges of the 3D Leaf Stitch Beanie Crochet and make your hard work look muddled rather than defined.
The weight of the yarn also plays a significant role in how the 3D Leaf Stitch Beanie Crochet – Pattern drapes on the head. Most patterns recommend a Worsted (Weight 4) or DK (Weight 3) yarn to ensure the leaves have enough body to stand out without making the hat feel overly heavy or stiff. When you choose a solid color—especially earthy tones like forest green, mustard yellow, or deep rust—the shadows created by the raised stitches in the Pattern become much more prominent and visually appealing.
In terms of tools, a crochet hook that matches your yarn gauge is essential, but many experts suggest having two sizes on hand for the 3D Leaf Stitch Beanie Crochet – Pattern. You might use a smaller hook for the ribbing at the base to ensure a snug fit around the forehead, and then switch to a slightly larger hook for the main body of the 3D Leaf Stitch Beanie Crochet. This transition helps the leaf motifs expand naturally without pulling the hat too tight or causing it to pucker in awkward places.
Don’t forget the importance of stitch markers when working on a complex 3D Leaf Stitch Beanie Crochet – Pattern. Because the leaf motifs repeat around the circumference of the hat, it is very easy to lose track of where one leaf ends and another begins. Placing a marker at the start of each repeat will save you hours of “frogging” (ripping out stitches) if you accidentally skip an increase or a post stitch in the middle of a round.
Tension is another factor that can make or break your 3D Leaf Stitch Beanie Crochet – Pattern. If you crochet too tightly, the “leaves” will look cramped and won’t have that signature 3D lift. If you crochet too loosely, the hat may become floppy and lose its structural integrity. Practicing a small swatch of the 3D Leaf Stitch Beanie Crochet before starting the full hat will help you find that “Goldilocks” tension that is just right for this specific texture.
Finally, ensure you have a sharp yarn needle and a pair of scissors ready for the finishing touches of the 3D Leaf Stitch Beanie Crochet – Pattern. Since this design often involves working in the round, you will want to weave in your ends seamlessly to maintain the illusion of continuous growth in the leaf patterns. A well-prepared workspace is the first step toward a successful and enjoyable experience with the 3D Leaf Stitch Beanie Crochet project.
2. Understanding the Anatomy of the 3D Leaf Stitch Beanie Crochet – Pattern
The core of the 3D Leaf Stitch Beanie Crochet – Pattern is the use of Front Post Double Crochet (FPDC) and Front Post Treble Crochet (FPTC) stitches. These are the “building blocks” that create the raised veins of the leaves. Instead of inserting your hook into the top of the stitch, you wrap it around the “post” or body of the stitch from the previous row. This technique is what gives the 3D Leaf Stitch Beanie Crochet its famous depth and tactile quality.
In a typical 3D Leaf Stitch Beanie Crochet – Pattern, the leaf usually begins at a single point and expands outward. This is done by placing multiple post stitches around a single post from the row below. As you progress through the Pattern, you will gradually increase the number of stitches in the center of the leaf and then decrease them back down to a point. This mathematical precision is what gives the 3D Leaf Stitch Beanie Crochet its realistic, organic leaf shape.
The “background” of the 3D Leaf Stitch Beanie Crochet – Pattern is just as important as the leaves themselves. Usually, the space between the leaves is worked in Back Post Double Crochet (BPDC) or simple half-double crochet. This creates a recessed area that pushes the leaves forward, accentuating the 3D effect. Without this contrast in height, the 3D Leaf Stitch Beanie Crochet would lose its impact and look like a standard textured hat rather than a sculptural masterpiece.
Crown shaping in a 3D Leaf Stitch Beanie Crochet – Pattern requires careful attention to detail. As you reach the top of the hat, you must decrease the number of stitches while still maintaining the appearance of the leaves. Most designers of the 3D Leaf Stitch Beanie Crochet will have you finish the final “points” of the leaves just as you reach the center of the crown, creating a beautiful star-like or floral closure at the very top of the beanie.
The ribbing or brim is the foundation of the 3D Leaf Stitch Beanie Crochet – Pattern. Usually worked first (if the hat is bottom-up) or last (if it is top-down), the ribbing provides the elasticity needed to keep the hat on your head. Most Patterns use a “Post Stitch Ribbing” (alternating FPDC and BPDC) to complement the texture of the main 3D Leaf Stitch Beanie Crochet, creating a cohesive look from the forehead to the crown.
Understanding how to read a 3D Leaf Stitch Beanie Crochet – Pattern chart can be incredibly helpful. Many of these designs are charted visually to show exactly where the post stitches overlap. Even if you prefer written instructions, keeping a visual map of the 3D Leaf Stitch Beanie Crochet will help you visualize the “veins” of the leaves, making it much easier to spot errors before they become permanent fixtures in your work.
3. Step-by-Step Execution of the 3D Leaf Stitch Beanie Crochet – Pattern
To start your 3D Leaf Stitch Beanie Crochet – Pattern, you will generally begin by creating a foundation chain that fits the circumference of the head, or a magic ring if starting from the top. Following the Pattern exactly during the first three rounds is vital, as this sets the placement for every leaf that will follow. If your foundation is off by even one stitch, the symmetry of the 3D Leaf Stitch Beanie Crochet will be compromised as the leaves begin to grow.
As you move into the “growth” phase of the 3D Leaf Stitch Beanie Crochet – Pattern, you will notice the leaves starting to take shape. This is the most exciting part of the project, as the flat fabric begins to transform into a 3D landscape. Ensure you are wrapping your yarn correctly for the post stitches; a common mistake in the 3D Leaf Stitch Beanie Crochet is forgetting to pull the loop up to the correct height, which can cause the leaf to look squashed or distorted.
Midway through the 3D Leaf Stitch Beanie Crochet – Pattern, you will reach the maximum width of each leaf. This is often where the Pattern introduces a change in color or a slight variation in the background stitch to add even more interest. Keeping your count consistent here is paramount. Many crafters find that reciting the stitch sequence of the 3D Leaf Stitch Beanie Crochet out loud helps them maintain the rhythm required for these complex, repeating motifs.
The “closing” of the leaves in the 3D Leaf Stitch Beanie Crochet – Pattern involves decreases like the Front Post Two Together (FP2Tog). This technique pulls the edges of the leaf inward to form the tip. It requires a bit of dexterity, but once you master it, you will see the iconic shape of the 3D Leaf Stitch Beanie Crochet come to life. Always check the back of your work to ensure you haven’t accidentally skipped any background stitches while focusing on the decorative front.
If your 3D Leaf Stitch Beanie Crochet – Pattern includes a slouchy fit, you will continue the leaf repeats for several extra inches before starting the crown decreases. This adds a modern, relaxed vibe to the 3D Leaf Stitch Beanie Crochet, making it a versatile piece that works for both casual outings and more formal winter events. The weight of the extra fabric actually helps the leaves hang beautifully, emphasizing the texture of the Pattern.
Once the main body is complete, you will finish the 3D Leaf Stitch Beanie Crochet – Pattern by closing the top tightly. If you started from the bottom, you will thread your yarn through the remaining stitches and pull them together like a drawstring. This final step transforms the tube of fabric into a proper 3D Leaf Stitch Beanie Crochet, ready to be topped with a faux-fur pom-pom or left plain to show off the intricate crown geometry.
4. Customizing and Caring for Your 3D Leaf Stitch Beanie Crochet – Pattern
One of the best things about the 3D Leaf Stitch Beanie Crochet – Pattern is how easily it can be customized. You can adjust the size by changing your hook or by adding more leaf repeats in the foundation. If you want a more subtle look, you can follow the 3D Leaf Stitch Beanie Crochet design using a tonal or “heathered” yarn, which gives the leaves a more vintage, understated feel compared to the bold impact of a solid, bright color.
For a luxury version of the 3D Leaf Stitch Beanie Crochet – Pattern, consider using a yarn with a touch of silk or alpaca. This adds a soft halo and a beautiful drape that makes the 3D Leaf Stitch Beanie Crochet feel like a high-end designer item. Just remember that softer fibers might stretch more over time, so you may want to work the ribbing of the Pattern with a slightly tighter tension to ensure the hat stays securely in place.
Adding a lining to your 3D Leaf Stitch Beanie Crochet – Pattern is a great way to make it even more functional for extreme cold. A simple fleece or jersey lining can be sewn into the inside of the 3D Leaf Stitch Beanie Crochet. This not only adds warmth but also protects the delicate post stitches on the inside from getting snagged on hair accessories or jewelry, extending the life of your handmade Pattern masterpiece.
Proper care is essential to keep your 3D Leaf Stitch Beanie Crochet – Pattern looking its best. Because of the raised stitches, these hats are more prone to catching on things than a flat-stitch beanie. It is highly recommended to hand-wash your 3D Leaf Stitch Beanie Crochet in cool water with a gentle wool soak. Never wring the hat; instead, roll it in a towel to remove excess moisture and lay it flat to dry to preserve the 3D shape of the Pattern.
If you notice your leaves starting to “flatten” after a season of wear, you can gently steam the 3D Leaf Stitch Beanie Crochet to revive the fibers. Hold a steam iron a few inches away from the fabric—never touch the iron directly to the yarn—and use your fingers to “fluff” the leaf motifs back into their original 3D position. This simple maintenance will keep your 3D Leaf Stitch Beanie Crochet – Pattern looking brand new for years.
Finally, don’t be afraid to experiment with the 3D Leaf Stitch Beanie Crochet – Pattern by adding beads or sequins into the “veins” of the leaves. This creates a stunning “dewdrop” effect that is perfect for holiday gifts or evening wear. The versatility of the 3D Leaf Stitch Beanie Crochet means that once you have mastered the basic Pattern, you have a foundation for endless creative variations that showcase your unique style as a fiber artist.
Frequently Asked Questions (FAQ)
Is the 3D Leaf Stitch Beanie Crochet – Pattern suitable for beginners?
This Pattern is generally considered an intermediate level. While it uses basic stitches like double crochet, the placement of the post stitches and the complex counting required to form the leaves might be challenging for a complete novice. However, a determined beginner with a good video tutorial and this 3D Leaf Stitch Beanie Crochet guide can certainly succeed.
How much yarn do I need for a 3D Leaf Stitch Beanie Crochet?
Typically, an adult-sized hat using a 3D Leaf Stitch Beanie Crochet – Pattern will require between 200 to 250 yards of Worsted weight yarn. Because post stitches use more yarn than standard stitches, it is always a good idea to have a second skein on hand just in case.
Can I make this beanie in different sizes?
Yes! To adjust the size of the 3D Leaf Stitch Beanie Crochet – Pattern, you can either change your hook size (using a smaller hook for a child and a larger one for a large adult) or increase/decrease the number of leaf repeats in multiples as specified in your Pattern instructions.
Why are my leaves not standing out?
If the leaves in your 3D Leaf Stitch Beanie Crochet look flat, it is likely due to either your yarn choice or your tension. Ensure you are using a yarn with good “bounce” and that you are not pulling your post stitches too tight. The “3D” effect relies on the stitches having enough height to lift off the surface.
Does this pattern use more yarn than a regular beanie?
Yes, the 3D Leaf Stitch Beanie Crochet – Pattern is a “yarn eater.” Post stitches wrap around the body of the stitch, essentially using double the amount of yarn for that specific area compared to a standard stitch. This is why the 3D Leaf Stitch Beanie Crochet is so much thicker and warmer.
Can I use a variegated yarn for this project?
While you can use any yarn, variegated or “busy” yarns tend to hide the 3D details. If the color changes too quickly, it can break up the visual line of the leaf. For the best results with the 3D Leaf Stitch Beanie Crochet – Pattern, stick to solid or semi-solid colors.
Conclusion
Mastering the 3D Leaf Stitch Beanie Crochet – Pattern is an incredibly rewarding milestone for any crochet enthusiast. Throughout this article, we have explored the importance of selecting the right materials, understanding the technical structure of post stitches, and the step-by-step process of bringing these organic, 3D shapes to life.
By following a well-structured Pattern, you can create a 3D Leaf Stitch Beanie Crochet that is as much a piece of art as it is a warm winter staple. The combination of texture, warmth, and style makes this project a standout in any handmade collection.